Objective
What is Doc739?
It is a comprehensive and complete documentation for the Binary Space Partitioning Window Manager (BSPWM).
Bspwm is a tiling window manager which uses binary space partition system. (C students must have known what it means). Unlike other dynamic window managers like dwm and awesomewm, bspwm is what you configure and use. It is possible to do anything with correct integration of configs : bspwm + sxhkd + eww or polybar, you will get a perfectly aligned environment that obeys your thoughts. I named this documentation as doc741 because it is short and aligns with documentation policy of my interest.
If you do not know what exactly is binary space partitioning, don't worry, the documentation will teach you.
What exactly is the purpose of The Doc741?
There has not been a very good documentation about the bspwm window manager in the web. Many beginners in linux stumble upon understanding the workflow and the exact process behind bspwm and struggle by copying someone else’s configuration blindly hoping that it works on their system too. Real power users do not copy, they build upon an already existing config or build something entirely from the scratch.
Linux punishes weak fundamentals, not because it is cruel towards you, but because it wants to make you stronger. Understanding about The Binary Space Partitioning Window Manager and Binary Space Partitioning before writing your first bspwm configuration will make you write optimised and good configs better than your copycat versions.
Most of the configurations are using bspwm in an underrated way. For example, people rerely use the query selectors with flags to batch-manipulate windows. Here’s an on-liner that toggles hidden states across all windows…
bash
if [ -n "$(bspc query -N -n .hidden)" ]; then flag=off; else flag=on; fi
for i in $(bspc query -N); do
    bspc node $i --flag hidden=$flag
done
The above code matters because it unhides or hides all windows dynamically, no tiling rules or scratchpads, reproducible, scriptable UI hacks…
Another powerful feature is the selector magic : @, which looks like : bspc node -f @parent, which lets you targe relative nodes - parent, first child, brother, etc…
This documentation aims in providing short scripts, cool tips for speeding up workflows, links to several popular bspwm configurations for quick references, a detailed explanation for the working logic behind bspwm, complete manipulation of the windows, advanced configurations and complex logic structures like : Open alacritty in the second workspace on every sunday nights in horizontally tiled mode along with ncmpcpp in a seperate alacritty window with so and so split ratio, when you have the habit of listening to music on sunday nights while working!
Everything you want to know about the bspwm window manager, you will get it here…
Help People Discover Doc741
-
Help others find about such an extensive documentation for bspwm by contributing to this project. You can open up pull requests, do corrections and error analysis for the code blocks in this documentation and expand it by adding specific case examples and linking other bspwm related projects.
-
If you find this documentation really useful to you, you can star this repository which will increase the ease with which this documentation is found and make it easier for people to reach out to this.
-
If you have any issues related to codes provided in this documentation, you can open up an issue in the github repository.
Github repositories
Pages
Mastering Bspwm
To master bspwm (Binary Space Partitioning Window Manager), you must move beyond simple configuration and understand it as a programmable environment. Because bspwm is merely a C program controlled by a socket client (bspc), mastery is equivalent to mastering the bspc command and the logic of binary trees.
Here is the exhaustive curriculum for total bspwm mastery, structured from architectural concepts to advanced kernel-level scripting.
1. The Theoretical Foundation (The “Binary” in BSPWM)
You cannot predict window behavior without understanding the data structure.
- The Full Binary Tree: Understand how every desktop is a root node that splits recursively.
- Internal Nodes vs. Leaves:
- Leaves hold windows (
client). - Internal Nodes hold structure (Split type: Horizontal/Vertical + Split Ratio).
- Leaves hold windows (
- Traversal Paths: Understanding how
next/prevcycles through the tree (pre-order, in-order, post-order traversal logic). - Tree Rotation: How “circulate” commands (
bspc node -C) physically rotate the tree structure.
2. The Control Interface (bspc)
Mastering every subcommand of the binary space partitioning controller.
- Node Selection (The Query Language):
- Directional:
north,south,east,west. - History:
last,older,newer. - Family:
parent,brother,ancestor,descendant. - Path Notations:
@/(root),@/1(left child),@/2(right child). - Modifiers:
.floating,.tiled,.pseudo_tiled,.locked,.sticky,.private,.hidden.
- Directional:
- Node Manipulation:
- Movement: Moving nodes within a desktop, across desktops, or across monitors (
bspc node -m,-d,-n). - Resizing: Differential resizing (
-z top -20 0) vs. Ratio resizing. - Swapping: Exchanging the position of two nodes (
bspc node -s). - Flags: Toggling
hidden(minimized),sticky(global),private(ignored by automatic splitting),locked(immune to closing).
- Movement: Moving nodes within a desktop, across desktops, or across monitors (
- Preselection (
-p):- Manually defining the split direction and ratio for the next window.
- Visualizing preselection feedback colors.
- Canceling preselection (
bspc node -p cancel).
- Receptacles (
-i):- Inserting empty nodes (leaves without windows) to reserve layout space.
- Dumping windows into receptacles.
3. The Input Daemon (sxhkd)
bspwm handles zero keyboard input. You must master sxhkd to drive it.
- Chord Chains: Binding sequences (
super + a ; b). - Brace Expansion: Creating compact matrices of commands (
super + {h,j,k,l}mapped to{west,south,north,east}). - Command Replay: Using
@to run commands on key release vs. press. - Sync vs. Async: Understanding when a command blocks
sxhkdand when it doesn’t. - Mode Simulation: Creating “modal” editing (like Vim) using chord chains or dynamic config reloading.
4. Logic & Automation (The “Programmable” Layer)
- Standard Rules (
bspc rule):- Static assignment:
bspc rule -a Firefox desktop='^2' follow=on. - One-shot rules (
-o): Rules that apply only to the very next window spawned.
- Static assignment:
- External Rules Command:
- Writing shell scripts that intercept
Window ID,Class, andInstancebefore the window is mapped. - Implementing complex logic (e.g., “If GIMP opens and I am on Monitor 1, float it; if Monitor 2, tile it”).
- Writing shell scripts that intercept
- Event Subscription (
bspc subscribe):- Listening to the event stream:
node_add,node_remove,desktop_focus,monitor_add. - Building daemon scripts that react to changes (e.g., “When I switch to Desktop 5, automatically change the wallpaper”).
- Listening to the event stream:
- State Dumping (
bspc query -T):- Reading the JSON state of the entire window manager.
- Writing scripts to save/load layouts (parsing JSON to reconstruct trees using receptacles).
5. Layout Management
- Automatic Schemes:
spiral: Windows split the largest node, spiraling inward.longest_side: Windows always split the longest edge (standard tiling).alternate: Windows alternate H/V splits.
- Manual Layouts: Building custom grids on the fly using preselection.
- Padding & Gaps:
window_gap: Space between nodes.top_padding,left_padding, etc.: Reserving space for bars/panels.- Configuring per-monitor or per-desktop padding (e.g., Mono-monitor setup needs different padding than Dual).
6. The Ecosystem (Integration)
- Polybar / Lemonbar:
- Parsing the
bspwminternal report (bspc subscribe report) to display workspace tags (Occupied, Free, Urgent, Focused).
- Parsing the
- X11 Tools:
xprop: FindingWM_CLASSandWM_NAMEfor rules.xwininfo: Debugging geometry.xtitle: Getting dynamic window titles for scripting.xdo/xdotool: Sending fake input or managing windows thatbspccannot touch.
- Compositors (Picom):
- Handling transparency, shadows, and blur.
- Managing opacity rules for focused vs. unfocused nodes.
7. Advanced “Hacks” & Workflows
- Scratchpads:
- Using the
hiddenflag and unique IDs to create “drop-down” terminals that toggle visibility. - Managing a “Scratchpad Desktop” (e.g., Desktop 10) vs. Hidden Nodes.
- Using the
- Swallowing:
- implementing terminal swallowing (launching an image viewer “eats” the terminal window until the viewer closes) via generic scripts or tools like
devour.
- implementing terminal swallowing (launching an image viewer “eats” the terminal window until the viewer closes) via generic scripts or tools like
- Dynamic Gaps:
- Scripting gaps to disappear when only one window is present (
smart_gaps).
- Scripting gaps to disappear when only one window is present (
- Urgency Hints:
- Handling
WM_HINTS(flashing red borders) when a background window needs attention.
- Handling
8. Troubleshooting & Debugging
- The Socket: Understanding
/tmp/bspwm_...socket. - Logs: Checking
~/.xsession-errors. - Visual Debugging: Using
bspc query -Tpiped tojqto visualize why a window is stuck in a specific split.
Introduction : Basics
bspwm is a minimal tiling window manager: you mainly configure the WM via a shell script (bspwmrc) and handle keybindings via sxhkd (sxhkdrc).
A good “getting started” path is: install bspwm + sxhkd, copy the example configs into ~/.config/…, make bspwmrc executable, then start sxhkd and bspwm from your X session.
Install and start
- Install
bspwm(the WM) andsxhkd(hotkey daemon). - Start
bspwmvia Xinit (or a display manager session), since bspwm is an X11 window manager.
Create initial config
- Copy the example configs from
/usr/share/doc/bspwm/examples/into:~/.config/bspwm/bspwmrc~/.config/sxhkd/sxhkdrc
- Make sure
bspwmrcis executable, because it’s a shell script that configures bspwm by runningbspccommands. - ArchWiki’s example uses these commands (adjust if your distro differs):
install -Dm755 /usr/share/doc/bspwm/examples/bspwmrc ~/.config/bspwm/bspwmrcinstall -Dm644 /usr/share/doc/bspwm/examples/sxhkdrc ~/.config/sxhkd/sxhkdrc
Learn the core concepts
bspwmrcis where you set window manager behavior (desktops, gaps, rules, etc.) by sending messages withbspc.sxhkdrcis where you define keybindings that typically callbspc(focus/move windows, switch desktops, launch apps).- bspwm doesn’t handle keyboard input directly, so a hotkey daemon like
sxhkdis required for shortcuts.
First troubleshooting checklist
If you boot into a blank screen and keys don’t work, check these first:
sxhkdis installed and actually started (and started in the background, since it blocks).~/.config/bspwm/bspwmrcis executable.- Your
sxhkdrcterminal command matches a terminal you have installed (the example config may referenceurxvt).
1. Core Architecture: The Binary Tree Philosophy
Unlike dynamic tilers (like DWM or Xmonad) that use predefined layout lists (master/stack, grid, spiral), bspwm is a manual tiler based on a data structure known as a full binary tree.
1.1 The Data Structure
Every monitor contains at least one desktop. Every desktop is the root of a binary tree.
- Nodes: The fundamental unit. A node is either a leaf (holding a window) or an internal node (holding two children).
- Leaves: The actual application windows (e.g., Firefox, Terminal).
- Internal Nodes: Containers that define the split direction (Horizontal/Vertical) and the split ratio (e.g., 0.5 for equal halves) between their two children.
BSPWM Binary Tree Structure
1.2 The Implication of “Manual” Tiling
In standard tilers, you “switch layouts.” In bspwm, you manipulate the tree directly.
- Automatic Mode: Bspwm decides where the next window goes based on the
automatic_scheme(usually “spiral” or “longest_side”). - Manual Mode: You explicitly “preselect” a region (North, South, East, West) on an existing node. The next window splits that specific node in the chosen direction. This architecture makes bspwm strictly deterministic. The layout is exactly what you build, nothing more, nothing less.
2. Installation & Environment
Bspwm adheres strictly to the Unix philosophy: “Do one thing and do it well.” It only manages windows. It does not handle:
- Keyboard input (handled by
sxhkd) - Compositing (handled by
picom) - Bars/Panels (handled by
polybarorlemonbar) - Wallpaper (handled by
fehornitrogen)
2.1 Dependencies (Arch Linux / General)
You must install both the window manager and the hotkey daemon.
# Arch Linux
sudo pacman -S bspwm sxhkd

# Debian/Ubuntu
sudo apt install bspwm sxhkd
2.2 X11 Session Entry
Because bspwm is just a binary, it must be launched via .xinitrc or a Display Manager (LightDM/GDM).
File: ~/.xinitrc
# Load resources
xrdb -merge ~/.Xresources &

# Start the hotkey daemon in the background (CRITICAL)
sxhkd &

# Start the compositor (optional but recommended)
picom &

# Set wallpaper
feh --bg-fill ~/Pictures/wall.jpg &

# Set cursor shape (fixes "X" cursor bug)
xsetroot -cursor_name left_ptr &

# Launch bspwm (must be the last line, no '&')
exec bspwm
3. The Nervous System: sxhkd
sxhkd is an X daemon that reacts to input events and executes commands. It is independent of bspwm but essential for it.
Config Location: ~/.config/sxhkd/sxhkdrc
3.1 Syntax & Chords
sxhkd uses a unique syntax that allows for “chord chains” (pressing keys in sequence) and “brace expansion” (compacting similar commands).
Brace Expansion (The Power Feature)
Instead of writing 4 separate lines for moving windows, you write one:
# Move window node (super + shift + {h,j,k,l})
super + shift + {h,j,k,l}
    bspc node -v {-20 0, 0 20, 0 -20, 20 0}
- When you press
Super + Shift + h, it executesbspc node -v -20 0. - When you press
Super + Shift + j, it executesbspc node -v 0 20.
Chord Chains
You can create “modes” without actual modes.
# Press Super + o, release, then press 'r' to reload config
super + o ; r
    bspc wm -r
3.2 Essential Keybindings Table
| Key Chord | Command | Description |
|---|---|---|
super + Return | $TERMINAL | Launch terminal |
super + w | bspc node -c | Close focused window |
super + {h,j,k,l} | bspc node -f {west,south,north,east} | Focus window directionally |
super + {1-9} | bspc desktop -f ^{1-9} | Switch to desktop 1-9 |
super + shift + {1-9} | bspc node -d ^{1-9} | Send window to desktop 1-9 |
4. The Brain: bspwmrc
File: ~/.config/bspwm/bspwmrc
Requirement: Must be executable (chmod +x bspwmrc).
This file is simply a shell script. It runs once at startup. If you change it, you must reload bspwm (bspc wm -r) to re-run it.
4.1 Monitor Configuration
You must explicitly map desktops to monitors. If you plug in a second monitor, bspwm won’t use it until you tell it to.
#!/bin/sh

# Clean setup for one or two monitors
if [[ $(xrandr -q | grep "HDMI-0 connected") ]]; then
    # Dual monitor setup
    bspc monitor DP-0 -d I II III IV V
    bspc monitor HDMI-0 -d VI VII VIII IX X
else
    # Single monitor setup
    bspc monitor DP-0 -d I II III IV V VI VII VIII IX X
fi
4.2 Global Aesthetics
# Border width (pixels)
bspc config border_width         2

# Window gap (space between windows)
bspc config window_gap          12

# Split ratio (0.5 = 50/50 split)
bspc config split_ratio          0.50

# Border colors
bspc config normal_border_color "#4c566a"
bspc config focused_border_color "#88c0d0"

# Focus follows mouse (true/false)
bspc config focus_follows_pointer true
5. Control Plane: Mastering bspc
bspc (Binary Space Partitioning Control) is the command-line client. You use it in bspwmrc, sxhkdrc, and your own scripts. Understanding bspc is understanding bspwm.
5.1 Selectors: The Query Language
Almost every bspc command requires you to select a target.
- Nodes:
-n(Target a window) - Desktops:
-d(Target a workspace) - Monitors:
-m(Target a screen)
Advanced Node Selectors
You can target nodes based on relationships, flags, or history.
focused: The currently active window.east,west,north,south: Directional neighbors.last: The previously focused node.biggest: The largest node on the desktop.@parent: The internal node holding the current window and its sibling. Example: Swap the current window with the biggest window on the desktop:
bspc node -s biggest.local
5.2 Node Modifications
- Flags: Nodes can be
hidden,sticky(follows you across desktops),private(ignored by some queries), orlocked(cannot be closed).
bspc node -g sticky  # Toggle sticky
bspc node -t floating # Float the window
- Preselection: The killer feature. Define where the next window opens.
bspc node -p south   # Preselect the bottom half
bspc node -p cancel  # Cancel preselection
6. Window Management Dynamics
6.1 Manual vs. Automatic
By default, bspwm splits windows automatically (spiraling inward). To take control, you use Preselection.
- Input: User presses
Super + Ctrl + L(East). - Visual Feedback: Bspwm highlights the right half of the current node in a distinct color (configurable via
presel_feedback_color). - Action: User opens a terminal.
- Result: The terminal spawns exactly in that highlighted area.
6.2 Receptacles
A Receptacle is a “placeholder” node—a leaf that contains no window. It reserves space in the tree layout.
- Use case: You want to build a complex layout (e.g., 3 small windows on the left, one big on the right) before you open the applications.
- Command:
bspc node -i(Insert receptacle).
6.3 Swallowing (Terminal Suppression)
“Swallowing” is when you launch a GUI app (like MPV or Sxiv) from a terminal, and the terminal disappears, being “swallowed” by the new app. When the app closes, the terminal returns.
- Bspwm does not do this natively.
- Solution: Use an external listener script or a wrapper tool like
devourin your sxhkd config.
7. Advanced Logic: External Rules
This is bspwm’s most powerful configuration feature. Instead of a simple “If app is Firefox -> move to desktop 2” list, you can point bspwm to a script.
Config: bspc config external_rules_command ~/.config/bspwm/external_rules
7.1 The External Rules Script
Bspwm passes the Window ID, Class, Instance, and Title to this script as arguments. The script prints commands to stdout that bspwm executes for that specific window.
Example: ~/.config/bspwm/external_rules
#!/bin/sh

wid=$1
class=$2
instance=$3
title=$(xtitle "$wid")

# If it's a Picture-in-Picture window (Firefox/Chrome)
if [ "$title" = "Picture-in-Picture" ]; then
    echo "state=floating"
    echo "sticky=on"
    echo "border=off"
    exit 0
fi

# If it's GIMP, move to desktop 8 and follow it
if [ "$class" = "Gimp" ]; then
    echo "desktop=^8"
    echo "follow=on"
    exit 0
fi

# Complex logic: If 2 nodes already exist on desktop 1, send next one to desktop 2
count=$(bspc query -N -d ^1 | wc -l)
if [ "$count" -ge 2 ]; then
    echo "desktop=^2"
fi
This allows for logic impossible in other window managers (e.g., “Float this window only if it’s Tuesday and I’m on Monitor 2”).
8. The Ecosystem
A “naked” bspwm is just black screens. You need the ecosystem to make it a workstation.
8.1 Polybar (Status Bar)
Polybar has a built-in bspwm module. It can display the focused desktop, occupied desktops, and urgent alerts.
Module Config:
[module/bspwm]
type = internal/bspwm
label-focused = %name%
label-focused-background = #3b4252
label-focused-underline= #88c0d0
label-occupied = %name%
label-urgent = %name%!
label-empty =
8.2 Rofi (Application Launcher)
Rofi works perfectly as a menu. Bind it in sxhkd:
super + space
    rofi -show drun -show-icons
8.3 Scratchpads (Hidden Windows)
Bspwm creates scratchpads easily using node flags.
- Hide:
bspc node -g hidden -f - Show:
bspc node <selector> -g hidden=off -fScripted Toggle (Sticky Scratchpad):
#!/bin/sh
id=$(xdotool search --class "scratchpad_term" | tail -1)

if [ -z "$id" ]; then
    # Launch if not running
    alacritty --class scratchpad_term &
else
    # Toggle visibility
    if bspc query -N -n "$id.hidden"; then
        bspc node "$id" -g hidden=off -d focused -f
    else
        bspc node "$id" -g hidden=on
    fi
fi
9. Troubleshooting & Debugging
9.1 The Blank Screen of Death
If you log in and see nothing:
- Check Executable: Did you
chmod +x ~/.config/bspwm/bspwmrc? - Check sxhkd: Is
sxhkdrunning? Switch to TTY (Ctrl+Alt+F2), login, and runpidof sxhkd. - Check Terminal: Does your
sxhkdrclaunch a terminal you actually have installed? (Default is oftenurxvt, you might havealacrittyorkitty).
9.2 Tree Visualization
To understand why your windows are splitting weirdly, dump the tree state:
bspc query -T -d | jq .
This outputs the JSON representation of the current desktop’s binary tree.
9.3 Orphaned Nodes
Sometimes a “ghost” node remains. Cleanup:
# Remove the node explicitly
bspc node <node_id> -k
Introduction : Architecture
1. Architectural Internals
1.1 The Binary Space Partitioning (BSP) Model
At its core, bspwm differs fundamentally from dynamic tilers (like i3, dwm, or xmonad) because it maps windows directly to the leaves of a full binary tree. There are no “lists” or “stacks” of windows; there is only the tree.
The node_t Structure
Understanding bspwm requires understanding the C structure that represents every node. A node is the atomic unit of the window manager.
- Internal Nodes: These are purely structural. They do not hold windows. Their sole purpose is to define a region of space and how it is split.
- Properties:
split_type(Horizontal or Vertical),split_ratio(0.0 to 1.0, default 0.5),first_child(pointer),second_child(pointer).
- Properties:
- Leaf Nodes: These are the containers for actual X11 windows.
- Properties:
client(Window ID),vacuity(Occupied or Empty/Receptacle).
BSPWM Binary Tree Structure When you “move” a window in bspwm, you are actually performing tree rotation or swapping pointers in this linked structure.
- Properties:
1.2 The IPC Architecture (Inter-Process Communication)
bspwm itself is a daemon that does not read a configuration file at runtime. It opens a Unix domain socket and waits for byte-stream commands.
- The Daemon (
bspwm): Sits in an event loop (usingselectorepoll), listening for two things simultaneously:
- X11 Events:
MapRequest,DestroyNotify,EnterNotify(from the X server). - Socket Messages: Commands from
bspc.
- The Client (
bspc): A lightweight binary that connects to the socket, sends a null-terminated string (e.g.,node\0-f\0west\0), waits for a response, and prints it to stdout. Implication: Yourbspwmrcis just a shell script that spamsbspccommands to the socket. Ifbspcfails,bspwmremains completely unconfigured (black screen).
2. The bspc Command language
bspc is not just a controller; it is a query language. Almost every command follows the pattern: bspc <DOMAIN> <ACTION> <SELECTOR>.
2.1 Selectors and Descriptors
A selector uniquely identifies a node, desktop, or monitor.
Syntax: [REFERENCE#]DESCRIPTOR(.MODIFIER)*
- Reference: The starting point. Defaults to
focused. You can set it arbitrarily:0x00200005#...starts the search from window0x00200005. - Descriptors:
- Directional:
north,south,east,west. - Cyclic:
next,prev(follows the tree traversal order). - Genealogical:
parent,brother,first_child,second_child,ancestor,descendant. - History:
last(last focused),older,newer.
- Directional:
- Modifiers: Filters that refine the selection.
.local(same desktop),.leaf(ignore internal nodes),.floating,.tiled.!: Negation..!hiddenmeans “not hidden”. Example: “Focus the first non-hidden floating window on the current desktop.”
bspc node -f .floating.!hidden.local.first
2.2 Path Selectors (@)
You can address nodes by their path from the root of the tree.
@/: The root of the current desktop.@/1: The first child (left/top) of the root.@/2: The second child (right/bottom) of the root.@/2/1: The first child of the second child of the root. This is useful for scripts that need to traverse the tree deterministically.
3. Command Reference
3.1 Node Operations (bspc node)
- Insertion (
-i): Inserts a “receptacle” (empty leaf) at the given split.bspc node -icreates a blank space where you can later dump a window.
- Preselection (
-p): Marks a node to be split in a specific way for the next window.bspc node -p south -o 0.75: “The next window will open in the bottom 25% of this node.”
- Flags (
-g):hidden: Removes the window from the tree layout but keeps it in memory (minimized).sticky: Keeps the window visible across all desktop switches on that monitor.private: Bspwm will try not to split this node.marked: Tags a node for batch operations.
3.2 Desktop & Monitor Operations
- Reordering:
bspc monitor -o I II III IVreorders desktops. - Swapping:
bspc desktop -s prevswaps the current desktop with the previous one. - Bubbling:
bspc desktop -b next“bubbles” the desktop (moves it one slot over in the list).
3.3 The Query System (bspc query)
This is the most powerful tool for scripting.
bspc query -T: Dumps the entire world state (monitors -> desktops -> nodes) as a JSON object.bspc query -N: Lists node IDs.- Use Case: Count windows on current desktop:
bspc query -N -d focused -n .leaf.!hidden | wc -l
4. Advanced Logic & Scripting
4.1 External Rules
Bspwm allows you to offload window placement logic to an external script. This is defined by external_rules_command.
How it works:
- A new window appears.
- Bspwm pauses.
- It calls your script with arguments:
WindowID,Class,Instance. - Your script prints key-value pairs to stdout (e.g.,
state=floating,desktop=^3). - Bspwm applies these settings before mapping the window. Example Script:
#!/bin/sh
wid=$1
class=$2
instance=$3

# Float all "Save As" dialogs
if [ "$class" = "Gtkwave" ] && [ "$instance" = "file_chooser" ]; then
    echo "state=floating"
    echo "center=on"
fi
4.2 State Restoration (Layouts)
Because the state is purely data (JSON), you can save and restore layouts.
- Save:
bspc query -T -d > layout.json. - Restore: A script is needed to parse this JSON. It would iterate through the tree, using
bspc node -ito create receptacles in the exact structure of the saved tree, and then launch applications to fill those receptacles.
4.3 The Subscriber (bspc subscribe)
For status bars (like Polybar) or event-driven scripts.
bspc subscribe report streams a continuous string describing the state:
W:m:DP-0:O:I:f:II:o:III:m:HDMI-0:o:IV:o:V
W: Start of report.m:DP-0: Monitor DP-0.O:I: Desktop I is Occupied.f:II: Desktop II is Free (empty).F:III: Desktop III is Focused. This allows bars to update instantly without polling.
5. Event Flow: A Step-by-Step
When you press Super + Enter (Terminal):
- X Server receives KeyPress.
- sxhkd (listening for keys) matches
super + Return. - sxhkd executes
$TERMINAL(e.g., Alacritty). - Alacritty starts and asks X11 for a window (
CreateWindow). - X Server sends
MapRequestto bspwm. - bspwm intercepts:
- Runs
external_rules_command. - Consults the
bspwmrcrules (bspc rule -a ...). - Finds the “insertion point” (focused node or preselection).
- Splits the tree node.
- Resizes existing windows.
- Runs
- bspwm grants the MapRequest.
- X Server draws the window.
This entire chain happens in milliseconds, driven by the binary tree logic that ensures no two windows ever overlap (unless floating).
Basics
Overview and Core Concepts
BSPWM (Binary Space Partitioning Window Manager) is a tiling window manager that represents windows as the leaves of a full binary tree. The fundamental innovation of bspwm is its use of binary space partitioning—a recursive subdivision algorithm that divides two-dimensional screen space into increasingly smaller rectangular regions—to manage window layout and positioning. Unlike traditional stacking window managers or even other tiling managers like i3 that use arbitrary tree structures, bspwm constrains itself to strictly binary trees, meaning each internal node can have exactly zero or two children. This architectural decision provides both elegance and flexibility, allowing users to manipulate the window hierarchy with sophisticated tree-based operations while maintaining simplicity in the core data structure.
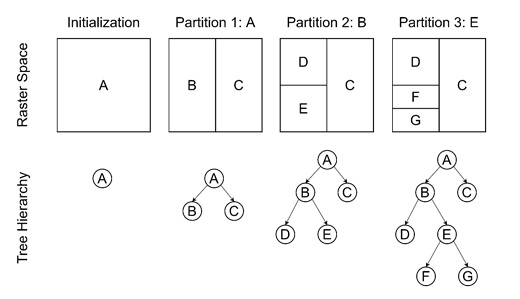
The genius of bspwm lies in how it translates the abstract concept of binary space partitioning into practical window management. When you open windows in bspwm, each new window becomes a leaf node in the binary tree. Every time a second window is added as a sibling to an existing window, the window manager automatically creates an internal node (also called a parent node) that serves as a container for both windows. This internal node represents the split between the two windows—it stores information about whether the split is horizontal or vertical and what ratio the rectangle is divided by. The recursive nature of this process means that adding a third window creates a new internal node with its own children, and this pattern continues indefinitely, building increasingly complex tree structures.
Understanding the binary tree structure in bspwm requires grasping several fundamental concepts from data structures and computer science. Nodes are the fundamental units of the tree; each node contains data and pointers to its children. In bspwm’s case, leaf nodes hold window references, while internal nodes store splitting information. Leaf nodes are nodes with no children and represent actual windows currently open on your screen. Internal nodes are nodes with at least one child; in bspwm, internal nodes always have exactly two children due to the binary tree constraint. Parent nodes have child nodes branching from them, sibling nodes share the same parent, and root nodes are the topmost nodes from which all other nodes descend.
The hierarchical nature of this structure provides profound practical benefits. Because bspwm maintains a strict binary tree, you can perform complex operations on entire subtrees, treating them as single units. This means you can rotate, flip, balance, or resize multiple windows at once by operating on their common parent node. This is fundamentally different from other tiling managers where window relationships are less formally defined and thus harder to manipulate programmatically.
The Binary Tree Data Structure Foundation
Basic Node Structure
At the heart of bspwm’s implementation lies a simple but powerful data structure: the binary tree node. In C (the language bspwm is written in), a basic binary tree node looks like this:
typedef struct node_t node_t;

struct node_t {
    int data;
    node_t* left;
    node_t* right;
};
However, bspwm’s actual node structure is considerably more sophisticated. Based on the source code examined in bspwm documentation, the actual node structure in bspwm contains:
- first_child and second_child pointers: Instead of “left” and “right,” bspwm names these children to reflect the order of window creation (first window to be spawned as first child, second window as second child)
- Parent pointer: Links back to the parent node for upward tree traversal
- Window reference: For leaf nodes, a pointer to the actual X11 window being managed
- Rectangle data: The bounding box (coordinates and dimensions) that the node occupies on screen
- Split parameters: For internal nodes, information about whether the split is horizontal or vertical, and the ratio determining how the rectangle is divided between the two children
This enriched node structure enables bspwm to not only maintain the tree hierarchy but also directly manage window geometry without requiring additional layout calculation passes. Every piece of information needed to render the windows is stored within the tree itself.
Tree Hierarchy in BSPWM’s Display System
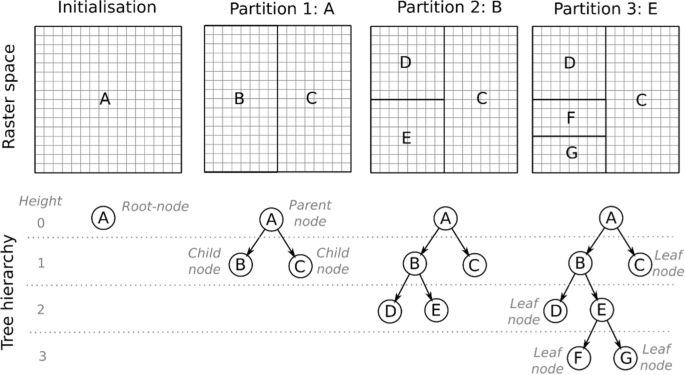
BSPWM organizes the display hierarchy into multiple levels, each with its own data structure. At the top level are monitors, which are represented as a doubly linked list rather than a tree, because there is typically no hierarchical relationship between monitors—they exist as peers. Each monitor structure contains:
- Name and ID
- Physical rectangle (coordinates and dimensions)
- Pointer to desktops contained within it
- Pointers to previous and next monitors (doubly linked list structure)
Within each monitor are desktops (also called workspaces), which are also organized as a doubly linked list within each monitor. Each desktop contains:
- Name and ID
- Layout information (tiled or monocle)
- A pointer to the root of the binary tree of windows on that desktop
- Window gaps and border width settings
- Pointers to previous and next desktops
At the bottom of this hierarchy are windows, which are organized as a binary tree rooted at the desktop level. The tree only exists at the window level; the monitor and desktop layers are linear structures. This three-layer hierarchy (monitors as linked list → desktops as linked list → windows as binary tree) provides the complete organizational framework for bspwm.
Binary Tree Partitioning Mechanisms
Fundamental Partitioning Concept
The core principle of binary space partitioning is recursive subdivision of space into two convex sets using hyperplanes as partitions. In two-dimensional screen space, these hyperplanes are simply lines—either horizontal or vertical. Each time bspwm inserts a new window, it doesn’t just place it anywhere; instead, it recursively subdivides the available rectangle into two smaller rectangles by drawing either a horizontal or vertical line across it.
The split is characterized by two parameters:
- Split type: Whether the division is horizontal (line drawn left-to-right) or vertical (line drawn top-to-bottom)
- Split ratio: A floating-point number between 0 and 1 representing where the line is drawn relative to the rectangle’s width or height
For example, if a 1920×1080 rectangle is split vertically with a ratio of 0.5, the result is two rectangles: one that is 960 pixels wide (0.5 × 1920) and another that is also 960 pixels wide (0.5 × 1920). If the ratio is 0.35, the first child gets 672 pixels (0.35 × 1920) and the second child gets 1248 pixels.
Perfect Binary Trees and Full Binary Trees
BSPWM specifically implements what computer scientists call a “full binary tree”—a binary tree where every internal node has exactly zero or two children. This is crucial because it means that you never have a situation where an internal node has only one child. In theoretical terms, this ensures that the tree structure remains mathematically clean and predictable.
The significance of this constraint cannot be overstated. In other tiling managers, you might have a container with a single window inside, creating unnecessary hierarchy. In bspwm’s full binary tree approach, if you have two windows, there’s exactly one internal node connecting them. If you add a third window, another internal node is created to organize one of the existing windows with the new window. This property makes tree operations, rotations, and transformations much more straightforward to reason about and implement.
Window Insertion Points and Automatic Mode Schemes
When a new window is opened in bspwm, it must be inserted somewhere into the tree. By default, the window is inserted at the focused window (or focused leaf node). The insertion mode determines how the tree structure changes to accommodate the new window. There are two primary insertion modes: automatic mode and manual mode, with automatic mode being the default.
In automatic mode, bspwm uses one of three schemes to determine where and how to split the tree:
1. Alternate Scheme (Default)
The alternate scheme splits the window based on the split type of the parent node’s parent. This creates a predictable pattern where splits alternate between horizontal and vertical. Here’s how it works:
When you open your first window on an empty desktop, it simply fills the desktop rectangle—no splits occur because there’s only one window (one leaf node, no internal nodes needed).
When you open a second window, an internal node is created. The initial polarity setting determines which child gets which side. By default, the second child receives the split direction specified by the initial polarity. If initial polarity is “second_child” (the default), the new window appears on the right (for vertical split) or bottom (for horizontal split).
When you open a third window, bspwm looks at the split type of the parent node’s parent. If the grandparent split is horizontal, the parent splits vertically, and vice versa. This alternating pattern continues recursively, creating a naturally balanced tile layout.
2. Longest Side Scheme
The longest side scheme examines the dimensions of the focused window’s rectangle and makes the split perpendicular to the longest side. If the window is wider than it is tall, it splits vertically (creating two narrower windows). If taller than wide, it splits horizontally (creating two shorter windows).
This scheme is particularly useful for monitors of unusual aspect ratios or when you want layouts that naturally adapt to the display geometry. For example, on an ultra-wide monitor (like 3440×1440), the longest side scheme would consistently split vertically, creating tall narrow columns rather than short wide rows.
3. Spiral Scheme
The spiral scheme inserts the new window at the position of the focused window, pushing the existing window deeper into the tree. This creates a spiral-like tiling pattern. When you add a new window, instead of creating a sibling alongside the focused window, the focused window becomes the child of a new internal node, and the new window becomes the other child.
The name comes from the visual pattern that emerges: windows gradually spiral outward as more are added, similar to a spiral staircase viewed from above. Each new window takes the place of the current focused window, and the previous window is displaced to a specific child position (first_child or second_child) of the new internal node, based on a spiral polarity setting.
Manual Mode and Preselection
While automatic mode provides sophisticated algorithms for placement, bspwm also offers manual mode, which gives users explicit control over where new windows appear. Manual mode is activated through preselection—the user specifies where the next window should be split using cardinal directions: north, south, east, or west.
When a user issues a command like bspc node -p north, they are preselecting the northern area of the focused window as the insertion point for the next window. This command converts the focused window’s insertion mode from automatic to manual. The preselection creates a visual feedback area showing where the new window will appear when it’s opened.
The preselection ratio can be adjusted to control the split distribution. For example, setting the ratio to 0.7 means the preselected area gets 70% of the focused window’s rectangle. When the new window opens in the preselected area, that ratio becomes the split ratio of the new internal node.
Preselection is particularly powerful because it allows users to build complex, custom layouts by manually specifying window placements. This transforms bspwm from a purely automatic layout manager into a hybrid that supports both automatic and manual tiling paradigms.
Internal Tree Operations and Manipulations
Tree Rotations and Flips
One of the most sophisticated features of bspwm is its support for tree rotations and flips—operations that restructure the tree without affecting which windows are visible, only their relative positions and hierarchy.
A tree rotation changes which nodes are parents and which are children, effectively restructuring the internal organization of the tree. This is conceptually similar to rotations in self-balancing binary search trees used in algorithms like AVL trees, but with a different purpose. In AVL trees, rotations rebalance the tree for search efficiency. In bspwm, rotations restructure the tiling layout.
When you rotate a subtree, the visual arrangement of windows changes. For example, rotating a subtree 90 degrees clockwise causes windows that were stacked vertically to appear horizontally, or vice versa. The command bspc node @/2 -R 90 rotates the subtree rooted at the second child of the desktop root by 90 degrees clockwise.
Tree flips are simpler operations that mirror the tree structure. A horizontal flip reverses the left-right ordering of children, while a vertical flip reverses the top-bottom ordering. These operations are useful for quickly rearranging window positions without changing their individual sizes or the overall layout structure.
Equalize and Balance Operations
The equalize operation resets all split ratios in a subtree to their default values (typically 0.5, giving each child equal space). This is useful when splits have been manually adjusted to non-uniform ratios and you want to quickly return to equal distribution.
The balance operation is more sophisticated: it adjusts split ratios so that all leaf nodes (windows) in a subtree occupy approximately equal areas. This is different from equalization because it calculates what split ratios are needed to achieve equal window sizes, rather than just resetting them. If your tree has uneven depth (some windows deeper in the tree than others), balance will automatically adjust the split ratios to compensate, ensuring all windows get roughly the same screen real estate.
Window Swapping and Moving
Bspwm provides commands to swap windows or subtrees in the tree. Swapping exchanges the positions of two windows or entire subtrees. For example, you can swap the left and right halves of a split, or swap two specific windows regardless of their position in the tree.
Window moving is different from swapping: it transplants a window from one position in the tree to another. When a window is moved to a new location, it takes its subtree with it, maintaining any child windows it may have had. This operation requires restructuring the tree to remove the window from its current location and reinsert it elsewhere.
Resize and Ratio Operations
While rotations and flips restructure the tree itself, resize and ratio operations adjust the split parameters without changing the tree structure. You can modify the split ratio of any internal node to give more space to one child or the other.
For example, bspc node -r 0.3 sets the split ratio of the focused node’s parent to 0.3, giving the focused node 30% of its parent’s rectangle and the sibling node 70%. You can also make relative adjustments using increment and decrement operators: bspc node -r +0.1 increases the focused node’s allocation by 10 percentage points.
Split Types and Geometric Relationships
Horizontal and Vertical Splits
Horizontal splits draw a line left-to-right, dividing the rectangle into top and bottom sections. The split ratio determines what percentage of the height goes to the first child versus the second child. A horizontal split with ratio 0.6 gives 60% of the height to the first child (top) and 40% to the second child (bottom).
Vertical splits draw a line top-to-bottom, dividing the rectangle into left and right sections. A vertical split with ratio 0.4 gives 40% of the width to the first child (left) and 60% to the second child (right).
The recursive nature of these splits is crucial to understanding bspwm’s behavior. When you add a fourth window to a tree with three windows, bspwm analyzes the current split orientations and recursively applies the chosen scheme (alternate, longest side, or spiral) to determine both the split type and the location of the new split.
Directional Focus and Movement
Bspwm implements directional focus and movement operations that work by examining the spatial relationships between nodes. When you press a key like “focus west,” bspwm doesn’t just move through the tree in a fixed order; instead, it calculates which window is in the western direction relative to the currently focused window and moves focus there.
This spatial awareness is computed using the rectangles stored in each node. By comparing the bounding boxes of windows, bspwm can determine which windows are adjacent in which directions, enabling intuitive directional navigation even when the tree structure doesn’t directly reflect the spatial layout.
Leaf Nodes, Receptacles, and Window States
Leaf Nodes and Their Properties
A leaf node is any node in the tree with no children. In bspwm, leaf nodes can be one of two things: either they hold a window reference (a regular window), or they are receptacles—empty leaf nodes that don’t hold any window.
When you open a window, it becomes a leaf node with a window reference. If the tree already has windows and you add a new one, the focused window (which was a leaf) becomes an internal node with two children: one holding the original window and one being a new leaf (either a receptacle or the new window, depending on whether you’ve preselected an area).
Receptacles
A receptacle is a leaf node that contains no window. Receptacles are manually inserted into the tree to create placeholder positions where windows can be placed later. They’re useful for creating complex predefined layouts without needing any windows to be open initially.
You can insert a receptacle with the command bspc node -i (insert receptacle). Once inserted, the receptacle acts like any other leaf node in the tree—it occupies space and participates in the layout. When a new window is opened, if its insertion point is a receptacle, the receptacle is replaced by the new window in-place, maintaining the structure you carefully constructed.
Receptacles are particularly powerful when combined with bspwm’s state-saving and state-loading capabilities. You can create a tree structure with receptacles representing where you want windows to go, save this structure, and then use scripting to automatically place windows in the receptacle positions when you restart.
Window States
In addition to their position in the tree, windows have states that determine how they interact with the tiling system:
- Tiled: The window’s size and position are determined by the tree structure. This is the default state for new windows.
- Pseudo-tiled: A tiled window that automatically shrinks to fit its content but doesn’t stretch beyond a certain size.
- Floating: The window can be moved and resized freely by the user. While not part of the tiling layout, floating windows still exist as nodes in the tree.
- Fullscreen: The window fills the entire monitor and has no borders.
The distinction between these states is important because it affects how the tree renders. Tiled windows participate in the recursive subdivision algorithm; floating and fullscreen windows do not.
Node Flags
Beyond states, nodes can have multiple flags set simultaneously:
- hidden: The window doesn’t occupy tiling space
- sticky: The window stays visible on the focused desktop of its monitor
- private: The window tries to maintain its tiling position even when other windows are added or removed
- locked: The window ignores close commands
- marked: Used for deferred actions and batch operations
- urgent: Has its urgency hint set (usually by the application)
Tree Traversal and Query Mechanisms
Depth-First and Breadth-First Traversal
To work with the binary tree, bspwm must be able to traverse it—visit each node systematically. There are two fundamental approaches to tree traversal that apply to bspwm’s tree:
Depth-first search (DFS) traverses as far down a branch as possible before exploring the next branch. It’s implemented using a stack (either an explicit stack or implicitly via recursion). In bspwm’s context, DFS is useful for operations that affect entire subtrees—you explore all descendants of a node before moving to the next branch.
Breadth-first search (BFS) explores nodes level by level, visiting all nodes at depth N before visiting nodes at depth N+1. It’s implemented using a queue and is useful for operations that need to consider all nodes at the same depth level.
Traversal Methods: Inorder, Preorder, and Postorder
For binary trees specifically, there are three common depth-first traversal methods that differ in when the node itself is processed relative to its children:
Inorder traversal: Left → Root → Right. Visit the left subtree, then the node itself, then the right subtree. For a binary search tree, inorder traversal visits nodes in sorted order.
Preorder traversal: Root → Left → Right. Visit the node first, then the left subtree, then the right subtree. This is useful when you need to process a node before its descendants (like when printing a tree structure).
Postorder traversal: Left → Right → Root. Visit the left subtree, then the right subtree, then the node itself. This is useful when you need to process children before the parent (like when deleting a tree or computing aggregates from the bottom up).
BSPWM’s bspc query command uses these traversal concepts internally. For example, when you query all windows in a desktop, bspwm performs a complete traversal of that desktop’s tree, visiting every leaf node to collect window IDs.
Selectors and Cyclic Traversal
Bspwm provides a powerful selector system for targeting nodes. Selectors combine a descriptor (like focused, pointed, biggest, smallest) with optional modifiers (like .leaf, .window, .descendant_of).
For cyclic traversal, bspwm implements a special traversal called “depth-first in-order traversal” that’s defined by the manual pages but differs from standard inorder traversal. This traversal mode is used by commands like bspc node -c to cycle through windows in a deterministic order.
Practical Rendering and Layout Generation
How the Tree Becomes a Layout
The binary tree structure alone doesn’t directly render windows; instead, the tree provides the instructions for how to partition screen space. The rendering process is conceptually straightforward: starting from the root node (the desktop rectangle), recursively subdivide based on the split type and ratio of each internal node until reaching leaf nodes (windows).
For each window, its final rectangle is calculated by tracing the path from the root to that leaf node in the tree, accumulating the subdivisions along the way. For example, if window W is the second child of its parent, and that parent is the first child of its parent, then W’s rectangle is calculated as:
- Start with the desktop rectangle (e.g., 1920×1080)
- Apply the root’s split (e.g., vertical at 0.5, yielding a 960-pixel-wide rectangle for W’s branch)
- Apply the parent’s split (e.g., horizontal at 0.6, yielding a 576-pixel-high rectangle for W)
Layouts Beyond Binary Tiling
While bspwm implements only two built-in layouts (tiled and monocle), its binary tree structure can support complex layouts through external scripting. The monocle layout displays one window full-screen, with others hidden but still present in the tree. The tiled layout is the default binary tree rendering.
More sophisticated layouts like “tall” (master-stack), “grid,” and “spiral” can be created by writing scripts that listen to bspwm events and manipulate window states, positions, and ratios based on custom rules. These scripts might set certain windows to floating state, adjust split ratios programmatically, or create receptacles in specific patterns.
Advanced Tree Concepts and Optimization
Tree Balance and Optimization
While bspwm doesn’t automatically rebalance its tree for search efficiency (as self-balancing BSTs do), it does provide operations to optimize layouts. The balance operation ensures that all leaf nodes occupy approximately equal areas, addressing one common aesthetic concern with deeply-nested trees where some windows get disproportionately small space.
The tree’s depth (the maximum distance from root to leaf) can affect how users perceive responsiveness when navigating. However, because the tree depth corresponds to visual nesting depth, users typically prefer shallower trees and naturally avoid creating excessively deep nesting.
Computational Complexity
The binary tree structure provides excellent algorithmic properties. Most operations on bspwm trees are O(log n) in the number of windows because the tree is typically reasonably balanced (though not formally balanced). Navigating to a specific window requires at most O(log n) comparisons. Even complex operations like rotating a subtree or applying balance operations are efficient because they operate on subtrees rather than re-rendering the entire layout.
The Intersection of Theory and Practice
From Computer Science to Window Management
The genius of bspwm is how it translates established computer science concepts into elegant window management. Binary space partitioning as a rendering algorithm comes from 3D graphics (developed in 1969). Self-balancing trees come from database and algorithm design. Tree rotations and flips come from advanced data structure theory.
By constraining window management to a strict binary tree, bspwm inherits decades of theory and optimization techniques. This means bspwm users, often unknowingly, are using sophisticated algorithmic structures that have been proven optimal for various problems.
Extensibility Through Tree Manipulation
The binary tree structure also makes bspwm uniquely extensible. Unlike window managers with more complex internal hierarchies, bspwm’s simplicity means that external scripts can manipulate the tree through well-defined bspc commands without risking corruption or inconsistency. You can write scripts that listen to window events and automatically adjust tree structure, create custom layouts, or build sophisticated multi-monitor coordination systems.
This extensibility is perhaps bspwm’s greatest strength: it’s not trying to be everything to everyone out of the box. Instead, it provides a clean, mathematically sound foundation (the binary tree) and powerful manipulation tools (bspc), allowing users to build their ideal workflow on top.
So Far
-
The binary tree structure and partitioning system in bspwm represents an elegant fusion of theoretical computer science and practical software engineering. By adopting binary space partitioning as its core organizational principle, bspwm achieves several important properties: deterministic layout behavior, powerful tree manipulation operations, efficient algorithms, mathematical rigor, and extensibility through scripting.
-
Understanding bspwm requires moving beyond thinking of it as merely a window manager and appreciating it as a direct implementation of computer science data structures and algorithms. The binary tree isn’t just an implementation detail—it’s the defining characteristic that makes bspwm flexible, powerful, and philosophically different from other tiling managers. Whether you use bspwm with its default automatic schemes or extend it with custom scripts, you’re working with a professionally designed data structure that has proven optimal across multiple domains of computer science.
-
For users who take time to understand the tree structure, bspwm unlocks capabilities that are difficult or impossible in other window managers: subtree rotations, surgical tree restructuring, mathematically defined layouts, and scriptable tree manipulation. This depth of capability, grounded in solid theory and elegant implementation, is why bspwm continues to appeal to advanced users and why learning its tree structure and partitioning mechanisms is well worth the effort.
Interface
Overview and Architecture
bspc (bspwm socket client) is the foundational command-line interface that enables all user interaction with the bspwm window manager. Rather than implementing complex, built-in keyboard handling or graphical menus, bspwm delegates this responsibility entirely to external tools, with bspc acting as the primary bridge between user scripts (commonly managed by sxhkd—the simple X hotkey daemon) and the bspwm daemon itself.
The architectural elegance of this design cannot be overstated. By separating concerns, bspwm maintains a lean, focused responsibility: managing the window tree structure and responding to X11 events. Meanwhile, bspc becomes the universal command-line API through which virtually all administrative and operational commands flow. This philosophy—described as “do one thing and do it well”—has enabled bspwm to become highly scriptable and customizable.
The communication model between these components follows a clear client-server pattern: sxhkd listens for keyboard and pointer events, translates them into bspc invocations, and bspc then connects to a Unix domain socket maintained by the bspwm daemon, transmitting the command and receiving responses. This architecture is typically represented as:
        PROCESS SOCKET
sxhkd --------> bspc <------> bspwm
This design ensures that bspc requires the bspwm daemon to be running; without it, commands will fail as there’s no daemon to process the messages.
Understanding bspc’s Command Structure
Domain-Based Command Hierarchy
bspc organizes all of its functionality around several primary domains, which represent different aspects of the window manager’s state that can be queried or modified. The general syntax follows this pattern:
bspc DOMAIN [SELECTOR] COMMAND [OPTIONS] [ARGUMENTS]
The primary domains are:
- node: Operations targeting individual windows (which are represented as leaf nodes in the binary tree structure)
- desktop: Operations targeting virtual desktops or workspaces
- monitor: Operations targeting physical displays or monitors
- query: Retrieving information about the current state without modifying it
- rule: Defining automatic rules for new windows
- config: Reading or setting configuration values
- wm: Whole-window-manager operations like restarting or dumping state
- subscribe: Listening to events emitted by bspwm
Each domain has its own set of subcommands and options.
Selectors: The Selection Language
One of the most powerful aspects of bspc is its sophisticated selector language, which allows precise specification of targets for commands. A selector consists of an optional reference, a descriptor, and any number of modifiers:
[REFERENCE#]DESCRIPTOR(.MODIFIER)*
This hierarchical structure enables complex queries and operations. The exclamation mark (!) can be prepended to any modifier to reverse its meaning.
Node Selectors
Node selectors target individual windows or tree nodes. The complete grammar for node selection includes:
NODE_SEL := [NODE_SEL#](DIR|CYCLE_DIR|PATH|any|first_ancestor|last|newest|
            older|newer|focused|pointed|biggest|smallest|
            <node_id>)[.[!]focused][.[!]active][.[!]automatic][.[!]local]
            [.[!]leaf][.[!]window][.[!]STATE][.[!]FLAG][.[!]LAYER]
            [.[!]SPLIT_TYPE][.[!]same_class][.[!]descendant_of]
            [.[!]ancestor_of]
The descriptors include directional references (DIR meaning north, west, south, or east), cycle directions (next, prev), path-based selection, and absolute identification by node ID.
For example:
# Focus the window to the east
bspc node east --focus

# Focus the previously focused window
bspc node last --focus

# Focus the biggest window
bspc node biggest --focus

# Focus a window by its ID
bspc node 0x01E00009 --focus

# Focus the focused window that is tiled (not floating)
bspc node focused.tiled --focus

# Focus nodes that are descendants of a specific node
bspc node @parent/descendant_of --focus
Modifiers allow filtering based on window properties:
[!]focused: Only consider the currently focused node[!]active: Only consider active nodes across all desktops[!]automatic: Only consider nodes in automatic insertion mode[!]local: Only consider nodes within the reference monitor[!]leaf: Only consider leaf nodes (actual windows)[!]window: Only consider nodes that hold windows[!]STATE: Filter by window state (tiled, pseudo_tiled, floating, fullscreen)[!]FLAG: Filter by node flags (hidden, sticky, private, locked, marked, urgent)[!]LAYER: Filter by stacking layer (below, normal, above)[!]SPLIT_TYPE: Filter by parent split type (horizontal, vertical)[!]same_class: Only consider windows of the same class as the reference[!]descendant_of: Only consider descendants of a specific node[!]ancestor_of: Only consider ancestors of a specific node
Desktop Selectors
Desktop selectors work similarly to node selectors but operate on the desktop (workspace) level:
DESKTOP_SEL := [DESKTOP_SEL#](CYCLE_DIR|any|last|newest|older|newer|
               [MONITOR_SEL:](focused|^<n>)|
               <desktop_id>|<desktop_name>)[.[!]focused][.[!]active]
               [.[!]occupied][.[!]urgent][.[!]local]
Desktop descriptors include:
CYCLE_DIR: Select next or previous desktopany: Select the first matching desktoplast: Select the previously focused desktopnewest: Select the newest desktop in the historyolder/newer: Select desktops relative to the reference in historyfocused: Select the currently focused desktop^<n>: Select the nth desktop (e.g.,^2for the second desktop)<desktop_id>: Select by unique ID<desktop_name>: Select by name
Desktop modifiers include:
[!]focused: Only consider the focused desktop[!]active: Only consider desktops that are active on their monitor[!]occupied: Only consider desktops with windows[!]urgent: Only consider desktops with urgent windows[!]local: Only consider desktops on the reference monitor
Monitor Selectors
Monitor selectors target physical displays:
MONITOR_SEL := [MONITOR_SEL#](DIR|CYCLE_DIR|any|last|newest|older|newer|
               focused|pointed|primary|^<n>|
               <monitor_id>|<monitor_name>)[.[!]focused][.[!]occupied]
Monitor descriptors include:
DIR: Select monitors in directional orderCYCLE_DIR: Cycle to next or previous monitorany: Select any monitorlast: Select the previously focused monitornewest/older/newer: Historical monitor selectionfocused: Select the currently focused monitorpointed: Select the monitor containing the pointerprimary: Select the primary monitor^<n>: Select the nth monitor<monitor_id>: Select by unique ID<monitor_name>: Select by name (e.g.,DP-1,HDMI-1)
Monitor modifiers include:
[!]focused: Only consider the focused monitor[!]occupied: Only consider monitors with occupied desktops
The Node Domain: Window Management
The node domain provides the most direct window manipulation capabilities. Nodes represent either windows (leaf nodes) or internal branching points in the binary tree structure.
Node Commands Overview
The complete set of node commands includes:
# Focus operations
bspc node [NODE_SEL] --focus [NODE_SEL]
bspc node [NODE_SEL] --activate [NODE_SEL]

# Movement operations
bspc node [NODE_SEL] --to-desktop DESKTOP_SEL [--follow]
bspc node [NODE_SEL] --to-monitor MONITOR_SEL [--follow]
bspc node [NODE_SEL] --to-node NODE_SEL [--follow]
bspc node [NODE_SEL] --swap NODE_SEL [--follow]

# Preselection (manual insertion mode)
bspc node [NODE_SEL] --presel-dir [~] DIR|cancel
bspc node [NODE_SEL] --presel-ratio RATIO

# Geometric operations
bspc node [NODE_SEL] --move dx dy
bspc node [NODE_SEL] --resize DIRECTION dx dy
bspc node [NODE_SEL] --ratio RATIO|(+|-)(PIXELS|FRACTION)
bspc node [NODE_SEL] --rotate 90|270|180
bspc node [NODE_SEL] --flip horizontal|vertical
bspc node [NODE_SEL] --equalize
bspc node [NODE_SEL] --balance

# Tree operations
bspc node [NODE_SEL] --circulate forward|backward
bspc node [NODE_SEL] --insert-receptacle

# State and property operations
bspc node [NODE_SEL] --state [~](tiled|pseudo_tiled|floating|fullscreen)
bspc node [NODE_SEL] --flag hidden|sticky|private|locked|marked[=on|off]
bspc node [NODE_SEL] --layer below|normal|above

# Lifecycle operations
bspc node [NODE_SEL] --close
bspc node [NODE_SEL] --kill
Practical Node Operations
Focus Management
Focus management is perhaps the most frequently used node operation. When a node is focused, it becomes the active window, receives keyboard input, and is typically highlighted with a colored border:
# Focus the focused window (appears redundant but useful in scripts)
bspc node focused --focus

# Focus a specific window by ID
bspc node 0x01E00009 --focus

# Focus the east window relative to currently focused
bspc node east --focus

# Focus the next window in cycle order
bspc node next --focus

# Focus the biggest window on the current desktop
bspc node biggest --focus

# Focus the smallest window on the current desktop
bspc node smallest --focus

# Focus a window that is in floating state
bspc node focused.floating --focus

# Focus a window that is NOT in floating state
bspc node focused.!floating --focus

# Focus all tiled windows on the focused desktop
# (useful in loops for batch operations)
bspc query -N -n focused -n .tiled
Window Movement and Sending
Moving windows between desktops and monitors is fundamental to bspwm’s functionality:
# Send the focused window to desktop 2
bspc node focused --to-desktop ^2

# Send the focused window to desktop 2 and follow it
bspc node focused --to-desktop ^2 --follow

# Send the focused window to the next desktop without following
bspc node focused --to-desktop next

# Send the focused window to the previous desktop
bspc node focused --to-desktop prev

# Send the focused window to the last desktop
bspc node focused --to-desktop last

# Send the focused window to the next monitor
bspc node focused --to-monitor next

# Send the focused window to the primary monitor and follow
bspc node focused --to-monitor primary --follow

# Send all windows on the current desktop to desktop 3
bspc query -N -d focused -n .window | while read node_id; do
    bspc node "$node_id" --to-desktop ^3
done
The --follow flag is particularly important. Without it, the focus remains where it was. With it, the focus “follows” the node being moved, shifting to wherever the node is sent.
Swapping Windows
Swapping exchanges the positions of two nodes in the tree, making it useful for rearranging windows:
# Swap the focused window with the east window
bspc node focused --swap east

# Swap the focused window with the next window
bspc node focused --swap next

# Swap with a specific window by ID
bspc node focused --swap 0x01E00009

# Swap focused window with its parent (all siblings swap implicitly)
bspc node focused --swap @parent

# Swap the entire desktop tree with the tree of desktop 2
bspc query -N -d focused -n @parent | head -1 | \
    xargs -I {} bspc node {} --swap @parent
Preselection: Manual Window Insertion
Preselection allows users to manually specify where the next window will be placed, overriding the automatic insertion scheme:
# Preselect the north direction for the next window
bspc node focused --presel-dir north

# Preselect west with default ratio (0.5)
bspc node focused --presel-dir west

# Preselect south with a specific ratio (30% to the south window)
bspc node focused --presel-dir south
bspc node focused --presel-ratio 0.3

# Preselect east with custom ratio (70% to the east window)
bspc node focused --presel-dir east
bspc node focused --presel-ratio 0.7

# Cancel preselection
bspc node focused --presel-dir cancel

# Toggle preselection (cancel if already set, otherwise set north)
bspc node focused --presel-dir ~north

# Preselect with dynamic ratio adjustment
# If already north, cancel; otherwise set north with ratio change
bspc node focused --presel-dir ~north
bspc node focused --presel-ratio 0.4
The preselection feedback visual (border and fill) helps users see where the window will be placed. This can be configured with:
# Set the preselection feedback color (RGB hex)
bspc config presel_feedback_color '#ff0000'

# Enable or disable the feedback visual
bspc config presel_feedback true
Window State Transitions
Windows can exist in four primary states, each representing different layout and interaction modes:
# Set window to tiled state (participates in tree layout)
bspc node focused --state tiled

# Set window to pseudo_tiled (tiled position, manually sizable)
bspc node focused --state pseudo_tiled

# Set window to floating (free positioning and sizing)
bspc node focused --state floating

# Set window to fullscreen (occupies entire monitor)
bspc node focused --state fullscreen

# Toggle between current and previous state
bspc node focused --state ~fullscreen

# Set multiple nodes to floating
bspc query -N -n .leaf | while read node_id; do
    bspc node "$node_id" --state floating
done

# Switch back to tiled from fullscreen
bspc node focused --state tiled
State transitions are crucial for workflow management. For instance, switching a window to floating state immediately removes it from the tree layout.
Node Flags: Additional Properties
Beyond state, nodes have several boolean flags that modify behavior:
# Hide a window (still in tree but not displayed)
bspc node focused --flag hidden on

# Unhide a hidden window
bspc node focused --flag hidden off

# Make a window sticky (visible on all desktops)
bspc node focused --flag sticky on

# Make a window private (can't be tiled with unrelated windows)
bspc node focused --flag private on

# Lock a node (prevents removal or structural changes)
bspc node focused --flag locked on

# Mark a node (mark for batch operations)
bspc node focused --flag marked on

# Set a node as urgent (needs attention)
bspc node focused --flag urgent on

# Toggle a flag
bspc node focused --flag marked !
Geometric Operations
Beyond the tree structure, individual nodes support geometric manipulations:
# Resize by moving the right edge 20 pixels right
bspc node focused --resize right 20 0

# Resize by moving the bottom edge 30 pixels down
bspc node focused --resize bottom 0 30

# Resize by moving both right and bottom
bspc node focused --resize bottom 20 30

# Move the window by 10 pixels right and 5 pixels down
bspc node focused --move 10 5

# Adjust the split ratio (controls window size relative to sibling)
bspc node focused --ratio 0.6  # This window gets 60% of space

# Adjust ratio by delta (add 10 pixels or +0.1 fraction)
bspc node focused --ratio +10
bspc node focused --ratio +0.1

# Rotate the split orientation of the parent node
bspc node focused --rotate 90

# Flip the orientation (vertical <-> horizontal)
bspc node focused --flip horizontal

# Equalize the sizes of all children under parent
bspc node focused --equalize

# Balance the tree (adjust ratios for visual balance)
bspc node focused --balance
Tree Circulation and Recycling
Advanced tree operations include circulation, which rotates windows around the tree:
# Circulate windows forward
bspc node focused --circulate forward

# Circulate windows backward
bspc node focused --circulate backward

# Circulate all windows on the desktop
bspc node @root --circulate forward
Window Lifecycle
Finally, nodes can be closed or killed:
# Close the focused window gracefully (sends close event)
bspc node focused --close

# Kill the focused window forcefully (terminates process)
bspc node focused --kill

# Close all windows on the current desktop
bspc query -N -d focused -n .window | while read node_id; do
    bspc node "$node_id" --close
done
The Desktop Domain: Virtual Workspace Management
The desktop domain manages virtual workspaces, allowing users to organize windows across multiple logical spaces.
Desktop Commands
Complete desktop command syntax:
# Focus operations
bspc desktop [DESKTOP_SEL] --focus [DESKTOP_SEL]
bspc desktop [DESKTOP_SEL] --activate [DESKTOP_SEL]

# Movement and organization
bspc desktop [DESKTOP_SEL] --to-monitor MONITOR_SEL [--follow]
bspc desktop [DESKTOP_SEL] --swap DESKTOP_SEL [--follow]

# Layout control
bspc desktop [DESKTOP_SEL] --layout monocle|tiled|cycle_dir

# Administrative operations
bspc desktop [DESKTOP_SEL] --rename <new_name>
bspc desktop [DESKTOP_SEL] --bubble next|prev
bspc desktop [DESKTOP_SEL] --remove
Practical Desktop Operations
Desktop Navigation
Moving between desktops is essential for multi-workspace workflows:
# Focus the next desktop on the current monitor
bspc desktop next --focus

# Focus the previous desktop
bspc desktop prev --focus

# Focus desktop by name
bspc desktop 'web' --focus

# Focus the second desktop on the current monitor
bspc desktop ^2 --focus

# Focus a specific desktop by ID
bspc desktop 0x0C00001 --focus

# Focus the last focused desktop
bspc desktop last --focus

# Cycle through unfocused desktops
bspc desktop prev.!focused --focus
Desktop Layout Control
Each desktop can use one of two primary layouts:
# Switch to tiled layout (auto-partition)
bspc desktop focused --layout tiled

# Switch to monocle layout (one window at a time, like fullscreen)
bspc desktop focused --layout monocle

# Cycle between layouts
bspc desktop focused --layout next

# Get current desktop layout
bspc query -D -d focused --names
The layout system is configurable with automatic schemes:
# Set automatic insertion scheme to longest_side
bspc config automatic_scheme longest_side

# Set to alternate (alternates split direction from parent)
bspc config automatic_scheme alternate

# Set to spiral (rotates windows in a spiral pattern)
bspc config automatic_scheme spiral

# Set initial polarity (where first child vs second child appears)
bspc config initial_polarity first_child
bspc config initial_polarity second_child
Desktop Movement Between Monitors
For multi-monitor setups, desktops can be moved between displays:
# Move the current desktop to the next monitor
bspc desktop focused --to-monitor next

# Move the current desktop to a specific monitor by name
bspc desktop focused --to-monitor DP-1

# Move and follow (focus moves to the desktop on new monitor)
bspc desktop focused --to-monitor next --follow

# Swap two desktops (swaps all their contents)
bspc desktop 1 --swap 2

# Swap with follow
bspc desktop focused --swap next --follow
Desktop Renaming and Organization
Desktops can be renamed and reordered:
# Rename the focused desktop
bspc desktop focused --rename 'workspace-1'

# Rename a specific desktop
bspc desktop web --rename 'browsing'

# Bubble the desktop (reorder within monitor)
bspc desktop focused --bubble next
bspc desktop focused --bubble prev

# Remove an empty desktop
bspc desktop empty --remove
The Monitor Domain: Multi-Display Management
The monitor domain handles operations on physical displays, critical for multi-monitor workflows.
Monitor Commands
Complete monitor command syntax:
# Focus operations
bspc monitor [MONITOR_SEL] --focus [MONITOR_SEL]

# Swapping and organization
bspc monitor [MONITOR_SEL] --swap MONITOR_SEL

# Desktop management
bspc monitor [MONITOR_SEL] --add-desktops <name>...
bspc monitor [MONITOR_SEL] --reset-desktops <name>...
bspc monitor [MONITOR_SEL] --reorder-desktops <name>...

# Geometric operations
bspc monitor [MONITOR_SEL] --rectangle WxH+X+Y

# Administrative
bspc monitor [MONITOR_SEL] --rename <new_name>
bspc monitor [MONITOR_SEL] --remove
Practical Monitor Operations
Multi-Monitor Navigation
For users with multiple displays:
# Focus the next monitor
bspc monitor next --focus

# Focus the previous monitor
bspc monitor prev --focus

# Focus the primary monitor
bspc monitor primary --focus

# Focus the monitor under the pointer
bspc monitor pointed --focus

# Focus a specific monitor by name (e.g., HDMI-1, DP-1)
bspc monitor DP-1 --focus

# Focus a monitor in a specific direction
bspc monitor north --focus
bspc monitor west --focus
Desktop Assignment to Monitors
A common configuration task is assigning specific desktops to each monitor:
# Add five desktops to the primary monitor
bspc monitor primary --add-desktops 1 2 3 4 5

# Add desktops to another monitor
bspc monitor DP-1 --add-desktops 6 7 8 9 10

# Reset desktops (replaces all existing ones)
bspc monitor primary --reset-desktops I II III IV V

# Reorder desktops on a monitor
bspc monitor focused --reorder-desktops 3 1 2
Complete Multi-Monitor Configuration
A typical multi-monitor bspwmrc might look like:
#!/bin/bash

# Kill any existing bars
killall -q polybar

# Wait for process termination
while pgrep -u $UID -x polybar >/dev/null; do sleep 1; done

# Get connected monitors using xrandr
# Configure monitors with xrandr first
xrandr --output DP-1 --primary --mode 2560x1440 --rate 60
xrandr --output HDMI-1 --mode 1920x1080 --rate 60 --right-of DP-1

# Configure bspwm for multiple monitors
bspc monitor DP-1 --reset-desktops I II III IV V
bspc monitor HDMI-1 --reset-desktops VI VII VIII IX X

# Global settings
bspc config border_width        2
bspc config window_gap         10
bspc config split_ratio        0.52
bspc config automatic_scheme   alternate
bspc config initial_polarity   second_child
bspc config remove_disabled_monitors true
bspc config remove_unplugged_monitors true

# Launch polybar for each monitor
polybar -c ~/.config/polybar/config primary &
polybar -c ~/.config/polybar/config secondary &

# Start window manager
exec bspwm
Swapping Monitors
In complex multi-monitor setups, entire monitor configurations can be swapped:
# Swap two monitors
bspc monitor primary --swap DP-1

# This swaps both the desktops and their layouts
The Query Domain: State Inspection
The query domain allows users to retrieve information about bspwm’s state without modifying it. This is essential for scripting and dynamic configuration.
Query Commands
Complete query command syntax:
# Query commands
bspc query --nodes [NODE_SEL]      # List matching node IDs
bspc query --desktops [DESKTOP_SEL] # List matching desktop IDs or names
bspc query --monitors [MONITOR_SEL] # List matching monitor IDs or names
bspc query --tree [SELECTOR]        # Print JSON tree structure

# Query options
bspc query [OPTIONS]
  --monitor [MONITOR_SEL]
  --desktop [DESKTOP_SEL]
  --node [NODE_SEL]
  --names                  # Print names instead of IDs
  --history               # Print node/desktop history
  --stack                 # Print window stacking order
Practical Query Operations
Finding Nodes
One of the most critical query operations is finding specific nodes/windows:
# List all node IDs on the focused desktop
bspc query -N -d focused

# List all window nodes (exclude parent nodes)
bspc query -N -n .window

# List all hidden nodes
bspc query -N -n .hidden

# List all floating windows on the focused desktop
bspc query -N -d focused -n .floating

# List all tiled windows on the focused desktop
bspc query -N -d focused -n .tiled

# List the biggest window on the focused desktop
bspc query -N -d focused -n biggest

# List all windows with the same class as the focused window
bspc query -N -n focused.same_class

# Find all urgent windows
bspc query -N -n .urgent

# Find the parent of the focused node
bspc query -N -n focused -n @parent

# List with names
bspc query -N --names -d focused

# Print node IDs and their names
bspc query -N -d focused --names
The output from query commands is typically node IDs in hexadecimal format (e.g., 0x01E00009), which can then be used in subsequent bspc commands.
Desktop and Monitor Queries
Similar queries work for desktops and monitors:
# List all desktops
bspc query -D

# List desktops on a specific monitor
bspc query -D -m DP-1

# List desktop names instead of IDs
bspc query -D --names

# List occupied desktops
bspc query -D -d .occupied

# List all monitors
bspc query -M

# List primary monitor
bspc query -M -m primary

# Print monitor names
bspc query -M --names

# List monitors with occupied desktops
bspc query -M -m .occupied
Tree Queries
For advanced diagnostics and state inspection, tree queries return JSON representations:
# Print the tree rooted at the focused desktop
bspc query -T -d focused

# Print the entire window tree on the primary monitor
bspc query -T -m primary

# Print the tree starting from the focused node
bspc query -T -n focused
The JSON structure provides complete tree information, useful for debugging and external tools.
Practical Query Use Cases
Queries enable sophisticated scripting patterns:
# Move the focused window to a desktop and follow it
id=$(bspc query -N -n focused); \
  bspc node -d ^2; \
  bspc node -f ${id}

# Move all floating windows to a specific desktop
bspc query -N -n .floating | while read node; do
    bspc node "$node" -d ^3
done

# Kill all hidden windows
bspc query -N -n .hidden | while read node; do
    bspc node "$node" -k
done

# Close all windows on a desktop except the focused one
focused_id=$(bspc query -N -n focused)
bspc query -N -d focused -n .window | grep -v "$focused_id" | while read node; do
    bspc node "$node" -c
done

# Get the largest window and focus it
largest=$(bspc query -N -d focused -n biggest)
bspc node "$largest" -f

# List all windows and their states
bspc query -N -d focused --names | while read node; do
    echo "Node: $node"
done
The Rule Domain: Window Auto-Configuration
The rule domain defines automatic behaviors for new windows based on their class, instance, or name.
Rule Commands
Complete rule command syntax:
# Add a rule
bspc rule --add (<class_name>|*)[:(<instance_name>|*)[:(<name>|*)]]
           [-o|--one-shot]
           [monitor=MONITOR_SEL|desktop=DESKTOP_SEL|node=NODE_SEL]
           [state=STATE]
           [layer=LAYER]
           [split_dir=DIR]
           [split_ratio=RATIO]
           [(hidden|sticky|private|locked|marked|center|follow|manage|focus|border)=(on|off)]
           [rectangle=WxH+X+Y]

# Remove rules
bspc rule --remove ^<n>|head|tail|(<class_name>|*)[:(<instance_name>|*)[:(<name>|*)]]

# List rules
bspc rule --list
Window Classification
To create effective rules, one must first identify window class and instance names. The standard tool for this is xprop:
# Get window properties
xprop

# Then click on the window you want to identify
# Look for the WM_CLASS line, which shows format: "instance", "class"
# Example output: WM_CLASS(STRING) = "firefox", "Firefox"
Common Rule Patterns
Typical bspwmrc rule definitions follow patterns like:
#!/bin/bash

# Remove all existing rules first
bspc rule -r '*'

# Define rules for various applications
bspc rule -a Gimp desktop=^8 state=floating
bspc rule -a Chromium desktop=^2
bspc rule -a mplayer2 state=floating
bspc rule -a Kupfer.py focus=on
bspc rule -a Screenkey manage=off
bspc rule -a Pavucontrol state=floating
bspc rule -a Pcmanfm state=floating center=on

# Firefox rules - instance:class format
bspc rule -a firefox desktop=^1 focus=on

# Terminal floating windows
bspc rule -a st-floating state=floating

# Specific floating size
bspc rule -a st rectangle=800x600+10+10 state=floating

# One-shot rules (apply only once)
bspc rule -a 'VirtualBox.*' -o state=floating
Rule Properties
Rules can control numerous window properties:
# Monitor and desktop placement
bspc rule -a myapp monitor=DP-1 desktop=^3

# Node placement (insert into specific parent)
bspc rule -a myapp node=@parent

# Window state
bspc rule -a myapp state=floating
bspc rule -a myapp state=fullscreen
bspc rule -a myapp state=pseudo_tiled

# Stacking layer
bspc rule -a myapp layer=above
bspc rule -a myapp layer=below

# Split parameters for new nodes
bspc rule -a myapp split_dir=north split_ratio=0.5

# Node flags
bspc rule -a myapp hidden=on
bspc rule -a myapp sticky=on
bspc rule -a myapp private=on
bspc rule -a myapp locked=on
bspc rule -a myapp marked=on

# Behavior modifiers
bspc rule -a myapp follow=on           # Follow to new desktop
bspc rule -a myapp center=on           # Center window
bspc rule -a myapp manage=off          # Don't manage (no decorations)
bspc rule -a myapp focus=on            # Focus immediately
bspc rule -a myapp border=on           # Draw border

# Floating rectangle specification
bspc rule -a myapp rectangle=640x480+100+100
Advanced Rule Techniques
One-Shot Rules
One-shot rules apply only once and are then automatically removed:
# Rule applies only to the first instance
bspc rule -a 'firefox' -o desktop=^1

# Useful for startup applications
bspc rule -a 'rofi' -o state=floating sticky=on
Pattern Matching Rules
Rules can use wildcards and patterns:
# Match all Firefox-derived applications
bspc rule -a 'firefox*' desktop=^1

# Match any instance of a class
bspc rule -a 'st' state=floating

# Match specific instance:class combination
bspc rule -a 'keepassxc:KeePassXC' state=floating center=on
Complex Rule Chains
Multiple rules can be layered to create sophisticated behaviors:
# Specific application instances first (most specific)
bspc rule -a 'mpv:mpv' state=floating rectangle=960x540+10+10

# General class rules (less specific)
bspc rule -a 'mpv' desktop=^4

# Fallback behaviors
bspc rule -a 'Floating*' state=floating
The Config Domain: System Configuration
The config domain allows reading and setting configuration values that control bspwm’s behavior.
Global Settings
Global settings affect the entire window manager:
# Colors (RGB hex format)
bspc config normal_border_color         '#222222'
bspc config active_border_color         '#555555'
bspc config focused_border_color        '#ff0000'
bspc config presel_feedback_color       '#ff0000'

# Dimensions
bspc config border_width                2
bspc config window_gap                  10
bspc config split_ratio                 0.52

# Insertion scheme
bspc config automatic_scheme            alternate
bspc config initial_polarity            second_child

# Layout behavior
bspc config borderless_monocle          true
bspc config gapless_monocle             true
bspc config single_monocle              false
bspc config top_monocle_padding         0
bspc config right_monocle_padding       0
bspc config bottom_monocle_padding      0
bspc config left_monocle_padding        0

# Pointer interaction
bspc config pointer_modifier            mod1
bspc config pointer_motion_interval     25
bspc config pointer_action1             move
bspc config pointer_action2             resize_side
bspc config pointer_action3             resize_corner
bspc config click_to_focus              button1
bspc config focus_follows_pointer       false
bspc config pointer_follows_focus       false
bspc config pointer_follows_monitor     false

# Focus and behavior
bspc config directional_focus_tightness low
bspc config removal_adjustment          unbalanced
bspc config center_pseudo_tiled         true
bspc config honor_size_hints            true

# External rules command
bspc config external_rules_command      "/path/to/rules/script"

# Status reporting
bspc config status_prefix               ''
bspc config mapping_events_count        -1

# EWMH compliance
bspc config ignore_ewmh_focus           false
bspc config ignore_ewmh_fullscreen      'enter'
bspc config ignore_ewmh_struts          false

# Monitor management
bspc config remove_disabled_monitors    true
bspc config remove_unplugged_monitors   true
bspc config merge_overlapping_monitors  false
Per-Monitor and Per-Desktop Settings
Some settings can be applied to specific monitors or desktops:
# Per-monitor padding
bspc config -m DP-1 top_padding 50
bspc config -m DP-1 bottom_padding 0
bspc config -m DP-1 left_padding 0
bspc config -m DP-1 right_padding 0

# Per-desktop window gap
bspc config -d '^1' window_gap 20
bspc config -d '^2' window_gap 0

# Per-node border width
bspc config -n focused border_width 3
bspc config -n unfocused border_width 1
Reading Configuration
To read current settings:
# Read a specific setting
bspc config border_width

# Read all settings (returns name value pairs)
bspc config

# Check a boolean setting
bspc config focus_follows_pointer
Common Configuration Examples
A typical complete configuration:
#!/bin/bash

# bspwmrc - bspwm configuration script

# Monitor setup (done before bspc commands)
xrandr --output DP-1 --mode 2560x1440 --rate 60 --primary
xrandr --output HDMI-1 --mode 1920x1080 --rate 60 --right-of DP-1

# Setup desktops
bspc monitor DP-1 -d 1 2 3 4 5
bspc monitor HDMI-1 -d 6 7 8 9 10

# Border and window gap
bspc config border_width 2
bspc config window_gap 8

# Colors
bspc config focused_border_color "#ff6600"
bspc config active_border_color "#0066ff"
bspc config normal_border_color "#333333"
bspc config presel_feedback_color "#ff6600"

# Insertion and layout
bspc config split_ratio 0.52
bspc config automatic_scheme alternate
bspc config initial_polarity first_child

# Monocle layout settings
bspc config borderless_monocle true
bspc config gapless_monocle true
bspc config single_monocle false

# Focus behavior
bspc config focus_follows_pointer false
bspc config pointer_follows_focus false

# Rules
bspc rule -r "*"
bspc rule -a Gimp state=floating
bspc rule -a firefox desktop=^1
bspc rule -a Chromium desktop=^2
bspc rule -a mpv state=floating
The Subscribe Domain: Event Streaming
The subscribe domain allows external programs to receive real-time notifications about changes in bspwm’s state.
Subscribe Commands
Complete subscribe command syntax:
# Subscribe to events
bspc subscribe [OPTIONS] (all|report|monitor|desktop|node|...)*

# Options
--fifo                  # Output to FIFO file
--count COUNT           # Exit after COUNT events
Event Types
The available events include:
monitor events:
  monitor_add <monitor_id> <monitor_name> <monitor_geometry>
  monitor_rename <monitor_id> <old_name> <new_name>
  monitor_remove <monitor_id>
  monitor_swap <src_monitor_id> <dst_monitor_id>
  monitor_focus <monitor_id>
  monitor_geometry <monitor_id> <monitor_geometry>

desktop events:
  desktop_add <monitor_id> <desktop_id> <desktop_name>
  desktop_rename <monitor_id> <desktop_id> <old_name> <new_name>
  desktop_remove <monitor_id> <desktop_id>
  desktop_swap <src_monitor_id> <src_desktop_id> <dst_monitor_id> <dst_desktop_id>
  desktop_transfer <src_monitor_id> <src_desktop_id> <dst_monitor_id>
  desktop_focus <monitor_id> <desktop_id>
  desktop_activate <monitor_id> <desktop_id>
  desktop_layout <monitor_id> <desktop_id> tiled|monocle

node events:
  node_add <monitor_id> <desktop_id> <ip_id> <node_id>
  node_remove <monitor_id> <desktop_id> <node_id>
  node_swap <src_monitor_id> <src_desktop_id> <src_node_id>
            <dst_monitor_id> <dst_desktop_id> <dst_node_id>
  node_transfer <src_monitor_id> <src_desktop_id> <src_node_id>
                <dst_monitor_id> <dst_desktop_id> <dst_node_id>
  node_focus <monitor_id> <desktop_id> <node_id>
  node_activate <monitor_id> <desktop_id> <node_id>
  node_presel <monitor_id> <desktop_id> <node_id> (dir DIR|ratio RATIO|cancel)
  node_stack <node_id_1> below|above <node_id_2>
  node_geometry <monitor_id> <desktop_id> <node_id> <node_geometry>
  node_state <monitor_id> <desktop_id> <node_id> tiled|pseudo_tiled|floating|fullscreen on|off
  node_flag <monitor_id> <desktop_id> <node_id> hidden|sticky|private|locked|marked|urgent on|off
  node_layer <monitor_id> <desktop_id> <node_id> below|normal|above

pointer events:
  pointer_action <monitor_id> <desktop_id> <node_id> move|resize_corner|resize_side begin|end

report events:
  report <status_string>
Practical Subscription Usage
Event subscription is typically used for status bars, external tools, and automation:
# Subscribe to all events
bspc subscribe all

# Subscribe to only desktop changes
bspc subscribe desktop

# Subscribe to node-related events only
bspc subscribe node

# Subscribe and exit after 10 events
bspc subscribe --count 10 all

# Parse events in a script
bspc subscribe monitor desktop | while read -r event; do
    case "$event" in
        monitor_focus*)
            echo "Monitor focus changed: $event"
            ;;
        desktop_focus*)
            echo "Desktop focus changed: $event"
            ;;
    esac
done

# Use with FIFO for status bar
bspc subscribe --fifo /tmp/bspwm_fifo report &
while true; do
    read -r status < /tmp/bspwm_fifo
    echo "$status"  # Update polybar or other status system
done
Status Report Format
The report event provides a compact status string with specific format:
Each report event consists of items separated by colons, where each item has the form `<type><value>`:
M<monitor_name>     - Monitor
m<monitor_name>     - Focused monitor
O<desktop_name>     - Occupied desktop (has windows)
o<desktop_name>     - Focused desktop
F<desktop_name>     - Active desktop
f<desktop_name>     - Focused and active desktop
U<desktop_name>     - Urgent desktop
u<desktop_name>     - Focused and urgent desktop
L(T|M)              - Layout (Tiled or Monocle)
T(T|P|F|=|@)        - Window state (Tiled, Pseudo-tiled, Floating, Equal, or Parent)
G(S?P?L?M?)         - Geometric flags
Example status strings:
m1:o1:Lclient:client.focused:O2:o3:o4:T1:L2:Tiled
m1:O1:o2:T1:L3:Monocle
The Wm Domain: Window Manager Operations
The wm domain provides system-level operations on the window manager itself.
Wm Commands
Complete wm command syntax:
# State operations
bspc wm --dump-state
bspc wm --load-state <file_path>

# Monitor operations
bspc wm --add-monitor <name> WxH+X+Y
bspc wm --reorder-monitors <name>...
bspc wm --adopt-orphans

# History and status
bspc wm --record-history on|off
bspc wm --get-status

# Lifecycle
bspc wm --restart
Practical Wm Operations
State Dump and Restore
The most complex wm operations involve saving and restoring complete window manager state:
# Dump the entire window manager state to a file
bspc wm --dump-state > ~/bspwm_state.json

# Later, restore the state
bspc wm --load-state ~/bspwm_state.json

# This is useful for:
# - Saving layouts before reconfiguring monitors
# - Recreating specific desktop layouts
# - Session persistence
Monitor Reordering
The reorder-monitors command allows changing monitor order:
# Reorder monitors (affects desktop cycling order)
bspc wm --reorder-monitors DP-1 HDMI-1

# Useful in multi-monitor scripts
xrandr --output DP-1 --mode 2560x1440 --primary
xrandr --output HDMI-1 --mode 1920x1080 --right-of DP-1
bspc wm --reorder-monitors DP-1 HDMI-1
Adopting Orphaned Windows
When monitors are physically removed or disabled, windows may become orphaned:
# Reassign orphaned windows to remaining monitors
bspc wm --adopt-orphans

# Useful in laptop docking/undocking scenarios
History Recording
For debugging and advanced use cases, window manager history can be recorded:
# Enable history recording
bspc config record_history true

# Disable it
bspc config record_history false
Getting Manager Status
The get-status command provides current status information:
# Get the current manager status
bspc wm --get-status

# Returns the same format as report events
Restarting the Window Manager
One of the most important wm operations is restarting bspwm while preserving state:
# Restart bspwm (preserves window layout)
bspc wm --restart

# Full restart with state loss
killall bspwm; bspwm &
Advanced bspc Patterns and Use Cases
Complex Scripting Examples
Dynamic Workspace Creation
A common pattern is creating workspaces on demand:
#!/bin/bash

# Create a new desktop on the focused monitor if not already present
create_desktop_if_missing() {
    local desktop_name=$1

    # Check if desktop already exists
    if bspc query -D -d "$desktop_name" >/dev/null 2>&1; then
        # Desktop exists, just focus it
        bspc desktop "$desktop_name" --focus
    else
        # Create new desktop
        bspc monitor focused --add-desktops "$desktop_name"
        bspc desktop "$desktop_name" --focus
    fi
}

# Usage
create_desktop_if_missing 'work'
Intelligent Window Movement
Moving windows with context awareness:
#!/bin/bash

# Move window to a specific app's desktop
move_to_app_desktop() {
    local app_class=$1
    local app_desktop

    # Find desktop where app exists
    app_desktop=$(bspc query -D -d ".occupied" | while read desktop; do
        if bspc query -N -d "$desktop" -n ".window" | \
           xdotool search --class "$app_class" 2>/dev/null >/dev/null; then
            echo "$desktop"
            break
        fi
    done)

    if [ -n "$app_desktop" ]; then
        # Move focused window to app's desktop
        bspc node focused --to-desktop "$app_desktop" --follow
    fi
}

# Usage
move_to_app_desktop 'Firefox'
Window Layout Templates
Pre-configured layouts that can be applied to desktops:
#!/bin/bash

# Apply a three-column layout to the focused desktop
layout_three_column() {
    # Add three windows vertically first
    local desktop=$(bspc query -D -d focused)

    # First window gets 50% width (splits vertically)
    bspc node -d "$desktop" -n first -p west -o 0.5

    # Second window gets 25% width
    bspc node -d "$desktop" -n second -p west -o 0.5
}

# Apply a main+side layout
layout_main_side() {
    bspc node focused --presel-dir east --presel-ratio 0.7
}
Focus Ring Management
Cycling through windows in focus order:
#!/bin/bash

# Cycle focus through windows
cycle_focus() {
    local direction=${1:-next}

    # Get current node
    local current=$(bspc query -N -n focused)

    # Get all window nodes on desktop
    local nodes=$(bspc query -N -n ".window" | grep -v "$current")

    # Focus next or previous
    local next_node=$(echo "$nodes" | head -1)
    if [ -n "$next_node" ]; then
        bspc node "$next_node" --focus
    fi
}

# Usage
cycle_focus next
cycle_focus prev
Workspace Stashing
Temporarily hiding windows for focus:
#!/bin/bash

# Hide all windows except focused on current desktop
stash_others() {
    local focused=$(bspc query -N -n focused)

    bspc query -N -d focused -n ".window" | while read node; do
        if [ "$node" != "$focused" ]; then
            bspc node "$node" --flag hidden on
        fi
    done
}

# Restore stashed windows
unstash() {
    bspc query -N -n ".hidden" -d focused | while read node; do
        bspc node "$node" --flag hidden off
    done
}
Interactive Window Selection
Using external tools with bspc for enhanced interactivity:
#!/bin/bash

# Use dmenu to select and focus window
select_window_dmenu() {
    # Get list of windows
    local windows=$(bspc query -N -n ".window" --names)

    # Use dmenu for selection
    local selected=$(echo "$windows" | dmenu -l 10)

    if [ -n "$selected" ]; then
        # Extract node ID and focus it
        # Note: This is a simplified example
        local node_id=$(bspc query -N -n ".window" --names | \
                       grep "$selected" | head -1)
        bspc node "$node_id" --focus
    fi
}
Integration with Other Tools
Polybar Integration
Status bars need constant bspwm state updates:
#!/bin/bash

# Module for polybar
get_bspwm_status() {
    bspc subscribe report | while read -r report; do
        # Parse report format
        # Extract relevant parts for display

        # Get focused desktop
        focused_desktop=$(echo "$report" | grep -o 'o[0-9]*' | sed 's/o//')

        # Get occupied desktops
        occupied=$(echo "$report" | grep -o 'O[0-9]*' | sed 's/O//')

        # Format for display
        echo "[$focused_desktop] $occupied"
    done
}
Dunst Notifications
Sending notifications on bspwm events:
#!/bin/bash

# Watch for desktop changes and notify
bspc subscribe desktop | while read -r event; do
    case "$event" in
        desktop_focus*)
            desktop=$(echo "$event" | awk '{print $NF}')
            dunstify -u low -t 1000 "Focus: Desktop $desktop"
            ;;
    esac
done
External Rules Commands
Complex rule logic can be delegated to external scripts:
#!/bin/bash
# external-rules.sh

# Get window properties
id=$1
class=$2
instance=$3
name=$4

# Complex rule logic
if [[ "$class" == "Firefox" ]]; then
    desktop=1
elif [[ "$class" == "Blender" ]]; then
    desktop=3
    echo "state=fullscreen"
else
    desktop=0
fi

echo "desktop=^$desktop"
Then configure bspwm to use it:
bspc config external_rules_command "/path/to/external-rules.sh"
Performance Optimization
For efficient scripting with large numbers of windows:
# Batch operations
# Instead of:
for i in {1..100}; do
    bspc node $id --resize right 10 0
done

# Do:
bspc node $id --resize right 1000 0

# Query once and reuse results
nodes=$(bspc query -N -d focused -n .window)
echo "$nodes" | while read node; do
    # Use $node multiple times
    bspc node "$node" --state floating
    bspc node "$node" --move 100 100
done

# Use pipes efficiently
bspc query -N -n .marked | xargs -I {} bspc node {} --flag marked off
Internal Implementation Details
Socket Communication Protocol
bspc communicates with bspwm via a Unix domain socket, typically located at `/tmp/bspwm<hostname>_<display>_<screen>-socket`[^1_1][^1_17][^1_2][^1_7]. The protocol is text-based, with commands formatted as strings sent to the socket[^1_1][^1_17][^1_2].
The message format follows this pattern:
<COMMAND> [SELECTOR] <OPERATIONS>
Where each component is space-separated and parameters with special characters are properly quoted.
The socket communication flow works as follows:
- bspc opens a connection to the bspwm socket
- Sends the formatted command string
- Receives a response (typically empty for successful commands, or an error message)
- For query commands, receives the requested data
- Closes the connection
This is a one-shot request-response model, with each invocation of bspc creating a new socket connection.
Selector Parsing and Resolution
The selector system involves complex parsing logic that resolves descriptors and modifiers into specific tree nodes. The parsing follows a hierarchical approach:
- Reference Parsing: Extract the reference node/desktop/monitor using
#as separator - Descriptor Parsing: Parse the primary descriptor (DIR, name, ID, etc.)
- Modifier Parsing: Apply each modifier in sequence with
.as separator - Resolution: Walk the tree structure to find the target
For directional selectors, bspwm walks the tree looking for nodes in the specified direction. For ID-based selectors, it performs a hash lookup. For name-based selectors, it searches the tree by name property.
Binary Tree Structure
The core data structure in bspwm is a full binary tree where:
- Each internal node represents a split (horizontal or vertical)
- Each internal node has exactly two children
- Each leaf node holds a window
- Each node has associated geometry (rectangle) and split parameters
When a window is inserted, the tree is restructured to accommodate it according to the insertion mode (automatic or manual). The insertion process:
- Finds the insertion point (usually the focused leaf)
- Creates a new internal node
- Attaches the existing window as one child
- Attaches the new window as the other child
- Assigns split parameters based on insertion mode
When a window is removed:
- The containing leaf node is removed
- The parent internal node is also removed
- The sibling subtree is promoted to replace the parent
This tree structure enables efficient window layout management and complex tiling patterns.
So Far
-
The bspc command and its underlying infrastructure represent a masterpiece of Unix philosophy applied to window management. By separating concerns between the window manager daemon, the command-line interface, and external tools, bspwm achieves remarkable flexibility and scriptability.
-
Understanding bspc deeply—from basic window operations through advanced query patterns and complex scripting—unlocks the full potential of bspwm. Whether managing a simple two-monitor setup or automating complex workflows across dozens of windows, bspc provides the precise control necessary to bend window management to your specific needs.
-
The socket-based communication model, sophisticated selector language, and event streaming capabilities combine to create an environment where external tools can seamlessly integrate with and extend bspwm’s functionality. This design has proven so effective that it has influenced other window managers and continues to attract a dedicated community of power users.
-
As you become more proficient with bspc, you’ll find yourself creating increasingly sophisticated workflows, custom integrations, and automated tasks that would be impossible or extremely difficult to implement in monolithic window managers. The investment in learning bspc’s command structure and internals pays dividends through a remarkably powerful and personalized window management system.
Writing Configs
Executive Summary
This documentation provides an in-depth exploration of bspwm (Binary Space Partitioning Window Manager) configuration, derived entirely from authoritative web sources. BSPWM is a sophisticated tiling window manager that represents windows as leaves of a full binary tree, controlled entirely through the bspc command-line client. This guide comprehensively covers every flag, command-line option, configuration setting, and advanced technique required to create a highly sophisticated and customized BSPWM environment. The documentation is organized to progress from foundational concepts through complex configuration scenarios, with detailed explanations of each component extracted directly from official documentation and community resources.
Understanding the Architecture and Fundamental Concepts
The Binary Space Partitioning Model
BSPWM fundamentally operates differently from other tiling window managers through its binary tree architecture. Unlike traditional grid-based layouts, BSPWM represents windows as the leaves of a full binary tree, where each split divides the available space into exactly two nodes. This architectural choice provides exceptional flexibility for window arrangements and enables sophisticated manipulation of window layouts through tree operations. The window manager only responds to X11 events and messages received on a dedicated socket, which is handled exclusively through the bspc client.
The Client-Server Model
The relationship between BSPWM and its control interface is built on a socket-based client-server model. BSPWM itself runs as a daemon and listens on a socket for messages from bspc, the command-line client that sends configuration commands and window management instructions. This separation provides exceptional modularity and allows complete configuration through shell scripts, making BSPWM exceptionally scriptable compared to window managers that require specialized configuration languages. The socket path, by default, follows the pattern /tmp/bspwm<hostname>_<display>_<screen>-socket, but can be customized through the BSPWM_SOCKET environment variable.
Configuration File Structure
BSPWM configuration resides in a single shell script located at $XDG_CONFIG_HOME/bspwm/bspwmrc, which typically resolves to ~/.config/bspwm/bspwmrc. This configuration file contains shell commands that invoke bspc to set up the window manager environment. The beauty of this approach lies in its simplicity: no special configuration language is required, and users can leverage any shell scripting capabilities to create dynamic, conditional configurations. When BSPWM starts, it executes this shell script, which should contain commands to start necessary daemons (like keyboard managers), set up monitors and desktops, configure display properties, and launch supporting applications.
BSPWM Command Structure and Domains
Overview of the BSPC Command
The bspc command functions as the exclusive interface to BSPWM, accepting a specific structure that organizes functionality into domains. The general syntax follows: bspc DOMAIN [SELECTOR] COMMANDS. This structure allows granular control over window manager behavior, from global settings to desktop-specific configurations to individual window manipulations. Understanding this hierarchical structure is essential for creating sophisticated configurations.
Available Domains and Their Purposes
BSPWM organizes all functionality into six primary domains:
- node: Controls individual window (node) operations
- desktop: Manages desktop/workspace-level settings
- monitor: Handles monitor-specific configurations
- query: Retrieves metadata and state information
- rule: Defines window matching and application rules
- wm: Controls global window manager states
Additionally, specialized domains handle config, subscribe, and quit operations. The subscribe domain enables event-driven scripting, a powerful feature for creating dynamic window management behaviors.
Node Domain: Individual Window Control
Node-Specific Commands
The node domain manages individual windows (called nodes in BSPWM terminology). When no selector is provided, the command defaults to the focused node. All node operations follow the syntax: bspc node [NODE_SEL] COMMAND.
Focus Operations: -f and --focus
The -f or –focus flag changes focus to a specified node. When used alone, it focuses the selected node; when given a NODE_SEL argument, it focuses that specific node. For example:
bspc node -f west- Focus the window to the westbspc node -f biggest- Focus the largest window
The focus command respects node selectors and modifiers, enabling complex selection patterns.
Activation: -a and --activate
The -a or –activate flag differs from focus by setting a node as active without necessarily giving it keyboard focus. This distinction is important in multi-monitor setups where you may want to highlight a window’s visual state independently of input focus. The activate command accepts an optional NODE_SEL parameter.
Desktop Transfer: -d and --to-desktop
The -d or –to-desktop flag sends a node to a specified desktop. The syntax is: bspc node -d DESKTOP_SEL. The optional –follow flag can be appended to maintain focus on the moved node after transfer. For example:
bspc node -d '^2' --follow- Move focused node to desktop 2 and maintain focus
Monitor Transfer: -m and --to-monitor
The -m or –to-monitor flag transfers a node to a specified monitor. Syntax: bspc node -m MONITOR_SEL. The –follow flag similarly maintains focus after the transfer. This is particularly useful in multi-monitor setups for dynamically redistributing windows.
Node-to-Node Transfer: -n and --to-node
The -n or –to-node flag moves a node to become a sibling of another specified node. This powerful operation enables precise positioning within the binary tree structure. The –follow flag again allows focus to follow the transferred node. Example:
bspc node -n newest.!automatic.local- Move focused node to the newest preselected area
Swapping Nodes: -s and --swap
The -s or –swap flag exchanges positions of two nodes in the tree, effectively swapping their visual positions and tiling spaces. The syntax is: bspc node -s NODE_SEL. The –follow flag moves focus to the swapped node’s new position. This differs from moving: the nodes exchange places rather than one replacing the other.
Preselection Direction: -p and --presel-dir
The -p or –presel-dir flag enables manual insertion mode by specifying where the next spawned window should appear relative to the current node. Valid directions are: north, south, east, west. Additionally, ~DIR syntax cancels a preselection if it matches the specified direction. For example:
bspc node -p east- Next window spawns to the east of current nodebspc node -p ~east- Cancel east preselection if currently active
Preselection Ratio: -o and --presel-ratio
The -o or –presel-ratio flag sets the proportion of space allocated to the preselected area. The RATIO parameter must be between 0 and 1. For instance, bspc node -o 0.4 allocates 40% of space to the preselected area and 60% to the existing content. This works in conjunction with preselection direction.
Node Movement: -v and --move
The -v or –move flag shifts a node’s position by pixel offsets. Syntax: bspc node -v dx dy. Both dx and dy are pixel values representing horizontal and vertical displacement. This command is particularly useful for floating windows, allowing pixel-perfect positioning adjustments.
Node Resizing: -z and --resize
The -z or –resize flag adjusts node dimensions by specifying an edge and pixel adjustments. Valid edges include: top, left, bottom, right, top_left, top_right, bottom_right, bottom_left. Syntax: bspc node -z EDGE dx dy. The dx and dy values represent horizontal and vertical pixel adjustments. For example:
bspc node -z right 20 0- Expand right edge by 20 pixels
Node Type/Split Cycling: -y and --type
The -y or –type flag changes or cycles the split type of a node’s parent. Valid arguments are horizontal, vertical, or next to cycle between types. This operation rotates the tree’s splitting orientation. Example:
bspc node -y next- Toggle between horizontal and vertical splits
Split Ratio Adjustment: -r and --ratio
The -r or –ratio flag modifies the split ratio of a node’s parent, controlling space distribution between siblings. Syntax: bspc node -r RATIO where RATIO is a decimal from 0-1, or (+|-)(PIXELS|FRACTION) for relative adjustments. For instance:
bspc node -r 0.6- Set split ratio to 60/40bspc node -r +0.05- Increase split ratio by 5%
Tree Rotation: -R and --rotate
The -R or –rotate flag rotates the tree rooted at the selected node. Valid angles are: 90, 270, 180. This operation is useful for dynamically rearranging window hierarchies. Example:
bspc node -R 90- Rotate tree 90 degrees clockwise
Tree Flipping: -F and --flip
The -F or –flip flag flips the tree rooted at the selected node. Valid directions are: horizontal, vertical. This mirrors the tree structure along the specified axis. Example:
bspc node -F horizontal- Flip tree horizontally
Tree Equalization: -E and --equalize
The -E or –equalize flag resets all split ratios within a node’s subtree to their default values (typically 0.5). This is useful for restoring a balanced layout after manual ratio adjustments.
Tree Balancing: -B and --balance
The -B or –balance flag adjusts split ratios within a subtree so all leaves occupy equal area. Unlike equalization, which resets all ratios identically, balancing respects the existing tree structure while equalizing final window areas.
Tree Circulation: -C and --circulate
The -C or –circulate flag moves windows within a tree in a circular pattern. Valid directions are: forward, backward. This operation is particularly useful for dynamic window rotation without explicit swapping.
Node State: -t and --state
The -t or –state flag changes a node’s state (tiling mode). Valid states are: tiled, pseudo_tiled, floating, fullscreen. The ~ prefix toggles to the previous state if the current state matches, or restores the previous state if no state is specified. Syntax: bspc node -t STATE. Examples:
bspc node -t floating- Make window floatingbspc node -t ~floating- Toggle floating state
Node Flags: -g and --flag
The -g or –flag flag manages binary flags that modify node behavior. Valid flags are: hidden, sticky, private, locked, marked, urgent. The flag syntax accepts optional =on|off to explicitly set state. Each flag serves a specific purpose:
- hidden: Node is hidden and doesn’t occupy tiling space
- sticky: Node stays on the focused desktop of its monitor
- private: Node resists movement and resizing during automatic insertion
- locked: Node ignores the close (
-c) message - marked: Arbitrary flag used for custom operations; unmarked automatically when sent to a preselected node
- urgent: Indicates window urgency (typically set externally); used for window selection
Examples:
bspc node -g sticky=on- Make window stickybspc node -g marked- Toggle marked flag
Node Layering: -l and --layer
The -l or –layer flag changes a node’s stacking layer. Valid layers are: below, normal, above. BSPWM maintains three stacking layers where below < normal < above, and within each layer: tiled/pseudo_tiled < floating < fullscreen. Examples:
bspc node -l above- Place window above all othersbspc node -l below- Place window below all others
Receptacle Insertion: -i and --insert-receptacle
The -i or --insert-receptacle flag creates a receptacle (empty leaf node) at the selected node’s position. Receptacles are particularly useful for creating predefined layouts that can be filled with windows later.
Node Closure: -c and --close
The -c or –close flag closes a node by sending it the close message. This respects the locked flag; if set, the message is ignored.
Node Termination: -k and –kill
The -k or –kill flag forcibly terminates a node’s window regardless of flags or settings. This is a hard termination that bypasses all safety mechanisms.
Node Selector Syntax
Node selectors determine which nodes are affected by commands. They follow the pattern: [REFERENCE#]DESCRIPTOR[.MODIFIER]*.
Node Descriptors
Descriptors specify the initial node selection:
- DIR (north|west|south|east): Relative direction
- CYCLE_DIR (next|prev): Cyclic direction
- any: Any node
- first_ancestor: First non-leaf ancestor
- last: Most recently focused
- newest: Most recently created
- older: Older than focused in history
- newer: Newer than focused in history
- focused: Currently focused node
- pointed: Node under mouse pointer
- biggest: Largest node by area
- smallest: Smallest node by area
- <node_id>: Direct node ID reference
Node Modifiers
Modifiers further filter the selection:
- [!]focused: Currently/not currently focused
- [!]active: Active/not active on desktop
- [!]automatic: In automatic/manual insertion mode
- [!]local: On/not on current desktop
- [!]leaf: Is/isn’t a leaf node
- [!]window: Has/doesn’t have a window
- [!]STATE: Matches/doesn’t match state (tiled|pseudo_tiled|floating|fullscreen)
- [!]FLAG: Has/doesn’t have flag (hidden|sticky|private|locked|marked|urgent)
- [!]LAYER: On/not on layer (below|normal|above)
- [!]SPLIT_TYPE: Split type (horizontal|vertical)
- [!]same_class: Same/different class as focused
- [!]descendant_of: Is/isn’t descendant of reference
- [!]ancestor_of: Is/isn’t ancestor of reference
Path Jumps
Path jumps navigate the tree structure:
- first|1: First child
- second|2: Second child
- brother: Sibling node
- parent: Parent node
- DIR: Directional jump
Desktop Domain: Workspace Management
Desktop-Specific Commands
The desktop domain manages workspace-level settings and operations. Syntax: bspc desktop [DESKTOP_SEL] COMMAND. If no DESKTOP_SEL is provided, the focused desktop is targeted.
Desktop Focus: -f and --focus
The -f or –focus flag switches focus to a specified desktop. Example:
bspc desktop -f '^2'- Focus the 2nd desktopbspc desktop -f next- Focus next desktop
Desktop Activation: -a and --activate
The -a or –activate flag sets a desktop as active (similar to node activation). This is distinct from focus and is useful in multi-monitor scenarios.
Desktop Transfer to Monitor: -m and --to-monitor
The -m or --to-monitor flag transfers a desktop to a different monitor. Syntax: bspc desktop -m MONITOR_SEL. The optional –follow flag moves focus to the transferred desktop.
Desktop Swapping: -s and --swap
The -s or –swap flag exchanges two desktops. Syntax: bspc desktop -s DESKTOP_SEL. The –follow flag maintains focus continuity.
Layout Selection: -l and --layout
The -l or --layout flag sets or cycles the desktop’s layout. Valid layouts are: tiled, monocle, or next to cycle. BSPWM provides two built-in layouts:
- tiled: Standard binary space partitioning with visible splits
- monocle: Fullscreen layout where only the most recently focused tiled/pseudo_tiled window is visible
Examples:
bspc desktop -l monocle- Switch to monocle layoutbspc desktop -l next- Cycle to next layout
Desktop Renaming: -n and --rename
The -n or --rename flag changes a desktop’s name. Syntax: bspc desktop -n <new_name>. Desktop names are used in keybindings and configurations.
Desktop Cycling: -b and --bubble
The -b or --bubble flag moves a desktop within the monitor’s desktop list. Direction values are next or prev. This reorders desktops without changing their content.
Desktop Removal: -r and `–remove**
The -r or --remove flag deletes a desktop. Windows on the removed desktop are transferred to the next available desktop.
Desktop Selector Syntax
Desktop selectors determine which desktops are affected.
Desktop Descriptors
- CYCLE_DIR (next|prev): Cyclic direction
- any: Any desktop
- last: Most recently focused
- newest: Most recently created
- older: Older in history
- newer: Newer in history
- focused: Currently focused
- ^< n >: The nth desktop
- MONITOR_SEL:focused: Focused desktop on specified monitor
- <desktop_id>: Direct ID reference
- <desktop_name>: By name
Desktop Modifiers
- [!]focused: Currently/not focused
- [!]active: Active/not active on desktop
- [!]occupied: Has/doesn’t have windows
- [!]urgent: Contains/doesn’t contain urgent windows
- [!]local: On/not on current monitor
- [!]LAYOUT: Matches/doesn’t match layout
- [!]user_LAYOUT: Custom layout matching
Monitor Domain: Multi-Monitor Configuration
Monitor-Specific Commands
The monitor domain controls monitor-specific settings and operations. Syntax: bspc monitor [MONITOR_SEL] COMMAND.
Monitor Focus: -f and --focus
The -f or --focus flag switches focus to a specified monitor. Example:
bspc monitor -f DP-1- Focus monitor named DP-1bspc monitor -f next- Focus next monitor
Monitor Swapping: -s and --swap
The -s or --swap flag exchanges two monitors. This is useful for reversing display order.
Add Desktops: -a and --add-desktops
The -a or --add-desktops flag creates new desktops on a monitor. Syntax: bspc monitor -a <name>.... Multiple desktop names can be provided. Example:
bspc monitor -a I II III IV V- Create five desktops named I through V
Reorder Desktops: -o and --reorder-desktops
The -o or --reorder-desktops flag changes the order of desktops on a monitor. Syntax: bspc monitor -o <name>.... The order must match existing desktop names.
Reset Desktops: -d and --reset-desktops
The -d or --reset-desktops flag reconfigures desktops, adding, removing, or renaming as needed. Syntax: bspc monitor -d <name>.... This command automatically handles all necessary adjustments.
Monitor Rectangle: -g and --rectangle
The -g or --rectangle flag manually sets monitor geometry. Syntax: bspc monitor -g WxH+X+Y. This is useful for multi-display configurations or unusual setups.
Monitor Renaming: -n and --rename
The -n or --rename flag changes a monitor’s name. Syntax: bspc monitor -n <new_name>.
Monitor Removal: -r and --remove
The -r or --remove flag removes a monitor from management. Desktops on the removed monitor are transferred to remaining monitors.
Monitor Selector Syntax
Monitor selectors determine which monitors are affected.
Monitor Descriptors
- DIR (north|west|south|east): Spatial direction
- CYCLE_DIR (next|prev): Cyclic direction
- any: Any monitor
- last: Most recently focused
- newest: Most recently added
- older: Older in history
- newer: Newer in history
- focused: Currently focused
- pointed: Monitor under pointer
- primary: Primary monitor
- ^< n >: The nth monitor
- <monitor_id>: By monitor ID
- <monitor_name>: By name (e.g., HDMI-1)
Monitor Modifiers
- [!]focused: Currently/not focused
- [!]occupied: Has/doesn’t have occupied desktops
Query Domain: State Information Retrieval
Query Commands
The query domain retrieves metadata and state information. Syntax: bspc query COMMANDS [OPTIONS].
Node Query: -N and --nodes
The -N or --nodes flag returns node IDs. Syntax: bspc query -N [NODE_SEL]. Without selectors, returns all node IDs. With selectors, returns matching nodes. Example:
bspc query -N -n focused- Get ID of focused nodebspc query -N -n .window- Get IDs of all window nodes
Desktop Query: -D and --desktops
The -D or --desktops flag returns desktop IDs. Syntax: bspc query -D [DESKTOP_SEL]. Returns all desktop IDs when no selector is given.
Monitor Query: -M and --monitors
The -M or --monitors flag returns monitor IDs. Syntax: bspc query -M [MONITOR_SEL]. Returns all monitor IDs without selector.
Tree Query: -T and --tree
The -T or --tree flag returns the complete tree structure in JSON or text format. This comprehensive output shows all relationships and states. Example:
bspc query -T- Output complete tree statebspc query -T -m DP-1- Tree for specific monitor
Query Options
Query results can be filtered and formatted.
Monitor Specification: -m and --monitor
The -m or --monitor option filters results to a specific monitor. Syntax: bspc query -m MONITOR_SEL.
Desktop Specification: -d and --desktop
The -d or --desktop option filters to a specific desktop. Syntax: bspc query -d DESKTOP_SEL.
Node Specification: -n and --node
The -n or --node option filters to a specific node. Syntax: bspc query -n NODE_SEL.
Names Output: --names
The --names flag outputs entity names instead of IDs. This is useful for human-readable output.
Rule Domain: Window Matching and Defaults
Rule Management Commands
The rule domain defines patterns and default configurations for new windows.
Adding Rules: -a and --add
The -a or --add flag creates a new rule. Syntax: bspc rule -a [CLASS[:INSTANCE[:NAME]]] [options]. The class, instance, and name can be wildcards using *. Fields can be escaped with backslash.
Rule properties include:
- monitor=MONITOR_SEL: Target monitor
- desktop=DESKTOP_SEL: Target desktop
- node=NODE_SEL: Target node (for insertion)
- state=STATE: Initial state (tiled|pseudo_tiled|floating|fullscreen)
- layer=LAYER: Initial layer (below|normal|above)
- honor_size_hints=(true|false|tiled|floating): Whether to respect ICCCM size hints
- split_dir=DIR: Preselection direction
- split_ratio=RATIO: Preselection ratio
- hidden=(on|off): Initially hidden state
- sticky=(on|off): Sticky flag state
- private=(on|off): Private flag state
- locked=(on|off): Locked flag state
- marked=(on|off): Marked flag state
- center=(on|off): Center floating windows
- follow=(on|off): Focus follows window
- manage=(on|off): Whether window is managed
- focus=(on|off): Initial focus state
- border=(on|off): Show window borders
- rectangle=WxH+X+Y: Initial geometry for floating windows
The -o or --one-shot flag makes the rule apply only once.
Examples:
bspc rule -a Firefox desktop=^2 follow=onbspc rule -a Gimp state=floating follow=off
Removing Rules: -r and --remove
The -r or --remove flag deletes rules. Syntax: bspc rule -r PATTERN. Patterns can be head, tail, ^< n > for index, or a class/instance/name pattern.
Listing Rules: -l and --list
The -l or --list flag displays all currently active rules.
External Rules Script
For complex matching logic beyond the built-in rule syntax, BSPWM supports external rule scripts. The external_rules_command setting specifies a script path. This script receives window information and outputs rule properties.
Script invocation: SCRIPT wid class instance name
Example external rules script:
#!/bin/sh
case "$2" in
    Firefox)
        echo "desktop=^2 follow=on"
        ;;
    Gimp)
        echo "state=floating"
        ;;
esac
Config Domain: Global Configuration
Configuration Settings
The config domain manages global, monitor-specific, desktop-specific, and node-specific settings.
General Syntax
bspc config [-m MONITOR_SEL|-d DESKTOP_SEL|-n NODE_SEL] <setting> [<value>]
Global Settings
Color Settings
Colors are specified in hexadecimal format: #RRGGBB
- normal_border_color: Border color for unfocused windows
- active_border_color: Border color for active (desktop-focused) windows
- focused_border_color: Border color for focused windows
- presel_feedback_color: Color of preselection indicator
Layout and Splitting
- split_ratio: Default ratio for binary splits (0 < ratio < 1)
- automatic_scheme: Algorithm for automatic window placement. Valid values:
- longest_side: Split along longest edge
- alternate: Alternate between horizontal and vertical
- spiral: Create spiral patterns
- initial_polarity: Which child receives the new window in automatic mode. Valid values:
- first_child: New window becomes first child
- second_child: New window becomes second child
- directional_focus_tightness: Strictness of directional focus algorithm. Valid values:
- high: Stricter matching
- low: Looser matching
Insertion and Removal
- removal_adjustment: Whether to readjust layout after window removal
- presel_feedback: Whether to show preselection feedback
Monocle Layout
- borderless_monocle: Remove borders in monocle layout
- gapless_monocle: Remove gaps in monocle layout
- top_monocle_padding, right_monocle_padding, bottom_monocle_padding, left_monocle_padding: Padding for monocle layout
- single_monocle: Switch to monocle if only one window remains
Status and Behavior
- borderless_singleton: Remove borders when only one window exists
- status_prefix: Prefix for status messages
- pointer_motion_interval: Minimum milliseconds between pointer motion updates
- pointer_modifier: Keyboard modifier for pointer actions. Valid values:
- shift, control, lock
- mod1 (Alt), mod2, mod3
- mod4 (Super), mod5
- pointer_action1, pointer_action2, pointer_action3: Mouse button actions. Valid values:
- move: Move floating windows
- resize_side: Resize from edge
- resize_corner: Resize from corner
- focus: Focus on click
- none: No action
- click_to_focus: Mouse button for focus-on-click. Valid values: button1, button2, button3, any, none
- swallow_first_click: Consume first click when focusing
- focus_follows_pointer: Focus window under pointer
- pointer_follows_focus: Move pointer to focused window
- pointer_follows_monitor: Move pointer to focused monitor
EWMH Compatibility
- mapping_events_count: How many mapping events to process
- ignore_ewmh_focus: Ignore EWMH focus requests
- ignore_ewmh_fullscreen: Ignore fullscreen requests. Valid values: none, all, or comma-separated enter, exit
- ignore_ewmh_struts: Ignore taskbar/panel space reservations
- center_pseudo_tiled: Center pseudo_tiled windows
Monitor Management
- remove_disabled_monitors: Remove monitors that are disabled
- remove_unplugged_monitors: Remove unplugged monitors
- merge_overlapping_monitors: Merge monitors with overlapping geometry
Monitor and Desktop Settings
Padding
Applied at monitor and desktop levels:
- top_padding, right_padding, bottom_padding, left_padding: Space reserved around the desktop edges. Commonly set to bar heights
Desktop Settings
Window Gap
- window_gap: Pixel spacing between windows. Can be set negative to create gapless layouts
Node Settings
Borders and Hints
- border_width: Border thickness in pixels
- honor_size_hints: Respect ICCCM window size hints. Valid values:
- true: Apply to all windows
- false: Don’t apply
- tiled: Apply only to tiled windows
- floating: Apply only to floating windows
Subscribe Domain: Event-Driven Scripting
Event Subscription
The subscribe domain enables reactive scripting based on window manager events. Syntax: bspc subscribe [OPTIONS] (all|report|monitor|desktop|node|...)*.
Subscription Options
FIFO Output: -f and --fifo
The -f or --fifo flag outputs events to a named FIFO instead of stdout. This enables long-lived subscriptions.
Event Count: -c and --count
The -c or --count flag exits after receiving COUNT events.
Available Events
Monitor Events
- monitor_add: New monitor connected
- monitor_rename: Monitor renamed
- monitor_remove: Monitor disconnected
- monitor_swap: Monitors swapped positions
- monitor_focus: Focus changed to monitor
- monitor_geometry: Monitor geometry changed
Desktop Events
- desktop_add: Desktop created
- desktop_rename: Desktop renamed
- desktop_remove: Desktop deleted
- desktop_swap: Desktops swapped
- desktop_transfer: Desktop transferred to different monitor
- desktop_focus: Desktop focus changed
- desktop_activate: Desktop activated
- desktop_layout: Layout changed
Node Events
- node_add: Window added
- node_remove: Window removed
- node_swap: Windows swapped
- node_transfer: Window transferred
- node_focus: Window focus changed
- node_activate: Window activated
- node_presel: Preselection changed
- node_stack: Stack order changed
- node_geometry: Window geometry changed
- node_state: Window state changed
- node_flag: Window flag changed
- node_layer: Stacking layer changed
Report Event
The report event outputs the complete current state in a specific format.
Event Processing Example
Using events to perform actions:
bspc subscribe node_add | while read -a msg; do
    desk_id=${msg[^1_2]}
    wid=${msg[^1_4]}
    # Make new windows fullscreen
    bspc node "$wid" -t fullscreen
done
Wm Domain: Window Manager State
Global Window Manager Operations
The wm domain controls global window manager state and operations.
Dump State: -d and --dump-state
The -d or --dump-state flag outputs the complete window manager state. This is useful for backing up configurations or analysis.
Load State: -l and --load-state
The -l or --load-state** flag restores a previously dumped state. Syntax: bspc wm -l <file_path>`.
Add Monitor: -a and --add-monitor
The -a or --add-monitor flag manually adds a monitor to management. Syntax: bspc wm -a <name> WxH+X+Y. Useful for dynamic monitor addition.
Reorder Monitors: -O and --reorder-monitors
The -O or --reorder-monitors flag changes the global monitor order. Syntax: bspc wm -O <name>....
Adopt Orphans: -o and --adopt-orphans
The -o or --adopt-orphans flag brings unmanaged windows under BSPWM control.
Record History: -h and --record-history
The -h or --record-history** flag enables/disables command history logging. Syntax: bspc wm -h on|off`.
Get Status: -g and --get-status
The -g or --get-status flag outputs the current status.
Restart: -r and --restart
The -r or `–restart** flag restarts BSPWM while preserving windows. This is useful during configuration updates.
Window States and Flags
Window States
Each window maintains exactly one state at any time:
Tiled
Tiled state means the window fills its assigned tiling space without overlapping others. Windows are arranged according to the binary tree structure. This is the default state for new windows.
Pseudo-Tiled
Pseudo-tiled windows respect ICCCM size hints while being centered within their tiling space. They can be resized but maintain their centered position.
Floating
Floating windows can be positioned and resized freely anywhere on the desktop. They don’t participate in automatic tiling but remain part of the node tree.
Fullscreen
Fullscreen windows occupy their monitor’s entire rectangle with no borders. They’re placed above other content. When a fullscreen window is present and a new floating window is created, BSPWM must change the fullscreen window to tiled to display the floating window on top, unless the floating window is placed on the above layer.
Window Flags
Flags are independent states that can be combined:
Hidden
Hidden windows don’t occupy tiling space and aren’t visible. They’re useful for implementing scratchpads and minimization-like functionality.
Sticky
Sticky windows follow the focused desktop on their monitor. When switching desktops, sticky windows appear on the new desktop.
Private
Private windows resist movement and resizing during automatic insertion. When inserting new windows into automatic mode, private nodes maintain their position and size rather than being split.
Locked
Locked windows ignore the close message sent by bspc node -c. They require forceful termination with bspc node -k.
Marked
Marked is an arbitrary flag useful for custom operations. It’s particularly valuable in conjunction with preselection to implement deferred window movement. Marked nodes automatically become unmarked when sent to a preselected node.
Urgent
Urgent indicates a window requiring attention. It’s typically set externally by applications (e.g., when incoming messages arrive). BSPWM uses this flag for window selection.
Stacking Layers
BSPWM implements three independent stacking layers:
- below: Lowest layer
- normal: Middle layer (default)
- above: Top layer
Within each layer, the window order follows: tiled & pseudo_tiled < floating < fullscreen. This means a floating window on the “below” layer appears above tiled windows on that layer but below all windows on the “normal” layer.
Advanced Configuration Patterns and Techniques
Monitor Setup and Multi-Monitor Configuration
Setting up monitors requires careful use of the monitor domain commands:
#!/bin/bash
# Example multi-monitor setup

# External monitor setup
bspc monitor eDP1 -d I II III IV V
bspc monitor HDMI1 -d VI VII VIII IX X

# Alternative: Conditional setup
if xrandr | grep -q "HDMI1 connected"; then
    xrandr --output HDMI1 --right-of eDP1 --auto
    bspc monitor eDP1 -d I II III IV
    bspc monitor HDMI1 -d V VI VII VIII
fi
Floating Desktop Configuration
Creating desktops where all windows float by default:
bspc rule -a "*" -o desktop=floating_desktop state=floating
bspc desktop floating_desktop -l tiled  # or any layout
Scratchpad/Dropdown Terminal Implementation
Using hidden sticky windows to create dropdown terminal functionality:
# Create dropdown terminal rule
bspc rule -a dropdown -o sticky=on state=floating hidden=on rectangle=800x600+560+240

# Launch dropdown terminal
alacritty --class dropdown -e zsh &

# Toggle script
bspc node any.hidden.sticky -g hidden -f
Receptacle-Based Manual Layouts
Using receptacles to build predefined layouts:
# Create three-pane layout with receptacles
bspc node -i
bspc node -p west -o 0.5
bspc node -i
bspc node -p south
bspc node -i

# Fill receptacles with windows - they automatically slot into place
External Rules for Complex Logic
When built-in rules aren’t sufficient, external rule scripts provide unlimited flexibility:
#!/bin/bash
# /home/user/.config/bspwm/external_rules

wid=$1
class=$2
instance=$3

case "$class" in
    Firefox)
        if [ "$instance" = "firefox" ]; then
            echo "desktop=^1 follow=on"
        else
            echo "desktop=^2"  # Private browsing to different desktop
        fi
        ;;
    Blender)
        echo "state=floating rectangle=1920x1080+0+0"
        ;;
    *)
        # Default behavior
        ;;
esac
Event-Driven Automatic Layouts
Using subscribe to dynamically adapt behavior:
# Automatically switch to monocle in fullscreen windows
bspc subscribe node_state | while read -a msg; do
    if [ "${msg[^1_8]}" = "fullscreen" ] && [ "${msg[^1_9]}" = "on" ]; then
        desk_id=$(echo "${msg[^1_1]}" | cut -d':' -f2)
        bspc desktop "$desk_id" -l monocle
    fi
done &
Node ID Tracking and Manipulation
Storing and using node IDs for complex operations:
# Store node ID and move it later
id=$(bspc query -N -n)
# ... perform other operations ...
bspc node "$id" -d '^2'  # Move stored node to desktop 2
Custom Layouts with Master Stack
While BSPWM provides only tiled and monocle, external scripts enable layouts like master-stack:
# Balance 3-pane layout
bspc node @/ -B
bspc node @/1 -r 0.66  # Make left side 66% of space
Pointer Action Configuration
Setting up mouse controls for floating window manipulation:
# Configure pointer modifier and actions
bspc config pointer_modifier mod1          # Use Alt key
bspc config pointer_action1 move           # Alt+Button1 moves
bspc config pointer_action2 resize_side    # Alt+Button2 resizes edge
bspc config pointer_action3 resize_corner  # Alt+Button3 resizes corner
Query-Based Window Selection
Complex window selection using query syntax:
# Find biggest window on current desktop and close it
biggest=$(bspc query -N -n biggest.local.!fullscreen.window)
bspc node "$biggest" -c

# Focus all windows of same class
class=$(bspc query -N -n | xargs -I {} xprop -id {} WM_CLASS | cut -d'"' -f2 | head -1)
bspc node ".same_class" -f
Tree Manipulation Example
Using rotate, flip, and balance for dynamic layouts:
# Rotate current desktop tree 90 degrees
bspc node @/ -R 90

# Flip tree horizontally
bspc node @/ -F horizontal

# Balance all split ratios for equal window sizes
bspc node @/ -B

# Equal spacing (reset all ratios)
bspc node @/ -E
Comprehensive Configuration Template
A sophisticated bspwmrc demonstrating multiple techniques:
#!/bin/bash
# ~/.config/bspwm/bspwmrc

# Start sxhkd for keybindings
sxhkd &

# Monitor setup
if xrandr | grep -q "HDMI1 connected"; then
    xrandr --output HDMI1 --right-of eDP1 --auto
    bspc monitor eDP1 -d 1 2 3 4 5
    bspc monitor HDMI1 -d 6 7 8 9 10
else
    bspc monitor -d 1 2 3 4 5 6 7 8 9 10
fi

# Global settings
bspc config window_gap 12
bspc config border_width 2
bspc config top_padding 0
bspc config bottom_padding 0
bspc config left_padding 0
bspc config right_padding 0

# Colors
bspc config normal_border_color "#3c3836"
bspc config focused_border_color "#b8bb26"
bspc config active_border_color "#a89984"

# Layout and splitting
bspc config split_ratio 0.5
bspc config automatic_scheme longest_side
bspc config initial_polarity second_child

# Pointer
bspc config pointer_modifier mod1
bspc config pointer_action1 move
bspc config pointer_action2 resize_side
bspc config pointer_action3 resize_corner

# EWMH
bspc config ignore_ewmh_focus true
bspc config ignore_ewmh_struts true

# Focus behavior
bspc config focus_follows_pointer false

# Rules
bspc rule -r '*'  # Clear existing rules

bspc rule -a Firefox desktop='^1'
bspc rule -a Thunderbird desktop='^2'
bspc rule -a Slack desktop='^9'
bspc rule -a feh state=floating
bspc rule -a Gimp state=floating follow=on
bspc rule -a St state=floating rectangle=800x600+560+240

# External rules script
bspc config external_rules_command ~/.config/bspwm/external_rules

# Start status bar
polybar main &

# Launch background apps
nm-applet &
So Far
-
BSPWM represents a paradigm shift in window manager configuration philosophy. Rather than implementing every feature directly within the window manager, BSPWM provides a powerful, scriptable interface through bspc that enables users to build sophisticated configurations entirely from shell scripts. This approach offers unprecedented flexibility and transparency—users can see exactly what commands are being executed and modify them without learning specialized syntax.
-
The comprehensive command set across six domains (node, desktop, monitor, query, rule, wm) combined with powerful selector syntax enables precise control over every aspect of window management. Advanced features like event subscription, external rule scripts, and tree manipulation operations provide the foundation for highly customized window management workflows.
-
Mastering BSPWM configuration requires understanding the hierarchical structure of selectors, the binary tree model of window arrangement, and how to combine simple commands into complex behaviors. The sophisticated user can leverage all documented flags and options to create configurations that adapt dynamically to their workflow, automating complex window management scenarios through scripting and event handling.
-
This documentation provides the authoritative reference for every flag, option, and configuration technique available in BSPWM, extracted from official sources and community expertise, enabling users to build the most sophisticated window management configurations possible.
BSPWM(1) Bspwm Manual BSPWM(1)
NAME bspwm - Binary space partitioning window manager
SYNOPSIS bspwm [-h|-v|-c CONFIG_PATH]
   bspc --print-socket-path

   bspc DOMAIN [SELECTOR] COMMANDS

   bspc COMMAND [OPTIONS] [ARGUMENTS]
DESCRIPTION
bspwm is a tiling window manager that represents windows as the leaves of a full binary tree.
   It is controlled and configured via bspc.
OPTIONS
-h Print the synopsis and exit.
   -v
       Print the version and exit.

   -c CONFIG_PATH
       Use the given configuration file.

   --print-socket-path
       Print the bspwm socket path and exit.
COMMON DEFINITIONS
DIR := north | west | south | east CYCLE_DIR := next | prev
SELECTORS Selectors are used to select a target node, desktop, or monitor. A selector can either describe the target relatively or name it globally.
   Selectors consist of an optional reference, a descriptor and any number of
   non-conflicting modifiers as follows:

       [REFERENCE#]DESCRIPTOR(.MODIFIER)*

   The relative targets are computed in relation to the given reference (the default
   reference value is focused).

   An exclamation mark can be prepended to any modifier in order to reverse its meaning.

   The following characters cannot be used in monitor or desktop names: #, :, ..

   The special selector %<name> can be used to select a monitor or a desktop with an
   invalid name.
Node
Select a node.
       NODE_SEL := [NODE_SEL#](DIR|CYCLE_DIR|PATH|any|first_ancestor|last|newest|
                               older|newer|focused|pointed|biggest|smallest|
                               <node_id>)[.[!]focused][.[!]active][.[!]automatic][.[!]local]
                                         [.[!]leaf][.[!]window][.[!]STATE][.[!]FLAG][.[!]LAYER][.[!]SPLIT_TYPE]
                                         [.[!]same_class][.[!]descendant_of][.[!]ancestor_of]

       STATE := tiled|pseudo_tiled|floating|fullscreen

       FLAG := hidden|sticky|private|locked|marked|urgent

       LAYER := below|normal|above

       SPLIT_TYPE := horizontal|vertical

       PATH := @[DESKTOP_SEL:][[/]JUMP](/JUMP)*

       JUMP := first|1|second|2|brother|parent|DIR

   Descriptors

       DIR
           Selects the window in the given (spacial) direction relative to the reference
           node.

       CYCLE_DIR
           Selects the node in the given (cyclic) direction relative to the reference node
           within a depth-first in-order traversal of the tree.

       PATH
           Selects the node at the given path.

       any
           Selects the first node that matches the given selectors.

       first_ancestor
           Selects the first ancestor of the reference node that matches the given
           selectors.

       last
           Selects the previously focused node relative to the reference node.

       newest
           Selects the newest node in the history of the focused node.

       older
           Selects the node older than the reference node in the history.

       newer
           Selects the node newer than the reference node in the history.

       focused
           Selects the currently focused node.

       pointed
           Selects the leaf under the pointer.

       biggest
           Selects the biggest leaf.

       smallest
           Selects the smallest leaf.

       <node_id>
           Selects the node with the given ID.

   Path Jumps

       The initial node is the focused node (or the root if the path starts with /) of the
       reference desktop (or the selected desktop if the path has a DESKTOP_SEL prefix).

       1|first
           Jumps to the first child.

       2|second
           Jumps to the second child.

       brother
           Jumps to the brother node.

       parent
           Jumps to the parent node.

       DIR
           Jumps to the node holding the edge in the given direction.

   Modifiers

       [!]focused
           Only consider the focused node.

       [!]active
           Only consider nodes that are the focused node of their desktop.

       [!]automatic
           Only consider nodes in automatic insertion mode. See also --presel-dir under
           Node in the DOMAINS section below.

       [!]local
           Only consider nodes in the reference desktop.

       [!]leaf
           Only consider leaf nodes.

       [!]window
           Only consider nodes that hold a window.

       [!](tiled|pseudo_tiled|floating|fullscreen)
           Only consider windows in the given state.

       [!]same_class
           Only consider windows that have the same class as the reference window.

       [!]descendant_of
           Only consider nodes that are descendants of the reference node.

       [!]ancestor_of
           Only consider nodes that are ancestors of the reference node.

       [!](hidden|sticky|private|locked|marked|urgent)
           Only consider windows that have the given flag set.

       [!](below|normal|above)
           Only consider windows in the given layer.

       [!](horizontal|vertical)
           Only consider nodes with the given split type.
Desktop
Select a desktop.
       DESKTOP_SEL := [DESKTOP_SEL#](CYCLE_DIR|any|last|newest|older|newer|
                                     [MONITOR_SEL:](focused|^<n>)|
                                     <desktop_id>|<desktop_name>)[.[!]focused][.[!]active]
                                                                 [.[!]occupied][.[!]urgent][.[!]local]
                                                                 [.[!]LAYOUT][.[!]user_LAYOUT]

       LAYOUT := tiled|monocle

   Descriptors

       CYCLE_DIR
           Selects the desktop in the given direction relative to the reference desktop.

       any
           Selects the first desktop that matches the given selectors.

       last
           Selects the previously focused desktop relative to the reference desktop.

       newest
           Selects the newest desktop in the history of the focused desktops.

       older
           Selects the desktop older than the reference desktop in the history.

       newer
           Selects the desktop newer than the reference desktop in the history.

       focused
           Selects the currently focused desktop.

       ^<n>
           Selects the nth desktop. If MONITOR_SEL is given, selects the nth desktop on
           the selected monitor.

       <desktop_id>
           Selects the desktop with the given ID.

       <desktop_name>
           Selects the desktop with the given name.

   Modifiers

       [!]focused
           Only consider the focused desktop.

       [!]active
           Only consider desktops that are the focused desktop of their monitor.

       [!]occupied
           Only consider occupied desktops.

       [!]urgent
           Only consider urgent desktops.

       [!]local
           Only consider desktops inside the reference monitor.

       [!](tiled|monocle)
           Only consider desktops with the given layout.

       [!](user_tiled|user_monocle)
           Only consider desktops which have the given layout as userLayout.
Monitor
Select a monitor.
       MONITOR_SEL := [MONITOR_SEL#](DIR|CYCLE_DIR|any|last|newest|older|newer|
                                     focused|pointed|primary|^<n>|
                                     <monitor_id>|<monitor_name>)[.[!]focused][.[!]occupied]

   Descriptors

       DIR
           Selects the monitor in the given (spacial) direction relative to the reference
           monitor.

       CYCLE_DIR
           Selects the monitor in the given (cyclic) direction relative to the reference
           monitor.

       any
           Selects the first monitor that matches the given selectors.

       last
           Selects the previously focused monitor relative to the reference monitor.

       newest
           Selects the newest monitor in the history of the focused monitors.

       older
           Selects the monitor older than the reference monitor in the history.

       newer
           Selects the monitor newer than the reference monitor in the history.

       focused
           Selects the currently focused monitor.

       pointed
           Selects the monitor under the pointer.

       primary
           Selects the primary monitor.

       ^<n>
           Selects the nth monitor.

       <monitor_id>
           Selects the monitor with the given ID.

       <monitor_name>
           Selects the monitor with the given name.

   Modifiers

       [!]focused
           Only consider the focused monitor.

       [!]occupied
           Only consider monitors where the focused desktop is occupied.
WINDOW STATES
tiled Its size and position are determined by the window tree.
   pseudo_tiled
       A tiled window that automatically shrinks but doesn’t stretch beyond its floating
       size.

   floating
       Can be moved/resized freely. Although it doesn’t use any tiling space, it is still
       part of the window tree.

   fullscreen
       Fills its monitor rectangle and has no borders.
NODE FLAGS
hidden Is hidden and doesn’t occupy any tiling space.
   sticky
       Stays in the focused desktop of its monitor.

   private
       Tries to keep the same tiling position/size.

   locked
       Ignores the node --close message.

   marked
       Is marked (useful for deferred actions). A marked node becomes unmarked after being
       sent on a preselected node.

   urgent
       Has its urgency hint set. This flag is set externally.
STACKING LAYERS
There’s three stacking layers: BELOW, NORMAL and ABOVE.
   In each layer, the windows are orderered as follows: tiled & pseudo-tiled < floating <
   fullscreen.
RECEPTACLES
A leaf node that doesn’t hold any window is called a receptacle. When a node is inserted on a receptacle in automatic mode, it will replace the receptacle. A receptacle can be inserted on a node, preselected and killed. Receptacles can therefore be used to build a tree whose leaves are receptacles. Using the appropriate rules, one can then send windows on the leaves of this tree. This feature is used in examples/receptacles to store and recreate layouts.
DOMAINS Node General Syntax
       node [NODE_SEL] COMMANDS

       If NODE_SEL is omitted, focused is assumed.

   Commands

       -f, --focus [NODE_SEL]
           Focus the selected or given node.

       -a, --activate [NODE_SEL]
           Activate the selected or given node.

       -d, --to-desktop DESKTOP_SEL [--follow]
           Send the selected node to the given desktop. If --follow is passed, the focused
           node will stay focused.

       -m, --to-monitor MONITOR_SEL [--follow]
           Send the selected node to the given monitor. If --follow is passed, the focused
           node will stay focused.

       -n, --to-node NODE_SEL [--follow]
           Send the selected node on the given node. If --follow is passed, the focused
           node will stay focused.

       -s, --swap NODE_SEL [--follow]
           Swap the selected node with the given node. If --follow is passed, the focused
           node will stay focused.

       -p, --presel-dir [~]DIR|cancel
           Preselect the splitting area of the selected node (or cancel the preselection).
           If ~ is prepended to DIR and the current preselection direction matches DIR,
           then the argument is interpreted as cancel. A node with a preselected area is
           said to be in "manual insertion mode".

       -o, --presel-ratio RATIO
           Set the splitting ratio of the preselection area.

       -v, --move dx dy
           Move the selected window by dx pixels horizontally and dy pixels vertically.

       -z, --resize top|left|bottom|right|top_left|top_right|bottom_right|bottom_left dx
       dy
           Resize the selected window by moving the given handle by dx pixels horizontally
           and dy pixels vertically.

       -y, --type CYCLE_DIR|horizontal|vertical
           Set or cycle the splitting type of the selected node.

       -r, --ratio RATIO|(+|-)(PIXELS|FRACTION)
           Set the splitting ratio of the selected node (0 < RATIO < 1).

       -R, --rotate 90|270|180
           Rotate the tree rooted at the selected node.

       -F, --flip horizontal|vertical
           Flip the tree rooted at selected node.

       -E, --equalize
           Reset the split ratios of the tree rooted at the selected node to their default
           value.

       -B, --balance
           Adjust the split ratios of the tree rooted at the selected node so that all
           windows occupy the same area.

       -C, --circulate forward|backward
           Circulate the windows of the tree rooted at the selected node.

       -t, --state ~|[~]STATE
           Set the state of the selected window. If ~ is present and the current state
           matches STATE, then the argument is interpreted as its last state. If the
           argument is just ~ with STATE omitted, then the state of the selected window is
           set to its last state.

       -g, --flag hidden|sticky|private|locked|marked[=on|off]
           Set or toggle the given flag for the selected node.

       -l, --layer below|normal|above
           Set the stacking layer of the selected window.

       -i, --insert-receptacle
           Insert a receptacle node at the selected node.

       -c, --close
           Close the windows rooted at the selected node.

       -k, --kill
           Kill the windows rooted at the selected node.
Desktop
General Syntax
       desktop [DESKTOP_SEL] COMMANDS

       If DESKTOP_SEL is omitted, focused is assumed.

   COMMANDS

       -f, --focus [DESKTOP_SEL]
           Focus the selected or given desktop.

       -a, --activate [DESKTOP_SEL]
           Activate the selected or given desktop.

       -m, --to-monitor MONITOR_SEL [--follow]
           Send the selected desktop to the given monitor. If --follow is passed, the
           focused desktop will stay focused.

       -s, --swap DESKTOP_SEL [--follow]
           Swap the selected desktop with the given desktop. If --follow is passed, the
           focused desktop will stay focused.

       -l, --layout CYCLE_DIR|monocle|tiled
           Set or cycle the layout of the selected desktop.

       -n, --rename <new_name>
           Rename the selected desktop.

       -b, --bubble CYCLE_DIR
           Bubble the selected desktop in the given direction.

       -r, --remove
           Remove the selected desktop.
Monitor
General Syntax
       monitor [MONITOR_SEL] COMMANDS

       If MONITOR_SEL is omitted, focused is assumed.

   Commands

       -f, --focus [MONITOR_SEL]
           Focus the selected or given monitor.

       -s, --swap MONITOR_SEL
           Swap the selected monitor with the given monitor.

       -a, --add-desktops <name>...
           Create desktops with the given names in the selected monitor.

       -o, --reorder-desktops <name>...
           Reorder the desktops of the selected monitor to match the given order.

       -d, --reset-desktops <name>...
           Rename, add or remove desktops depending on whether the number of given names
           is equal, superior or inferior to the number of existing desktops.

       -g, --rectangle WxH+X+Y
           Set the rectangle of the selected monitor.

       -n, --rename <new_name>
           Rename the selected monitor.

       -r, --remove
           Remove the selected monitor.
Query
General Syntax
       query COMMANDS [OPTIONS]

   Commands

       The optional selectors are references.

       -N, --nodes [NODE_SEL]
           List the IDs of the matching nodes.

       -D, --desktops [DESKTOP_SEL]
           List the IDs (or names) of the matching desktops.

       -M, --monitors [MONITOR_SEL]
           List the IDs (or names) of the matching monitors.

       -T, --tree
           Print a JSON representation of the matching item.

   Options

       -m,--monitor [MONITOR_SEL|MONITOR_MODIFIERS], -d,--desktop
       [DESKTOP_SEL|DESKTOP_MODIFIERS], -n,--node [NODE_SEL|NODE_MODIFIERS]
           Constrain matches to the selected monitors, desktops or nodes.

       --names
           Print names instead of IDs. Can only be used with -M and -D.
Wm
General Syntax
       wm COMMANDS

   Commands

       -d, --dump-state
           Dump the current world state on standard output.

       -l, --load-state <file_path>
           Load a world state from the given file. The path must be absolute.

       -a, --add-monitor <name> WxH+X+Y
           Add a monitor for the given name and rectangle.

       -O, --reorder-monitors <name>...
           Reorder the list of monitors to match the given order.

       -o, --adopt-orphans
           Manage all the unmanaged windows remaining from a previous session.

       -h, --record-history on|off
           Enable or disable the recording of node focus history.

       -g, --get-status
           Print the current status information.

       -r, --restart
           Restart the window manager
Rule
General Syntax
       rule COMMANDS

   Commands

       -a, --add (<class_name>|*)[:(<instance_name>|*)[:(<name>|*)]] [-o|--one-shot]
       [monitor=MONITOR_SEL|desktop=DESKTOP_SEL|node=NODE_SEL] [state=STATE] [layer=LAYER]
       [honor_size_hints=(true|false|tiled|floating)] [split_dir=DIR] [split_ratio=RATIO]
       [(hidden|sticky|private|locked|marked|center|follow|manage|focus|border)=(on|off)]
       [rectangle=WxH+X+Y]
           Create a new rule. Colons in the instance_name, class_name, or name fields can
           be escaped with a backslash.

       -r, --remove ^<n>|head|tail|(<class_name>|*)[:(<instance_name>|*)[:(<name>|*)]]...
           Remove the given rules.

       -l, --list
           List the rules.
Config
General Syntax
       config [-m MONITOR_SEL|-d DESKTOP_SEL|-n NODE_SEL] <setting> [<value>]
           Get or set the value of <setting>.
Subscribe
General Syntax
       subscribe [OPTIONS] (all|report|monitor|desktop|node|...)*
           Continuously print events. See the EVENTS section for the description of each
           event.

   Options

       -f, --fifo
           Print a path to a FIFO from which events can be read and return.

       -c, --count COUNT
           Stop the corresponding bspc process after having received COUNT events.
Quit
General Syntax
       quit [<status>]
           Quit with an optional exit status.
EXIT CODES
If the server can’t handle a message, bspc will return with a non-zero exit code.
SETTINGS Colors are in the form #RRGGBB, booleans are true, on, false or off.
   All the boolean settings are false by default unless stated otherwise.
Global Settings
normal_border_color Color of the border of an unfocused window.
   active_border_color
       Color of the border of a focused window of an unfocused monitor.

   focused_border_color
       Color of the border of a focused window of a focused monitor.

   presel_feedback_color
       Color of the node --presel-{dir,ratio} message feedback area.

   split_ratio
       Default split ratio.

   status_prefix
       Prefix prepended to each of the status lines.

   external_rules_command
       Absolute path to the command used to retrieve rule consequences. The command will
       receive the following arguments: window ID, class name, instance name, and
       intermediate consequences. The output of that command must have the following
       format: key1=value1 key2=value2 ...  (the valid key/value pairs are given in the
       description of the rule command).

   automatic_scheme
       The insertion scheme used when the insertion point is in automatic mode. Accept the
       following values: longest_side, alternate, spiral.

   initial_polarity
       On which child should a new window be attached when adding a window on a single
       window tree in automatic mode. Accept the following values: first_child,
       second_child.

   directional_focus_tightness
       The tightness of the algorithm used to decide whether a window is on the DIR side
       of another window. Accept the following values: high, low.

   removal_adjustment
       Adjust the brother when unlinking a node from the tree in accordance with the
       automatic insertion scheme.

   presel_feedback
       Draw the preselection feedback area. Defaults to true.

   borderless_monocle
       Remove borders of tiled windows for the monocle desktop layout.

   gapless_monocle
       Remove gaps of tiled windows for the monocle desktop layout.

   top_monocle_padding, right_monocle_padding, bottom_monocle_padding,
   left_monocle_padding
       Padding space added at the sides of the screen for the monocle desktop layout.

   single_monocle
       Set the desktop layout to monocle if there’s only one tiled window in the tree.

   borderless_singleton
       Remove borders of the only window on the only monitor regardless its layout.

   pointer_motion_interval
       The minimum interval, in milliseconds, between two motion notify events.

   pointer_modifier
       Keyboard modifier used for moving or resizing windows. Accept the following values:
       shift, control, lock, mod1, mod2, mod3, mod4, mod5.

   pointer_action1, pointer_action2, pointer_action3
       Action performed when pressing pointer_modifier + button<n>. Accept the following
       values: move, resize_side, resize_corner, focus, none.

   click_to_focus
       Button used for focusing a window (or a monitor). The possible values are: button1,
       button2, button3, any, none. Defaults to button1.

   swallow_first_click
       Don’t replay the click that makes a window focused if click_to_focus isn’t none.

   focus_follows_pointer
       Focus the window under the pointer.

   pointer_follows_focus
       When focusing a window, put the pointer at its center.

   pointer_follows_monitor
       When focusing a monitor, put the pointer at its center.

   mapping_events_count
       Handle the next mapping_events_count mapping notify events. A negative value
       implies that every event needs to be handled.

   ignore_ewmh_focus
       Ignore EWMH focus requests coming from applications.

   ignore_ewmh_fullscreen
       Block the fullscreen state transitions that originate from an EWMH request. The
       possible values are: none, all, or a comma separated list of the following values:
       enter, exit.

   ignore_ewmh_struts
       Ignore strut hinting from clients requesting to reserve space (i.e. task bars).

   center_pseudo_tiled
       Center pseudo tiled windows into their tiling rectangles. Defaults to true.

   remove_disabled_monitors
       Consider disabled monitors as disconnected.

   remove_unplugged_monitors
       Remove unplugged monitors.

   merge_overlapping_monitors
       Merge overlapping monitors (the bigger remains).
Monitor and Desktop Settings
top_padding, right_padding, bottom_padding, left_padding Padding space added at the sides of the monitor or desktop.
Desktop Settings window_gap Size of the gap that separates windows.
Node Settings border_width Window border width.
   honor_size_hints
       If true, apply ICCCM window size hints to all windows. If floating, only apply them
       to floating and pseudo tiled windows. If tiled, only apply them to tiled windows.
       If false, don’t apply them. Defaults to false.
POINTER BINDINGS
click_to_focus Focus the window (or the monitor) under the pointer if the value isn’t none.
   pointer_modifier + button1
       Move the window under the pointer.

   pointer_modifier + button2
       Resize the window under the pointer by dragging the nearest side.

   pointer_modifier + button3
       Resize the window under the pointer by dragging the nearest corner.

   The behavior of pointer_modifier + button<n> can be modified through the
   pointer_action<n> setting.
EVENTS
report See the next section for the description of the format.
   monitor_add <monitor_id> <monitor_name> <monitor_geometry>
       A monitor is added.

   monitor_rename <monitor_id> <old_name> <new_name>
       A monitor is renamed.

   monitor_remove <monitor_id>
       A monitor is removed.

   monitor_swap <src_monitor_id> <dst_monitor_id>
       A monitor is swapped.

   monitor_focus <monitor_id>
       A monitor is focused.

   monitor_geometry <monitor_id> <monitor_geometry>
       The geometry of a monitor changed.

   desktop_add <monitor_id> <desktop_id> <desktop_name>
       A desktop is added.

   desktop_rename <monitor_id> <desktop_id> <old_name> <new_name>
       A desktop is renamed.

   desktop_remove <monitor_id> <desktop_id>
       A desktop is removed.

   desktop_swap <src_monitor_id> <src_desktop_id> <dst_monitor_id> <dst_desktop_id>
       A desktop is swapped.

   desktop_transfer <src_monitor_id> <src_desktop_id> <dst_monitor_id>
       A desktop is transferred.

   desktop_focus <monitor_id> <desktop_id>
       A desktop is focused.

   desktop_activate <monitor_id> <desktop_id>
       A desktop is activated.

   desktop_layout <monitor_id> <desktop_id> tiled|monocle
       The layout of a desktop changed.

   node_add <monitor_id> <desktop_id> <ip_id> <node_id>
       A node is added.

   node_remove <monitor_id> <desktop_id> <node_id>
       A node is removed.

   node_swap <src_monitor_id> <src_desktop_id> <src_node_id> <dst_monitor_id>
   <dst_desktop_id> <dst_node_id>
       A node is swapped.

   node_transfer <src_monitor_id> <src_desktop_id> <src_node_id> <dst_monitor_id>
   <dst_desktop_id> <dst_node_id>
       A node is transferred.

   node_focus <monitor_id> <desktop_id> <node_id>
       A node is focused.

   node_activate <monitor_id> <desktop_id> <node_id>
       A node is activated.

   node_presel <monitor_id> <desktop_id> <node_id> (dir DIR|ratio RATIO|cancel)
       A node is preselected.

   node_stack <node_id_1> below|above <node_id_2>
       A node is stacked below or above another node.

   node_geometry <monitor_id> <desktop_id> <node_id> <node_geometry>
       The geometry of a window changed.

   node_state <monitor_id> <desktop_id> <node_id> tiled|pseudo_tiled|floating|fullscreen
   on|off
       The state of a window changed.

   node_flag <monitor_id> <desktop_id> <node_id>
   hidden|sticky|private|locked|marked|urgent on|off
       One of the flags of a node changed.

   node_layer <monitor_id> <desktop_id> <node_id> below|normal|above
       The layer of a window changed.

   pointer_action <monitor_id> <desktop_id> <node_id> move|resize_corner|resize_side
   begin|end
       A pointer action occurred.

   Please note that bspwm initializes monitors before it reads messages on its socket,
   therefore the initial monitor events can’t be received.
REPORT FORMAT
Each report event message is composed of items separated by colons.
   Each item has the form <type><value> where <type> is the first character of the item.

   M<monitor_name>
       Focused monitor.

   m<monitor_name>
       Unfocused monitor.

   O<desktop_name>
       Occupied focused desktop.

   o<desktop_name>
       Occupied unfocused desktop.

   F<desktop_name>
       Free focused desktop.

   f<desktop_name>
       Free unfocused desktop.

   U<desktop_name>
       Urgent focused desktop.

   u<desktop_name>
       Urgent unfocused desktop.

   L(T|M)
       Layout of the focused desktop of a monitor.

   T(T|P|F|=|@)
       State of the focused node of a focused desktop.

   G(S?P?L?M?)
       Active flags of the focused node of a focused desktop.
ENVIRONMENT VARIABLES
BSPWM_SOCKET The path of the socket used for the communication between bspc and bspwm. If it isn’t defined, then the following path is used: /tmp/bspwm<host_name><display_number><screen_number>-socket.
CONTRIBUTORS • Steven Allen : steven at stebalien.com
   •   Thomas Adam <thomas at xteddy.org>

   •   Ivan Kanakarakis <ivan.kanak at gmail.com>
AUTHOR
Bastien Dejean : nihilhill at gmail.com
Bspwm 0.9.12 10/08/2025 BSPWM(1)
Deeply explain all off these in seperate subheadings how to what to and with example each of the feature in bspwm in 40000 words
Perfect! Now I have comprehensive information. Let me create a detailed, in-depth guide about bspwm. I’ll now generate the comprehensive answer.
A Comprehensive In-Depth Guide to BSPWM: The Binary Space Partitioning Window Manager
This comprehensive guide provides an exhaustive explanation of BSPWM (Binary Space Partitioning Window Manager), covering all major features, domains, commands, and configurations with detailed examples and practical applications. BSPWM is a sophisticated tiling window manager that organizes windows using binary space partitioning algorithms, represented as leaves in a full binary tree structure. Unlike traditional window managers that require mouse interactions for window management, BSPWM operates through a client-server socket architecture where the bspc command client communicates with the bspwm server daemon, allowing keyboard-driven, highly customizable window management.
I. Introduction to BSPWM Architecture and Core Concepts
A. What is Binary Space Partitioning (BSP)?
Binary Space Partitioning is a mathematical technique originally developed for three-dimensional computer graphics that recursively divides a rectangular space by splitting it along axis-aligned lines. In the context of BSPWM, this algorithm is applied to monitor screen rectangles, creating a hierarchical binary tree structure where each internal node represents a split (either horizontal or vertical) and each leaf node represents a window or empty receptacle.
The fundamental principle behind BSP in BSPWM is elegant: every node in the tree either has exactly zero children (leaf nodes) or exactly two children (internal nodes). Each internal node manages a rectangular area and decides how to split it between its two child nodes using two parameters: the split type (horizontal or vertical) and the split ratio (a value between 0 and 1, where 0.5 means equal distribution). This mathematical approach ensures that every pixel on the screen is always accounted for and that the layout remains perfectly tiled without gaps or overlaps, except for borders and user-configured gaps.
Example of BSP in Action: When you start with a single window filling the entire monitor (node 1), and open a second window (node 2), BSPWM creates an internal node (node b) that splits the screen according to the automatic insertion scheme. If the split is vertical with a ratio of 0.5, the first window gets 50% of the width on the left and the second window gets 50% on the right. Opening a third window (node 3) causes the tree to reorganize, with one of the existing nodes being displaced to create space for the new window.
B. Architecture: Client-Server Socket Model
BSPWM operates using a three-component architecture where the window manager itself (the bspwm daemon) is separate from its control program (bspc) and keyboard binding manager (sxhkd). This separation of concerns provides several advantages:
1. **bspwm daemon**: Runs in the background listening on a Unix domain socket (`/tmp/bspwm<hostname>_<display>_<screen>-socket`), managing all window operations and desktop state
- bspc client: Sends commands to the bspwm socket to manage windows, desktops, monitors, and query the window tree
- sxhkd daemon: A separate process that intercepts X11 keyboard and pointer events and translates them into
bspccommands
This architecture means BSPWM doesn’t handle any keyboard input directly—it only responds to socket messages. This makes BSPWM completely independent of any particular key binding system and allows the same window manager to be used with different hotkey daemons.
C. Fundamental Concepts: Monitors, Desktops, and Nodes
Monitors are physical displays or virtual output devices (detected via RandR or Xinerama protocols) that act as containers holding rectangular regions. Each monitor displays one focused desktop at a time. When you have multiple monitors, each can show a different desktop.
Desktops (also called workspaces or virtual desktops) are independent tree structures that contain windows. A monitor shows one desktop at a time, but can switch between them. Each desktop has its own layout (tiled or monocle) and contains its own hierarchy of windows.
Nodes are the abstract tree nodes—either internal nodes (which define splits) or leaf nodes (which hold windows or are empty receptacles). Every window in BSPWM is represented as a leaf node in the binary tree. Empty leaf nodes without windows are called receptacles and serve as placeholders for future window insertions.
Example Monitor/Desktop/Node Hierarchy:
Monitor 1 (1920x1080)
├── Desktop 1 (focused) - containing Tree T1
│   ├── Node 1 (window: Firefox)
│   ├── Node 2 (window: Terminal)
│   └── Node 3 (receptacle)
├── Desktop 2 - containing Tree T2
│   └── Node 1 (window: Editor)
└── Desktop 3 - containing Tree T3
    └── (empty)

Monitor 2 (1920x1080)
└── Desktop 4 - containing Tree T4
    └── Node 1 (window: Media Player)
II. Selectors: The Foundation of BSPWM Control
Selectors are the core mechanism through which you target windows, desktops, or monitors for operations. Understanding selectors is absolutely essential because almost every bspc command uses them to specify which object to operate on.
A. Selector Syntax and Structure
The general syntax for a selector is:
[REFERENCE#]DESCRIPTOR(.MODIFIER)*
This breaks down as:
- REFERENCE: An optional reference node/desktop/monitor (defaults to focused)
- DESCRIPTOR: The primary selection method (direction, cycling, ID, etc.)
- MODIFIERS: Zero or more filtering conditions, each can be negated with
!
For example: node east.!floating.window means “select the node to the east that is not floating and has a window in it”.
B. Node Selectors in Depth
Node Selectors target specific windows/nodes in the tree. The complete syntax is:
NODE_SEL := [NODE_SEL#](DIR|CYCLE_DIR|PATH|any|first_ancestor|last|newest|older|newer|focused|pointed|biggest|smallest|<node_id>)[.[!]focused][.[!]active][.[!]automatic][.[!]local][.[!]leaf][.[!]window][.[!]STATE][.[!]FLAG][.[!]LAYER][.[!]SPLIT_TYPE][.[!]same_class][.[!]descendant_of][.[!]ancestor_of]
Node Selector Descriptors (primary selection methods):
| Descriptor | Behavior | Example |
|---|---|---|
north|south|east|west (DIR) | Select window spatially in given direction | bspc node west -f |
next|prev (CYCLE_DIR) | Cycle within tree traversal order | bspc node next -f |
any | Select first matching node | bspc node any.floating -f |
focused | Currently focused node | bspc node focused -t floating |
pointed | Node under mouse pointer | bspc node pointed -c |
biggest|smallest | Largest or smallest leaf | bspc node biggest -s focused |
last | Previously focused node | bspc node last -f |
newest|older|newer | History-based selection | bspc node newest -n @^1 |
<node_id> | Specific node by ID | bspc node 0x00800001 -t floating |
@PATH | Path-based navigation | bspc node @/first/brother -f |
Node Selector Modifiers (filtering conditions):
# States
.tiled              - Only tiled windows
.pseudo_tiled       - Only pseudo-tiled windows
.floating           - Only floating windows
.fullscreen         - Only fullscreen windows

# Flags
.hidden             - Hidden (not displayed)
.sticky             - Stays on focused desktop
.private            - Resists movement/resize
.locked             - Can't be closed
.marked             - Custom marking
.urgent             - Has urgency hint

# Layers
.below              - Below normal layer
.normal             - Normal stacking layer
.above              - Above normal layer

# Tree structure
.leaf               - Leaf nodes only
.window             - Nodes with windows only
.same_class         - Windows of same application class
.descendant_of      - All descendants
.ancestor_of        - All ancestors
Practical Node Selector Examples:
# Focus the window to the east
bspc node east -f

# Focus the largest window that's not fullscreen
bspc node biggest.!fullscreen -f

# Select first tiled window on current desktop
bspc node .local.tiled -f

# Move focused window to the second child position
bspc node -n @/second -f

# Select all windows of Firefox class
bspc node .same_class -t floating
C. Desktop Selectors
Desktop Selectors target specific workspaces and have the syntax:
DESKTOP_SEL := [DESKTOP_SEL#](CYCLE_DIR|any|last|newest|older|newer|[MONITOR_SEL:](focused|^<n>)|<desktop_id>|<desktop_name>)[.[!]focused][.[!]active][.[!]occupied][.[!]urgent][.[!]local][.[!]LAYOUT][.[!]user_LAYOUT]
Desktop Selector Descriptors:
| Descriptor | Behavior |
|---|---|
next|prev | Cycle to next/previous desktop |
focused | Currently active desktop |
^<n> | Nth desktop (^1 = first) |
^1|^2|^3... | Numbered desktops |
<desktop_name> | Desktop by name |
occupied | Desktops with windows |
urgent | Desktops with urgent windows |
Practical Desktop Selector Examples:
# Focus the second desktop
bspc desktop ^2 -f

# Send window to desktop named "work" and follow
bspc node -d work --follow

# Focus an occupied desktop
bspc desktop .occupied -f

# List all unoccupied desktops
bspc query -D -d .!occupied
D. Monitor Selectors
Monitor Selectors target specific physical displays:
MONITOR_SEL := [MONITOR_SEL#](DIR|CYCLE_DIR|any|last|newest|older|newer|focused|pointed|primary|^<n>|<monitor_id>|<monitor_name>)[.[!]focused][.[!]occupied]
Practical Monitor Selector Examples:
# Focus the monitor to the right
bspc monitor east -f

# Focus the primary monitor
bspc monitor primary -f

# List all monitors
bspc query -M --names

# Send desktop to second monitor
bspc desktop -m ^2 --follow
E. Path Selectors: Advanced Tree Navigation
Path selectors allow you to navigate the tree structure directly using spatial relationships:
PATH := @[DESKTOP_SEL:][[/]JUMP](/JUMP)*
JUMP := first|1|second|2|brother|parent|DIR
Path Navigation Examples:
# Focus first child of focused node
bspc node @/first -f

# Focus the second child
bspc node @/second -f

# Focus parent of focused node
bspc node @/parent -f

# Focus brother (sibling) of focused node
bspc node @/brother -f

# Navigate using directions within path
bspc node @/first/east -f

# Cross-desktop path navigation
bspc node @^2:/first -f  # First child of desktop 2
III. Window States: How BSPWM Manages Window Modes
BSPWM provides four distinct window states that determine how windows are positioned and rendered. Understanding these states is crucial for effective window management.
A. Tiled State
Tiled windows are fully managed by the BSPWM tiling algorithm. Their size and position are entirely determined by their position in the binary tree and the tree’s split ratios. Windows in this state cannot overlap, and the entire monitor space is divided among them.
Characteristics of Tiled Windows:
- Respects and fills the rectangular region allocated by the tree
- Cannot overlap other tiled or pseudo-tiled windows
- Automatically resizes when the tree structure changes
- Follows the configured border width and gaps
- Cannot be freely moved or resized by the user (only through tree operations)
Example Configuration:
# Set focused window to tiled
bspc node focused -t tiled

# Set all windows of Firefox to tiled
bspc node .same_class -t tiled

# Create rule for specific application
bspc rule -a libroffice -t tiled
B. Pseudo-Tiled State
Pseudo-tiled (also called sticky floating or “forced”) windows are a hybrid between tiled and floating. They are positioned and sized according to the tree structure like tiled windows, but they automatically shrink to respect the application’s size hints (if enabled) and don’t stretch beyond their requested size.
Characteristics of Pseudo-Tiled Windows:
- Positioned like tiled windows (respects tree allocation)
- Can shrink to respect window size hints
- Won’t stretch beyond application’s preferred size
- Useful for dialog windows, floating applications that you want managed by the tree
- Still participate in the binary tree layout
Example Use Cases:
# Set to pseudo-tiled (good for dialogs)
bspc node focused -t pseudo_tiled

# Rule for GIMP tools palette (prefers fixed size)
bspc rule -a Gimp -t pseudo_tiled

# This window takes its tree space but respects its size hints
C. Floating State
Floating windows are completely freed from the tiling tree structure. They can be positioned and resized freely anywhere on the monitor, overlapping other windows. However, floating windows are still part of the tree structure (just not as visible participants) and still have a position in the tree hierarchy.
Characteristics of Floating Windows:
- Can be moved and resized freely with keyboard or mouse
- Can overlap other windows
- Still counted in the tree but don’t participate in tiling
- Can be moved to different desktops
- Useful for temporary windows, dialogs, notifications
Example Operations:
# Set focused window to floating
bspc node focused -t floating

# Move floating window by pixels
bspc node focused -v -20 0    # Move left 20 pixels
bspc node focused -v 0 20     # Move down 20 pixels

# Resize floating window
bspc node focused -z bottom 0 20  # Expand bottom side

# Focus floating windows only
bspc node .floating -f
D. Fullscreen State
Fullscreen windows fill the entire monitor rectangle with no borders or gaps. Fullscreen windows are always on top (in the NORMAL stacking layer by default) and completely hide other windows beneath them. Important: BSPWM uses different stacking layers which affect fullscreen behavior.
Characteristics of Fullscreen Windows:
- Fills entire monitor dimensions
- No borders, gaps, or padding applied
- Appears above all other windows
- Can be overridden by ABOVE-layer windows
- Useful for games, presentations, full-screen applications
Example Operations:
# Toggle current window fullscreen
bspc node focused -t fullscreen

# Set specific application to fullscreen
bspc rule -a mpv -t fullscreen

# Make fullscreen window exit
bspc node focused -t tiled  # Return to tiled

# Focus under fullscreen window (requires switching states)
bspc node focused.fullscreen -t floating
E. State Toggling and Dynamic Switching
BSPWM supports elegant state toggling using the tilde ~ character, which switches between the current state and the previous state:
# Toggle between current and previous state
bspc node focused -t ~

# Toggle to specific state (if currently in that state, revert)
bspc node focused -t ~floating  # If floating, goes back; if not, becomes floating

# Create sxhkd binding for cycling through states
super + {t,s,f}
    bspc node -t {tiled,pseudo_tiled,floating}

# Or with toggling
super + shift + {t,s,f}
    bspc node -t {~tiled,~pseudo_tiled,~floating}
IV. Node Flags: Behavioral Modifiers for Windows
Node flags are boolean properties that modify how BSPWM treats a particular window beyond just its state. These flags enable powerful window management patterns and advanced configurations.
A. Hidden Flag
Hidden windows are completely removed from the layout and hidden from view. They don’t occupy any tiling space and can be toggled to reappear later.
Usage Examples:
# Hide focused window
bspc node focused -g hidden

# Show all hidden windows on current desktop
bspc node .hidden -g hidden=off

# Toggle hidden state
bspc node focused -g hidden=toggle

# Script to create scratchpad functionality
#!/bin/bash
if bspc node focused -g | grep hidden; then
    bspc node focused -g hidden=off -f
else
    bspc node focused -g hidden=on
fi
B. Sticky Flag
Sticky windows automatically follow the focused desktop of their monitor. This means if you switch desktops on a monitor, the sticky window moves with you, remaining visible on every desktop you visit.
Use Cases:
- Always-visible status windows
- Quick-reference applications
- Floating notes or widgets
- Monitor-persistent applications
Configuration:
# Make focused window sticky
bspc node focused -g sticky

# Rule for always-visible terminal
bspc rule -a sticky_terminal -g sticky=on -t floating

# Create sticky note/dashboard window
st -n sticky_widget &  # Custom class
bspc rule -a sticky_widget -g sticky=on state=floating

# Sxhkd binding
super + shift + s
    bspc node focused -g sticky
C. Private Flag
Private windows attempt to maintain their tiling position and size even when other windows are added or removed from the tree. This prevents automatic resizing when the tree structure changes.
Behavior:
- Resists repositioning when tree changes
- Useful for preventing windows from being moved around
- Maintains size hints more strictly
Example:
# Make a media player private so it stays in place
bspc node id:0x00800001 -g private

# Rule for video players
bspc rule -a vlc -g private=on

# Practical use: video window that shouldn't move when opening other windows
D. Locked Flag
Locked windows ignore the node -c (close) command, preventing accidental closure through keyboard shortcuts. They can only be closed using node -k (kill) or through the application’s own UI.
Usage:
# Lock focused window against closure
bspc node focused -g locked

# Lock specific application
bspc rule -a firefox -g locked=on

# Toggle lock state
bspc node focused -g locked=toggle

# In sxhkd, you might have:
super + shift + l
    bspc node focused -g locked

# And then close uses -c which is ignored for locked nodes
super + shift + w
    bspc node focused -c  # Silently fails for locked windows
E. Marked Flag
Marked nodes are flagged with an arbitrary marker that serves as a building block for custom scripting. A marked node automatically becomes unmarked after being sent to a preselected node.
Key Characteristics:
- Completely arbitrary—doesn’t change behavior by itself
- Used for deferred operations (mark now, operate later)
- Automatically unmarks after preselection
- Enables powerful multi-step workflows
Practical Examples:
# Mark a node for later operation
bspc node focused -g marked

# Move all marked nodes to preselected location
bspc node newest.marked.local -n newest.!automatic.local

# Sxhkd workflow example:
# Step 1: Mark windows
super + m
    bspc node focused -g marked

# Step 2: Navigate and preselect area
super + p; {h,j,k,l}
    bspc node -p {west,south,north,east}

# Step 3: Move marked nodes to preselection
super + y
    bspc node newest.marked.local -n newest.!automatic.local

# Practical workflow: mark multiple windows, define their layout with
# preselections, then move them all at once
F. Urgent Flag
Urgent windows have their urgency hint set externally (usually by applications requesting attention—like chat notifications). This flag indicates that a window requires user attention.
BSPWM Behavior with Urgent:
- Desktop containing urgent window can be highlighted differently
- Can be used to style borders in unique colors
- Can drive notifications to user
Configuration:
# Style urgent windows differently
bspc config urgent_border_color "#FF0000"

# Focus urgent windows
bspc node .urgent -f

# Clear urgency (focus the window)
bspc node focused -f
G. Managing Multiple Flags Simultaneously
Flags can be combined and managed together:
# Set multiple flags at once
bspc node focused -g hidden=on -g sticky=on -g locked=on

# Toggle specific flag
bspc node focused -g marked=toggle

# Create comprehensive window configuration
bspc rule -a myapp \
    -g hidden=off \
    -g sticky=on \
    -g private=on \
    state=floating
V. Stacking Layers: Window Z-Order Management
BSPWM implements three stacking layers that determine the Z-order (depth) in which windows are rendered. This provides fine control over which windows appear on top.
A. Layer Overview
ABOVE ────────── (highest Z-order)
  ├── Fullscreen > Floating > Tiled
NORMAL ────────── (default)
  ├── Fullscreen > Floating > Tiled
BELOW ────────── (lowest Z-order)
  ├── Fullscreen > Floating > Tiled
Within each layer, windows follow a consistent drawing order: fullscreen windows appear above floating windows, which appear above tiled/pseudo-tiled windows.
B. Setting and Managing Layers
The ABOVE Layer: Used for permanently visible windows that should never be hidden:
# Make window appear above everything
bspc node focused -l above

# Typical use: notification windows, always-on-top utilities
bspc rule -a notification -l above

# Floating panel that should stay visible
The NORMAL Layer: The default layer for most windows:
# Return to normal layer
bspc node focused -l normal

# Most windows stay here
The BELOW Layer: For background windows:
# Place window below everything
bspc node focused -l below

# Use case: background wallpaper application, monitor display
bspc rule -a wallpaper_app -l below
C. Practical Layer Usage
# Create an always-on-top floating window
bspc node floating_app -l above

# Desktop setup: wallpaper below, then tiled windows, then floating on top
bspc node .wallpaper -l below
bspc node .tiled -l normal
bspc node .floating -l above

# Advanced: fullscreen overlay
# When you want a fullscreen window but something above it
bspc rule -a overlay_app -t floating -l above -r

# Solve fullscreen problems: put floating windows on above layer
bspc config external_rules_command ~/.config/bspwm/external_rules

# In external_rules script:
[[ "$(xdotool getactivewindow getwindowname)" == *"Overlay"* ]] && \
    echo "layer=above"
VI. Receptacles: The Empty Node Concept
Receptacles are leaf nodes in the tree that don’t hold any window. They serve as placeholders for future window placements and enable powerful tree-building patterns.
A. Understanding Receptacles
When you insert a receptacle at a node’s location, it becomes an empty leaf in the tree. When a new window is opened and directed to a receptacle (in automatic mode), the receptacle is replaced by the window node. This allows you to pre-build the entire tree structure before opening windows.
Receptacle Key Properties:
- Leaf nodes without windows
- Can be inserted explicitly at any location
- Automatically replaced when window inserted in automatic mode
- Can be preselected and killed manually
- Useful for creating fixed layouts
B. Creating and Managing Receptacles
# Insert receptacle at focused node
bspc node focused -i

# Insert receptacle on specific location
bspc node -n @/first -i

# Kill a receptacle
bspc node receptacle_id -k

# Query all receptacles on desktop
bspc query -N -n .leaf.!window

# List receptacle IDs
bspc query -N -n .receptacle
C. Receptacle-Based Layout System
Receptacles enable a sophisticated layout system using dump/load:
#!/bin/bash
# Build layout with receptacles
bspc desktop ^1 -l monocle

# Create tree structure using receptacles
bspc node -i           # Receptacle 1
bspc node -i           # Receptacle 2
bspc node -i           # Receptacle 3

# Now when you open windows, they fill these receptacles in order
# Window 1 goes to receptacle 1
# Window 2 goes to receptacle 2
# Window 3 goes to receptacle 3

# Dump this state
bspc wm -d > ~/.config/bspwm/layouts/my_layout.json

# Later, restore with:
bspc wm -l ~/.config/bspwm/layouts/my_layout.json
D. Receptacle vs. Preselection Comparison
| Aspect | Receptacle | Preselection |
|---|---|---|
| Visual Feedback | None | Colored preview area |
| Automatic Replacement | Yes, in auto mode | No, requires manual action |
| Multiple Instances | Yes, can have many | Yes, one per node |
| Persistence | Until window inserted | Canceled on split |
| Use Case | Pre-build layouts | Interactive splitting |
# Using receptacles for fixed layout
bspc node -i; bspc node -i; bspc node -i  # 3 receptacles
# Open windows - they fill the receptacles

# Using preselection for interactive layout
bspc node -p west      # Next window splits to west
# Open window - it appears to the west
VII. Insertion Modes: Automatic vs. Manual Window Placement
BSPWM provides two insertion modes that determine how new windows are positioned in the tree: automatic and manual modes.
A. Automatic Insertion Mode (Default)
In automatic mode, new windows are inserted according to one of three schemes that automatically determine where they should go:
How Automatic Mode Works: When in automatic insertion mode at node N, a new window takes the space of N, and N is displaced into a new branch. The tree automatically reorganizes to accommodate the new window.
The Three Automatic Schemes:
1. Spiral Scheme (Default: “alternate”)
The spiral scheme creates a rotating pattern where windows are arranged in a spiral from outside inward (or inside outward, depending on initial_polarity). This is the most common and visually appealing default:
# Enable spiral (alternate) scheme
bspc config automatic_scheme alternate

# How it works visually:
# With 4 windows:
#   ┌─────────────────┐
#   │       1         │
#   │  ┌────────┐     │
#   │  │   2    │  4  │
#   │  │ ┌──┐   │     │
#   │  │ │3 │   │     │
#   │  │ └──┘   │     │
#   │  └────────┘     │
#   └─────────────────┘

# Sxhkd binding to switch schemes
super + shift + a
    bspc config automatic_scheme alternate && \
    notify-send "Spiral mode"
2. Longest Side Scheme The longest_side scheme always splits the longest side of the available rectangle, creating a more balanced layout:
# Enable longest side scheme
bspc config automatic_scheme longest_side

# How it works: always splits the longest rectangle edge
# Tends to create more balanced, square-ish windows

# Practical comparison:
# Spiral creates:     │ Longest_side creates:
#    │ │ │ │ │         │  │  │
#    ├─┼─┼─┼─┤         ├──┼──┤
#    │ │ │ │ │         │  │  │
#    ├─┴─┴─┴─┤         └──┴──┘

super + shift + l
    bspc config automatic_scheme longest_side && \
    notify-send "Longest side mode"
3. Alternate Scheme Alternates between horizontal and vertical splits in a consistent pattern:
# Note: Recent versions use "alternate" for spiral
# Check documentation for your version
bspc config automatic_scheme spiral  # May be labeled "spiral" in newer versions
B. Manual Insertion Mode (Preselection)
In manual mode, you explicitly specify where the next window should be placed using preselection. This allows precise control over window placement:
How Manual Mode Works:
- Select a node
- Preselect a direction (north, south, east, west)
- When a new window opens, it automatically appears in the preselected direction
- The preselection is consumed and automatic mode resumes
# Enable preselection on focused node
bspc node -p west       # Next window splits to the west (left)
bspc node -p north      # Next window splits to the north (top)
bspc node -p south      # Next window splits to the south (bottom)
bspc node -p east       # Next window splits to the east (right)

# Cancel preselection
bspc node -p cancel

# Adjust preselection ratio (default 0.5)
bspc node -o 0.3        # Next window gets 30%, current gets 70%
bspc node -o 0.7        # Next window gets 70%, current gets 30%

# Example workflow:
# 1. Preselect split direction
bspc node -p west
# 2. Open new window (e.g., Alt+Enter in sxhkd)
# 3. New window appears to the west
# 4. Preselection is consumed, back to automatic mode
C. Configuration Options for Insertion
# Set automatic scheme
bspc config automatic_scheme {alternate|longest_side|spiral}

# Set initial polarity (where to attach on single-node tree)
bspc config initial_polarity first_child   # Attach as first child
bspc config initial_polarity second_child  # Attach as second child

# Set directional focus tightness (affects directional selection)
bspc config directional_focus_tightness high   # Strict direction matching
bspc config directional_focus_tightness low    # Loose direction matching

# Enable/disable removal adjustment
bspc config removal_adjustment true   # Adjust tree when removing windows
D. Practical Insertion Mode Usage
# Sxhkd complete example:
# Focus node and cycle insertion schemes
super + shift + {a,l,s}
    bspc config automatic_scheme {alternate,longest_side,spiral} && \
    notify-send "Scheme: $(bspc config automatic_scheme)"

# Preselection workflow
super + ctrl + {h,j,k,l}
    bspc node -p {west,south,north,east}

# Clear preselection
super + ctrl + space
    bspc node -p cancel

# Adjust preselection ratio
super + {minus,equal}
    RATIO=$(bspc config split_ratio); \
    bspc config split_ratio $(bc <<< "scale=2; $RATIO - 0.05") || \
    bspc config split_ratio $(bc <<< "scale=2; $RATIO + 0.05")

# Open window (in preselection, goes to preselected location)
super + Return
    terminal
VIII. Node Operations: Commands for Window Management
The node domain contains the most frequently used commands for managing individual windows.
A. Focus Operations
Focus moves keyboard and mouse input to a specific window:
# Focus specific selector
bspc node SELECTOR -f

# Focus east window
bspc node east -f

# Focus the biggest window
bspc node biggest -f

# Focus floating windows
bspc node .floating -f

# Focus window by ID
bspc node 0x00800001 -f

# Focus and follow (for multi-monitor):
bspc node NODE_SEL -f --follow

# Sxhkd focus example:
super + {h,j,k,l}
    bspc node -f {west,south,north,east}

super + {comma,period}
    bspc node -f {prev,next}.local.!hidden.window

super + bracket{left,right}
    bspc desktop -f {prev,next}.local
B. Activation Operations
Activate sets a node as the active node of its desktop (for multi-monitor awareness):
# Activate focused node
bspc node focused -a

# This differs from focus in multi-monitor setups
# Focus changes which window receives input
# Activate sets which is "most recent" on that desktop
C. Moving Windows Between Desktops
Send to Desktop moves a window to a different workspace:
# Send to specific desktop
bspc node -d DESKTOP_SEL

# Send to desktop 2
bspc node -d ^2

# Send to named desktop
bspc node -d "work"

# Send and follow (keep focus on window)
bspc node -d ^2 --follow

# Sxhkd example:
super + shift + {1-9,0}
    bspc node -d '^{1-9,10}' --follow

# Move to next desktop
super + shift + bracket{left,right}
    bspc node -d {prev,next}.local --follow
D. Moving Windows Between Monitors
Send to Monitor moves windows to different physical displays:
# Send to specific monitor
bspc node -m MONITOR_SEL

# Send to east monitor
bspc node -m east --follow

# Send to primary monitor
bspc node -m primary --follow

# Sxhkd example:
super + shift + m
    bspc node -m next --follow

# Send to specific monitor and follow
super + shift + {Left,Right}
    bspc node -m {west,east} --follow
E. Swapping Nodes
Swap exchanges the position of two nodes in the tree:
# Swap with another node
bspc node -s NODE_SEL

# Swap with brother (sibling)
bspc node -s @brother

# Swap with previous window
bspc node -s prev

# Swap and follow (focus stays on window being swapped)
bspc node -s NODE_SEL --follow

# Practical example:
# Swap with biggest window
super + g
    bspc node -s biggest.window

# Swap with last focused
super + shift + g
    bspc node -s last
F. Resizing and Adjusting Windows
Move repositions floating windows:
# Move floating window by pixels
bspc node -v dx dy

# Move left 20 pixels
bspc node -v -20 0

# Move down 20 pixels
bspc node -v 0 20

# Sxhkd example for floating window movement:
super + shift + {Left,Down,Up,Right}
    bspc node -v {-20 0,0 20,0 -20,20 0}
Resize changes window dimensions:
# Resize by moving a specific edge
bspc node -z EDGE dx dy

# EDGE options: top, left, bottom, right, top_left, top_right, bottom_left, bottom_right

# Expand bottom edge by 20 pixels
bspc node -z bottom 0 20

# Contract left edge by 20 pixels
bspc node -z left 20 0

# Sxhkd resizing mode:
super + alt + {h,j,k,l}
    bspc node -z {left -20 0,bottom 0 20,top 0 -20,right 20 0}

# Or contract:
super + alt + shift + {h,j,k,l}
    bspc node -z {left 20 0,bottom 0 -20,top 0 20,right -20 0}

# Continuous resize mode (like vim motions):
super + r : {h,j,k,l}
    bspc node -z {left -20 0,bottom 0 20,top 0 -20,right 20 0}
G. Managing Split Ratios (tiled windows)
Ratio adjusts how space is divided between windows:
# Set specific ratio (0 < ratio < 1)
bspc node -r RATIO

# Set to 0.6 (60/40 split)
bspc node -r 0.6

# Adjust by relative amount
bspc node -r +0.05    # Increase ratio by 5%
bspc node -r -0.05    # Decrease ratio by 5%

# Change by pixel amount
bspc node -r +10px    # Increase by 10 pixels
bspc node -r -10px    # Decrease by 10 pixels

# Sxhkd ratio adjustment:
super + shift + {minus,equal}
    bspc node -r {-0.05,+0.05}

# Balance splits
super + b
    bspc node @focused -B
H. Tree Manipulation Operations
Rotate spins the tree structure at a node:
# Rotate 90 degrees clockwise
bspc node -R 90

# Rotate 180 degrees
bspc node -R 180

# Rotate 270 degrees (or -90)
bspc node -R 270

# Sxhkd binding:
super + {comma,period}
    bspc node @focused -R {90,-90}
Flip mirrors the tree:
# Flip horizontally (left-right)
bspc node -F horizontal

# Flip vertically (top-bottom)
bspc node -F vertical

# Sxhkd bindings:
super + {slash,backslash}
    bspc node @focused -F {horizontal,vertical}
Circulate rotates windows in the tree:
# Circulate windows forward (clockwise)
bspc node -C forward

# Circulate windows backward (counter-clockwise)
bspc node -C backward

# Practical use: rotate order of windows without changing layout
super + shift + c
    bspc node -C forward

# This moves: window1 -> window2 -> window3 -> window1
Equalize resets all split ratios to default (0.5):
# Reset all ratios in tree
bspc node -E

# Useful when tree becomes unbalanced
super + shift + e
    bspc node -E

# Undo manual resizing
Balance adjusts ratios so all leaves occupy equal area:
# Balance the tree
bspc node -B

# After resizing, rebalance:
super + shift + b
    bspc node -B

# Different from equalize:
# Equalize: all ratios = 0.5
# Balance: adjusts all ratios so leaf areas are equal
I. Window State and Flag Management
State changes window state:
# Set specific state
bspc node -t STATE

# States: tiled, pseudo_tiled, floating, fullscreen

# Toggle to previous state
bspc node -t ~

# Toggle to specific state (if already in state, revert)
bspc node -t ~floating  # floating <-> previous state

# Sxhkd state cycling:
super + {t,shift+t,s,f}
    bspc node -t {tiled,pseudo_tiled,floating,fullscreen}

# Individual toggles:
super + shift + t
    bspc node -t floating
super + shift + f
    bspc node -t fullscreen
Flag manages node flags:
# Set flag on/off
bspc node -g FLAG={on|off}

# Toggle flag
bspc node -g FLAG

# Flags: hidden, sticky, private, locked, marked, urgent

# Examples:
bspc node -g hidden=on       # Hide window
bspc node -g locked=toggle   # Toggle lock
bspc node -g marked          # Mark (toggle)

# Sxhkd bindings:
super + ctrl + {m,x,y,z}
    bspc node -g {marked,locked,sticky,private}

# Sticky window:
super + shift + s
    bspc node -g sticky=toggle
Layer sets stacking layer:
# Set layer
bspc node -l LAYER

# Layers: below, normal, above

bspc node -l above    # Always on top
bspc node -l normal   # Standard (default)
bspc node -l below    # Background

# Sxhkd binding:
super + {comma,period}
    bspc node -l {below,above}
J. Closing and Killing Windows
Close sends a close signal to the window:
# Close focused window (gracefully)
bspc node -c

# Close window by selector
bspc node NODE_SEL -c

# Sxhkd:
super + shift + w
    bspc node -c
Kill forcefully terminates the window:
# Kill focused window
bspc node -k

# Kill all windows on desktop
bspc node -k

# Use kill when close doesn't work
super + shift + q
    bspc node -k
K. Inserting and Managing Receptacles
Insert Receptacle creates empty placeholder nodes:
# Insert receptacle at focused node location
bspc node -i

# Build layout with receptacles before opening windows
bspc node -i; bspc node -i; bspc node -i

# Then open windows and they fill receptacles

# Script to create grid layout:
#!/bin/bash
# Create 2x2 grid of receptacles
bspc desktop -l tiled
for i in {1..3}; do bspc node -i; done
IX. Desktop Operations: Workspace Management
The desktop domain manages virtual desktops/workspaces.
A. Creating and Managing Desktops
Add Desktops to a monitor:
# Create desktops
bspc monitor -a NAMES

# Add desktops to current monitor
bspc monitor -a I II III IV V

# Multiple desktops at once:
bspc monitor -a I II III IV V VI VII VIII IX X

# Sxhkd configuration (in bspwmrc):
bspc monitor -a 1 2 3 4 5 6 7 8 9 10
Reset Desktops to match a list:
# Replace desktop list
bspc monitor -d NAMES

# Removes, adds, or renames desktops to match list
bspc monitor -d one two three
Rename Desktop:
# Rename desktop
bspc desktop -n NAME

# Example:
bspc desktop -n "work"
bspc desktop ^2 -n "media"
Remove Desktop:
# Remove empty desktop
bspc desktop -r

# Remove desktop 5
bspc desktop ^5 -r
B. Focusing Desktops
Focus Desktop:
# Focus specific desktop
bspc desktop SELECTOR -f

# Focus desktop 2
bspc desktop ^2 -f

# Focus next desktop
bspc desktop next -f

# Focus previous
bspc desktop prev -f

# Focus by name
bspc desktop "work" -f

# Sxhkd bindings:
super + {1-9,0}
    bspc desktop -f '^{1-9,10}'

# Cycle through desktops
super + {Right,Left}
    bspc desktop -f {next,prev}.local
C. Desktop Layout
Layout switches between tiling modes:
# Switch layout
bspc desktop -l LAYOUT

# Layouts: tiled (default), monocle

# Set to monocle (one window fullscreen)
bspc desktop -l monocle

# Cycle layout
bspc desktop -l next

# Sxhkd:
super + m
    bspc desktop -l next

# Or explicit:
super + {t,f}
    bspc desktop -l {tiled,monocle}
Monocle Layout Options:
# Borderless monocle (no window borders)
bspc config borderless_monocle true

# Gapless monocle (no gaps)
bspc config gapless_monocle true

# Padding in monocle
bspc config top_monocle_padding 20
bspc config left_monocle_padding 20
bspc config right_monocle_padding 20
bspc config bottom_monocle_padding 20

# Single window uses monocle
bspc config single_monocle true
D. Moving and Swapping Desktops
Send Node to Desktop:
# Send focused window to desktop
bspc node -d DESKTOP_SEL

# Send to desktop 2
bspc node -d ^2

# Send and follow (keep focus on window)
bspc node -d ^2 --follow

# Send to named desktop
bspc node -d "work" --follow

# Sxhkd example:
super + shift + {1-9,0}
    bspc node -d '^{1-9,10}' --follow
Swap Desktops:
# Swap position of two desktops
bspc desktop -s DESKTOP_SEL

# Swap focused with desktop 2
bspc desktop -s ^2

# Sxhkd:
super + shift + {Left,Right}
    bspc desktop -s {prev,next}.local
Move Desktop to Monitor:
# Move desktop to different monitor
bspc desktop -m MONITOR_SEL

# Move desktop to east monitor
bspc desktop -m east

# Sxhkd:
super + alt + {Left,Right}
    bspc desktop -m {west,east}
E. Bubble and Reorder Desktops
Bubble moves desktop in focus order:
# Bubble left (move before previous)
bspc desktop -b prev

# Bubble right (move after next)
bspc desktop -b next

# Sxhkd:
super + shift + {comma,period}
    bspc desktop -b {prev,next}
X. Monitor Operations: Multi-Display Management
Monitor operations manage physical displays or virtual outputs.
A. Monitor Configuration
Add Monitor:
# Add virtual monitor
bspc wm -a NAME WIDTHxHEIGHT+X+Y

# Example: virtual 1920x1080 at position 0,0
bspc wm -a virtual_monitor 1920x1080+0+0
Reset Monitor Rectangle:
# Set monitor dimensions and position
bspc monitor -g WIDTHxHEIGHT+X+Y

# Set to 1920x1080 at 0,0
bspc monitor -g 1920x1080+0+0

# Get current monitor dimensions
bspc query -M -m focused -T | jq '.rectangle'
Rename Monitor:
# Rename monitor
bspc monitor -n NAME

# Rename primary monitor
bspc monitor primary -n "Main"
Remove Monitor:
# Remove monitor
bspc monitor -r

# Must be empty or desktops transferred first
B. Focus and Swap
Focus Monitor:
# Focus specific monitor
bspc monitor SELECTOR -f

# Focus east monitor
bspc monitor east -f

# Focus primary
bspc monitor primary -f

# Focus next monitor
bspc monitor next -f

# Sxhkd:
super + shift + {h,j,k,l}
    bspc monitor -f {west,south,north,east}
Swap Monitors:
# Swap positions of monitors
bspc monitor -s MONITOR_SEL

# Swap with east monitor
bspc monitor -s east

# Sxhkd:
super + shift + m
    bspc monitor -s next
C. Monitor-Specific Configuration
# Set padding per monitor
bspc config -m MONITOR top_padding 20

# Set for specific monitor
bspc config -m primary top_padding 20

# Window gap per monitor
bspc config -m eDP1 window_gap 10
XI. Query Operations: Inspecting the Window Tree
The query domain allows you to inspect and extract information about the window tree.
A. Querying Nodes
Query Nodes:
# List node IDs matching selector
bspc query -N -n SELECTOR

# Get focused window ID
bspc query -N -n focused

# Get all tiled windows
bspc query -N -n .tiled

# Get all windows on current desktop
bspc query -N -d focused

# Use in scripts:
FOCUSED_ID=$(bspc query -N -n focused)
echo "Focused window ID: $FOCUSED_ID"

# Get multiple nodes:
for node in $(bspc query -N -n .floating); do
    echo "Floating window: $node"
done
B. Querying Desktops
Query Desktops:
# List desktop names
bspc query -D --names

# List desktop IDs
bspc query -D

# Get occupied desktops
bspc query -D -d .occupied

# Get empty desktops
bspc query -D -d .!occupied

# Get urgent desktops
bspc query -D -d .urgent

# Script example:
EMPTY_DESK=$(bspc query -D -d .!occupied | head -1)
echo "First empty desktop: $EMPTY_DESK"
C. Querying Monitors
Query Monitors:
# List monitor names
bspc query -M --names

# List monitor IDs
bspc query -M

# Get focused monitor
bspc query -M -m focused --names

# Get all monitors
for monitor in $(bspc query -M); do
    echo "Monitor: $monitor"
done
D. Tree Visualization
Query Tree:
# Print entire tree as JSON
bspc query -T

# Query desktop tree
bspc query -T -d focused

# Query node subtree
bspc query -T -n focused

# Pretty print with jq:
bspc query -T -d focused | jq .

# Extract specific info:
bspc query -T | jq '..[].id'  # All node IDs
bspc query -T | jq '..[].client.class'  # All window classes
XII. Window Rules: Automatic Window Configuration
Rules apply automatic configurations to windows based on matching criteria.
A. Built-in Rules
Basic Rule Syntax:
bspc rule -a CLASS[:INSTANCE[:NAME]] [options]

# Options:
# State: state=STATE (tiled|pseudo_tiled|floating|fullscreen)
# Desktop: desktop=DESKTOP_SEL
# Monitor: monitor=MONITOR_SEL
# Flags: hidden=on|off, sticky=on|off, private=on|off, locked=on|off, marked=on|off
# Layer: layer=LAYER (below|normal|above)
# Splitting: split_dir=DIR, split_ratio=RATIO
# Size hints: honor_size_hints=true|false|tiled|floating
# Layout: rectangle=WxH+X+Y (for floating windows)
# Other: center=on|off, follow=on|off, manage=on|off, focus=on|off, border=on|off

# One-shot: -o|--one-shot (applies only once)
B. Creating Rules
Common Rule Examples:
# Firefox always opens on desktop 2
bspc rule -a Firefox desktop=^2

# GIMP tools floating, sticky
bspc rule -a Gimp -t floating -g sticky=on

# Media player fullscreen
bspc rule -a vlc -t fullscreen

# Dialog windows floating
bspc rule -a '*' -t floating -o  # One-shot for unmatched dialogs

# Locked terminal
bspc rule -a Termite -g locked=on

# Application on specific monitor
bspc rule -a Firefox monitor=HDMI-1

# Combination rule
bspc rule -a libreoffice \
    -t pseudo_tiled \
    desktop=^3 \
    -g sticky=on \
    split_ratio=0.7

# Multiple class selectors
bspc rule -a {Firefox,Chrome} desktop=^2
C. Matching Patterns
Class Matching:
# Exact class match
bspc rule -a Firefox state=floating

# Class and instance
bspc rule -a Firefox:Preferences state=floating

# Class, instance, and name
bspc rule -a "VLC:vlc::*" state=floating

# Wildcard patterns
bspc rule -a "*" state=floating -o  # Fallback rule
bspc rule -a "* notification*" state=floating layer=above

# Negation
bspc rule -a Firefox -r  # Remove Firefox rules
D. List and Manage Rules
Rule Management:
# List all rules
bspc rule -l

# List rules numbered
bspc rule -l | cat -n

# Remove rule by pattern
bspc rule -r Firefox

# Remove rule by number
bspc rule -r ^3

# Remove all rules
bspc rule -r '*'

# Remove specific rules
bspc rule -r Firefox Chromium
E. External Rules Command
For more complex rules, use an external script:
# Configure external rules
bspc config external_rules_command ~/.config/bspwm/external_rules

# Script receives: WID CLASS INSTANCE [INTERMEDIATE_RULES]
# Output format: key1=value1 key2=value2 ...

# Example external_rules script:
#!/bin/bash

wid=$1
class=$2
instance=$3

# Get window geometry with xdotool
geometry=$(xdotool getwindowgeometry "$wid" | awk '/Geometry/ {print $2}')

# Custom logic
if [[ "$class" == "Firefox" ]]; then
    echo "desktop=^2"
elif [[ "$geometry" == "1920x1080"* ]]; then
    # Large window - make floating
    echo "state=floating"
fi

# Can be very complex:
if xdotool getwindowname "$wid" | grep -q "Settings"; then
    echo "state=floating layer=above center=on"
fi

# Make executable:
chmod +x ~/.config/bspwm/external_rules
XIII. Events and Subscriptions: Reactive Programming with BSPWM
BSPWM generates comprehensive events for every state change, enabling real-time monitoring and scripting.
A. Event Types
Available Events:
Monitor Events:
- monitor_add <monitor_id> <name> <geometry>
- monitor_remove <monitor_id>
- monitor_swap <src_monitor_id> <dst_monitor_id>
- monitor_focus <monitor_id>
- monitor_geometry <monitor_id> <geometry>
- monitor_rename <monitor_id> <old_name> <new_name>
Desktop Events:
- desktop_add <monitor_id> <desktop_id> <name>
- desktop_remove <monitor_id> <desktop_id>
- desktop_swap <src_monitor_id> <src_desktop_id> <dst_monitor_id> <dst_desktop_id>
- desktop_transfer <src_monitor_id> <src_desktop_id> <dst_monitor_id>
- desktop_focus <monitor_id> <desktop_id>
- desktop_activate <monitor_id> <desktop_id>
- desktop_layout <monitor_id> <desktop_id> <layout>
- desktop_rename <monitor_id> <desktop_id> <old_name> <new_name>
Node Events:
- node_add <monitor_id> <desktop_id> <ip_id> <node_id>
- node_remove <monitor_id> <desktop_id> <node_id>
- node_swap <src_monitor_id> <src_desktop_id> <src_node_id> <dst_monitor_id> <dst_desktop_id> <dst_node_id>
- node_transfer <src_monitor_id> <src_desktop_id> <src_node_id> <dst_monitor_id> <dst_desktop_id> <dst_node_id>
- node_focus <monitor_id> <desktop_id> <node_id>
- node_activate <monitor_id> <desktop_id> <node_id>
- node_presel <monitor_id> <desktop_id> <node_id> (dir DIR|ratio RATIO|cancel)
- node_stack <node_id_1> (below|above) <node_id_2>
- node_geometry <monitor_id> <desktop_id> <node_id> <geometry>
- node_state <monitor_id> <desktop_id> <node_id> <state> (on|off)
- node_flag <monitor_id> <desktop_id> <node_id> <flag> (on|off)
- node_layer <monitor_id> <desktop_id> <node_id> <layer>
- pointer_action <monitor_id> <desktop_id> <node_id> <action> (begin|end)
B. Subscribing to Events
Basic Subscribe:
# Subscribe to specific event type
bspc subscribe node_add | while read -a msg; do
# msg array contains: monitor_id desktop_id ip_id node_id
node_id="${msg[^1_4]}"
echo "New node added: $node_id"
# Perform action
done
# Subscribe to multiple event types
bspc subscribe node_add node_remove | while read -a msg; do
event_type="${msg[^1_0]}"
case "$event_type" in
node_add)
echo "Node added"
;;
node_remove)
echo "Node removed"
;;
esac
done
# Subscribe to all events
bspc subscribe all | while read line; do
echo "$line"
done
C. Practical Event Scripts
Example 1: Auto-fullscreen New Windows:
#!/bin/bash
# Make every new window fullscreen automatically
bspc subscribe node_add | while read -a msg; do
monitor_id="${msg[^1_1]}"
desktop_id="${msg[^1_2]}"
node_id="${msg[^1_4]}"
# Auto-fullscreen
bspc node "$node_id" -t fullscreen
done
Example 2: Auto-floating by Window Class:
#!/bin/bash
# Make certain applications floating automatically
FLOATING_APPS=("mpv" "VLC" "Zathura")
bspc subscribe node_add | while read -a msg; do
node_id="${msg[^1_4]}"
# Get window class (requires extra lookup)
class=$(xdotool getactivewindow getwindowname 2>/dev/null || echo "")
for app in "${FLOATING_APPS[@]}"; do
if [[ "$class" == *"$app"* ]]; then
bspc node "$node_id" -t floating
break
fi
done
done
Example 3: Status Bar Integration:
#!/bin/bash
# Update polybar on window events
bspc subscribe node_focus desktop_focus | while read -a msg; do
# Update status bar
pkill -SIGUSR1 polybar
# Or update custom status
echo "$(date): $(bspc query -N -n focused)" > /tmp/bspwm_status
done
Example 4: Sticky Window Management:
#!/bin/bash
# Automatically make certain windows sticky
bspc subscribe node_add node_focus | while read -a msg; do
node_id="${msg[^1_4]}"
# Make all floating windows sticky automatically
state=$(bspc query -N -n "$node_id" -T | jq -r '.client.state')
if [[ "$state" == "floating" ]]; then
bspc node "$node_id" -g sticky=on
fi
done
D. Using FIFO for Event Processing
Alternative method using named pipes:
# Get FIFO path
FIFO_PATH=$(bspc --print-socket-path)
# Create monitoring script
#!/bin/bash
bspc subscribe -f | nc -l localhost 5000 &
# In another terminal, connect:
nc localhost 5000 | while read event; do
echo "$event"
done
XIV. Configuration Settings: Customizing BSPWM Behavior
BSPWM provides numerous settings to customize appearance and behavior.
A. Global Settings
Color Settings:
# Set border colors (in hex #RRGGBB)
bspc config normal_border_color "#484848" # Unfocused, unfocused monitor
bspc config focused_border_color "#1F8999" # Focused, focused monitor
bspc config active_border_color "#CCCCCC" # Focused, unfocused monitor
bspc config presel_feedback_color "#7C7C7C" # Preselection area
# Practical configuration:
bspc config normal_border_color "#3c3836"
bspc config focused_border_color "#d79921"
bspc config active_border_color "#a89984"
bspc config presel_feedback_color "#458588"
# Test colors in terminal:
bspc config normal_border_color "#FF0000" # Test red
# Changes apply immediately to new windows
Dimension Settings:
# Border width
bspc config border_width 2 # 0-10 pixels
# Window gap (space between windows)
bspc config window_gap 10 # Default: 12
# Padding (space from screen edge)
bspc config top_padding 20
bspc config bottom_padding 0
bspc config left_padding 0
bspc config right_padding 0
# Combined padding:
for side in top right bottom left; do
bspc config "${side}_padding" 20
done
# Per-monitor padding:
bspc config -m HDMI-1 top_padding 30
Insertion and Splitting:
# Default split ratio
bspc config split_ratio 0.5 # 0 < ratio < 1
# Automatic insertion scheme
bspc config automatic_scheme alternate # or longest_side
# Initial attachment direction
bspc config initial_polarity first_child # or second_child
# Directional focus strictness
bspc config directional_focus_tightness high # or low
# Removal behavior
bspc config removal_adjustment true
Layout Options:
# Monocle-specific settings
bspc config borderless_monocle true # Remove borders in monocle
bspc config gapless_monocle true # Remove gaps in monocle
# Monocle padding
bspc config top_monocle_padding 20
bspc config bottom_monocle_padding 0
bspc config left_monocle_padding 0
bspc config right_monocle_padding 0
# Single window behavior
bspc config single_monocle false # Switch to monocle with 1 window
# Singleton settings
bspc config borderless_singleton true # Remove border on single window
B. Focus and Click Behavior
# Focus follows mouse pointer
bspc config focus_follows_pointer true
# Mouse moves to focused window
bspc config pointer_follows_focus false
# Mouse moves when focus changes to different monitor
bspc config pointer_follows_monitor false
# Click button to focus
bspc config click_to_focus button1 # button1, button2, button3, any, none
# Don't replay click that gave focus
bspc config swallow_first_click true
C. Pointer and Mouse Settings
# Pointer movement interval (milliseconds)
bspc config pointer_motion_interval 10 # Minimum between motion events
# Modifier key for pointer actions (Alt=mod1, Super=mod4, etc.)
bspc config pointer_modifier mod4
# Pointer actions (button 1, 2, 3)
bspc config pointer_action1 move # Super+button1: move window
bspc config pointer_action2 resize_side # Super+button2: resize side
bspc config pointer_action3 resize_corner # Super+button3: resize corner
# Possible values: move, resize_side, resize_corner, focus, none
# Example for alternative bindings:
bspc config pointer_modifier mod1 # Alt instead of Super
bspc config pointer_action1 focus # Just focus, don't move
bspc config pointer_action2 move
bspc config pointer_action3 resize_corner
D. EWMH and Compatibility Settings
# Ignore EWMH focus requests from applications
bspc config ignore_ewmh_focus true
# Ignore EWMH fullscreen requests
bspc config ignore_ewmh_fullscreen none # none, all, or: enter,exit
# Ignore window struts (panel reservations)
bspc config ignore_ewmh_struts false
# Example: allow fullscreen but not fullscreen changes
bspc config ignore_ewmh_fullscreen "exit" # Ignore exit, allow enter
# Pseudo-tiled centering
bspc config center_pseudo_tiled true
E. Monitor Management
# Remove disabled monitors
bspc config remove_disabled_monitors false
# Remove unplugged monitors
bspc config remove_unplugged_monitors true
# Merge overlapping monitors
bspc config merge_overlapping_monitors true
# Mapping events to handle
bspc config mapping_events_count -1 # -1 = all events
F. History Recording
# Record focus history
bspc config record_history true
# Use in scripts:
bspc wm -h on # Enable history recording
bspc node older -f # Focus previously focused
bspc wm -h off # Disable history
G. Size Hints
# Honor window size hints (ICCCM hints)
bspc config honor_size_hints false
# Options:
# false: ignore all hints
# true: apply to all windows
# tiled: apply only to tiled windows
# floating: apply only to floating windows
# floating|tiled: apply to both
# Example:
bspc config honor_size_hints floating # Dialogs respect requested size
H. Practical Configuration File Example
#!/bin/bash
# ~/.config/bspwm/bspwmrc
# Monitor setup
bspc monitor -d I II III IV V VI VII VIII IX X
# Appearance
bspc config border_width 2
bspc config window_gap 10
bspc config split_ratio 0.5
bspc config normal_border_color "#3c3836"
bspc config focused_border_color "#d79921"
bspc config active_border_color "#a89984"
# Layout
bspc config borderless_monocle false
bspc config gapless_monocle false
# Behavior
bspc config automatic_scheme alternate
bspc config split_ratio 0.5
bspc config focus_follows_pointer true
# Rules
bspc rule -a Firefox desktop=^2
bspc rule -a Gimp state=floating sticky=on
bspc rule -a mpv state=floating
# Start additional daemons
sxhkd &
polybar main &
XV. Query and World State Management
Advanced commands for inspecting and managing BSPWM’s global state.
A. Dumping and Loading State
Dump State:
# Get current state as JSON
bspc wm -d > state.json
# This includes:
# - Monitor configuration
# - Desktop hierarchy
# - Window tree structure
# - Focus history
# - All settings
# Inspect structure:
bspc wm -d | jq '.' | less
Load State:
# Restore state from file
bspc wm -l /path/to/state.json
# Requires absolute path
bspc wm -l ~/.config/bspwm/layouts/default.json
# Used internally for restart:
bspc wm -r # Dumps state, restarts, loads state
B. Report Format
Status Messages:
# Get current status
bspc wm -g
# Returns format: M<name>:O<name>:F<name>:...
# Report format codes:
# M<name> - Focused monitor
# m<name> - Unfocused monitor
# O<name> - Occupied focused desktop
# o<name> - Occupied unfocused desktop
# F<name> - Free focused desktop
# f<name> - Free unfocused desktop
# U<name> - Urgent focused desktop
# u<name> - Urgent unfocused desktop
# L<T|M> - Layout (T=tiled, M=monocle)
# T<T|P|F|=|@> - Node state (T=tiled, P=pseudo-tiled, F=floating, ==fullscreen, @=manual)
# G<flags> - Flags
# Example script to parse:
#!/bin/bash
bspc wm -g | while IFS=: read -ra items; do
for item in "${items[@]}"; do
type="${item:0:1}"
value="${item:1}"
case "$type" in
M) echo "Focused monitor: $value" ;;
O) echo "Occupied desktop: $value" ;;
L) echo "Layout: $value" ;;
esac
done
done
C. World State Operations
Restart BSPWM:
# Restart, preserving all state
bspc wm -r
# Equivalent to:
# 1. Dump state
# 2. Kill bspwm
# 3. Restart bspwm
# 4. Load state
# Sxhkd binding:
super + alt + r
bspc wm -r
Adopt Orphans:
# Manage windows from previous session
bspc wm -o
# If X session crashed, windows still exist
# This command brings them under BSPWM management
XVI. Practical Sxhkd Configuration for BSPWM
A complete, real-world sxhkd configuration demonstrating all major bindings.
A. Complete Sxhkd Configuration Example
#!/bin/bash
# ~/.config/sxhkd/sxhkdrc
# Application launching
super + Return
kitty
super + d
rofi -show drun
super + slash
sxhkd-help
# WM control
super + alt + {q,r}
bspc {quit,wm -r}
# Window state
super + {t,shift+t,s,f}
bspc node -t {tiled,pseudo_tiled,floating,fullscreen}
# Window flags
super + ctrl + {m,x,y,z}
bspc node -g {marked,locked,sticky,private}
# Focus operations
super + {h,j,k,l}
bspc node -f {west,south,north,east}
super + {comma,period}
bspc node -f {prev,next}.local.!hidden.window
super + shift + {h,j,k,l}
bspc node -s {west,south,north,east}
super + g
bspc node -s biggest.window
# Desktop navigation
super + {1-9,0}
bspc desktop -f '^{1-9,10}'
super + bracket{left,right}
bspc desktop -f {prev,next}.local
super + shift + {1-9,0}
bspc node -d '^{1-9,10}' --follow
# Preselection (manual splitting)
super + ctrl + {h,j,k,l}
bspc node -p {west,south,north,east}
super + ctrl + space
bspc node -p cancel
super + ctrl + {minus,equal}
bspc config split_ratio $(bspc config split_ratio){-,+}$(echo 0.05)
# Floating window management
super + shift + {Left,Down,Up,Right}
bspc node -v {-20 0,0 20,0 -20,20 0}
super + alt + {h,j,k,l}
bspc node -z {left -20 0,bottom 0 20,top 0 -20,right 20 0}
# Tree manipulation
super + {comma,period}
bspc node @focused -R {90,-90}
super + {slash,backslash}
bspc node @focused -F {horizontal,vertical}
super + shift + c
bspc node -C forward
super + shift + e
bspc node -E
super + b
bspc node @focused -B
# Closing windows
super + shift + w
bspc node -c
super + shift + q
bspc node -k
# Monitor operations
super + shift + m
bspc node -m next --follow
super + shift + {Left,Right}
bspc monitor -f {west,east}
# Layout control
super + m
bspc desktop -l next
# Scratchpad/hidden window
super + shift + space
bash ~/.config/bspwm/toggle_scratchpad.sh
B. Advanced Sxhkd Patterns
Resize Mode:
# Enter resize mode with Super+E, then use hjkl
super + e : {h,j,k,l}
bspc node -z {left -20 0,bottom 0 20,top 0 -20,right 20 0}
super + e : shift + {h,j,k,l}
bspc node -z {right -20 0,top 0 20,bottom 0 -20,left 20 0}
# Exit with Escape key (default)
Multi-key Sequences:
# Super+P enters preselect mode
super + p : {h,j,k,l}
bspc node -p {west,south,north,east}
super + p : shift + {h,j,k,l}
bspc node -p {east,north,south,west}
super + p : c
bspc node -p cancel
super + p : space
bspc node -p cancel
Workspace Management:
# Super+W enters workspace mode
super + w : {1-9,0}
bspc desktop -f '^{1-9,10}'
super + w : shift + {1-9,0}
bspc node -d '^{1-9,10}' --follow
super + w : {Left,Right}
bspc desktop -f {prev,next}.local
XVII. Real-World Usage Scenarios
A. Setting Up a Developer Workflow
#!/bin/bash
# ~/.config/bspwm/setup_dev.sh
# Create desktop setup
bspc desktop ^1 -n code
bspc desktop ^2 -n terminal
bspc desktop ^3 -n browser
bspc desktop ^4 -n reference
# Rule for always-open applications
bspc rule -a Zathura desktop=^4 state=floating
# Code desktop layout (2 columns)
bspc desktop code -l tiled
bspc config -d code window_gap 15
# Terminal desktop (single window)
bspc desktop terminal -l monocle
bspc config -d terminal borderless_monocle true
# Browser floating on specific desktop
bspc rule -a Firefox desktop=^3 --follow
# Always open terminal on terminal desktop
bspc rule -a kitty desktop=^2
B. Multi-Monitor Setup
#!/bin/bash
# ~/.config/bspwm/bspwmrc
# Get monitor names
PRIMARY=$(xrandr -q | grep " connected" | head -1 | awk '{print $1}')
SECONDARY=$(xrandr -q | grep " connected" | tail -1 | awk '{print $1}')
# Configure primary monitor
bspc monitor "$PRIMARY" -d I II III IV V
# Configure secondary monitor
if [[ -n "$SECONDARY" ]]; then
bspc monitor "$SECONDARY" -d VI VII VIII IX X
fi
# Set padding per monitor
bspc config -m "$PRIMARY" top_padding 30
bspc config -m "$SECONDARY" top_padding 30
# Move specific apps to secondary
bspc rule -a "VLC" -m "$SECONDARY"
C. Gaming Setup
#!/bin/bash
# Create gaming desktop
# Separate desktop for games
bspc desktop ^9 -n gaming
# Games go fullscreen on dedicated desktop
bspc rule -a "Steam" desktop=^9 state=floating follow=on
bspc rule -a "wine" desktop=^9 state=fullscreen
bspc rule -a ".*Game.*" state=fullscreen
# Disable window gaps for games
bspc config -d gaming window_gap 0
# Disable borders for games
bspc config -d gaming border_width 0
# Sxhkd binding to switch to gaming desktop
super + alt + g
bspc desktop -f ^9
D. Productivity Mode
#!/bin/bash
# Simplified, distraction-free setup
# Single application per desktop
bspc config focus_follows_pointer false
bspc config split_ratio 0.5
# Balanced window gaps
bspc config window_gap 8
bspc config border_width 1
# Monocle for focus
bspc rule -a "Writer" desktop=^1 state=monocle
bspc rule -a "code-oss" desktop=^2 state=monocle
bspc rule -a "Firefox" desktop=^3 state=monocle
# Sxhkd bind to toggle distraction-free mode
super + alt + f
bash ~/.config/bspwm/toggle_focus_mode.sh
Conclusion
-
BSPWM represents a paradigm shift in window management philosophy, moving from direct graphical manipulation to declarative, keyboard-driven tree manipulation. Its strength lies in the separation of concerns: the window manager handles the tree logic,
bspcprovides the control interface, andsxhkdhandles keyboard bindings. This architecture enables extraordinary flexibility and customization. -
The binary space partitioning algorithm ensures that screen real estate is always optimally allocated, with no wasted space or overlapping windows in tiled mode. The rich selector syntax allows targeting any window configuration with surgical precision. Advanced features like receptacles, preselection, flags, and event subscriptions enable sophisticated window management workflows that would be difficult or impossible in traditional window managers.
-
Whether you’re a developer seeking efficient workspace management, a power user who wants complete control over your desktop environment, or someone simply tired of mouse-driven window management, BSPWM provides the tools and flexibility to create a window management system tailored exactly to your needs. The learning curve is steep, but the rewards in productivity and customization justify the investment.
Config References
The Config-Ref
Below given is a curated list of awesome bspwm configs for ready reference, cloning and experimentation. We do not advice you to blindly copy configs, instead read them and try writing them by your own. But it is up to you whether to use bspwm or build upon bspwm.
These are some nice configurations that beginners should try learning and configuring.
These configs are configured by various people as per their system requirements. You may run into issues if some scripts are not compactible or optimised for your system, or if you are missing some dependencies. Doc741 does not rank based on popularity, it is alphabetical order. No offense.
Best Configurations
1) Archcraft-Bspwm
Desc : This is a very asthetic and beautiful bspwm configuration hand crafted personally for Archcraft OS by adi1090x. Has rich polybar and rofi ecosystem.
Gallery :
2) Gh0stzk-Dotfiles
Desc : These dotfiles are designed with the goal of providing a bspwm environment that is lightweight, efficient, and functional, tailored for any use. Has rich theming system, about 18 prebuilt themes. [This is original text] from gh0stzk.
Gallery :

How to get yours here
Make a pull request to the repository linking your bspwm dotfile repository with description. If you have a very good documentation and configuration for bspwm with a nice asthetic, your bspwm configuration can mean a lot to others. It will be added to the list.
How to Contribute to Doc741
Doc741 exists to make bspwm understandable, not just configurable. Contributions that improve clarity, correctness, and learning are always welcome. You don’t need to be an expert to contribute - even small improvements help.
What You Can Contribute
You can help Doc741 in many ways:
- Fix typeos or unclear explanations
- Improve wording for beginners
- Add examples that explain why, not just how
- Expand existing sections with missing details
- Suggest new sections or topics
- Share debugging tips or common pitfalls If something confused you while learning bspwm, that’s probably worth documenting.
What Doc741 Values
Before contributing, keep these principles in mind:
- Explain concepts, not just commands
- Prefer reasoning over copy-paste solutions
- Assume the reader is curious, not careless
- Keep a neutral, respectful tone
- Make sure that your content has clarity
Doc741 aims to reduce blind config copying, not encourage it. But this documentation shall include some configuration files and references purely for learning purposes.
How to contribute
- Fork the repository from github : rdbhvr-001/doc741
- Create a new branch for your change in that forked repository
- Install
rust mdbookfor documentation by the following commands
# Make sure that you have cargo and rust installed. A simple surf in web can help you install them.
# Install mdbook via cargo
cargo install mdbook
# Make sure to add cargo to your PATH
- Learn how to use mdbook.
- In the forked repository, you will find
SUMMARY.mdfile and other md files inside src directory, which is basically the index and source for Doc741, follow the instructions given in step 4. - After editting the markdown files or adding new ones, you can use the following command to generate the book from the project root dir.
# To test it in your friendly local browser test with
mdbook serve
# To build the book, in the terminal typeos
mdbook build
# The book is compiled to html and is in `./book` directory.
- Rename the
./bookto./docs - Open up a pull request after testing the book locally in browser
An Easier Way to Contribute :
You can click that edit source button on the navbar near print button to directly edit the source, make a pull request and make changes.